Book Image

Mastering Kubernetes - Third Edition

By : Gigi Sayfan
Book Image

Mastering Kubernetes - Third Edition

By: Gigi Sayfan

Overview of this book

The third edition of Mastering Kubernetes is updated with the latest tools and code enabling you to learn Kubernetes 1.18’s latest features. This book primarily concentrates on diving deeply into complex concepts and Kubernetes best practices to help you master the skills of designing and deploying large clusters on various cloud platforms. The book trains you to run complex stateful microservices on Kubernetes including advanced features such as horizontal pod autoscaling, rolling updates, resource quotas, and persistent storage backend. With the two new chapters, you will gain expertise in serverless computing and utilizing service meshes. As you proceed through the chapters, you will explore different options for network configuration and learn to set up, operate, and troubleshoot Kubernetes networking plugins through real-world use cases. Furthermore, you will understand the mechanisms of custom resource development and its utilization in automation and maintenance workflows. By the end of this Kubernetes book, you will graduate from an intermediate to advanced Kubernetes professional.
Table of Contents (19 chapters)
17
Other Books You May Enjoy
18
Index

Creating a single-node cluster with Minikube

In this section, we will create a local single-node cluster using Minikube. Local clusters are the most useful for developers that want quick edit-test-deploy-debug cycles on their machine, before committing their changes. Local clusters are very useful for DevOps and operators that want to play with Kubernetes locally, without concerns about breaking a shared environment. While Kubernetes is typically deployed on Linux in production, many developers work on Windows PCs or Macs. That said, there are not too many differences if you do want to install Minikube on Linux:

Figure 2.1: The minikube logo

Meet kubectl

Before we start creating clusters, let us talk about kubectl. It is the official Kubernetes CLI and it interacts with your Kubernetes cluster's API server via its API. It is configured by default using the ~/.kube/config file, which is a YAML file that contains metadata, connection info, and authentication tokens or certificates for one or more clusters. Kubectl provides commands you can use to view your configuration and switch between clusters if it contains more than one. You can also point kubectl at a different config file by setting the KUBECONFIG environment variable. I prefer a third approach, which is keeping separate config file for each cluster and copying the active cluster's config file to ~/.kube/config (symlinks do not work).

We will discover together what kubectl can do along the way. The purpose here is just to avoid confusion when working with different clusters and configuration files.

Quick introduction to Minikube

Minikube is the most mature local Kubernetes cluster. It runs the latest stable Kubernetes release and it supports Windows, macOS, and Linux. It supports:

  • LoadBalancer service type via Minikube tunnel
  • NodePort service type via Minikube service
  • Multiple clusters
  • Filesystem mounts
  • GPU support for machine learning
  • RBAC
  • Persistent volumes
  • Ingress
  • Dashboard via Minikube dashboard
  • Custom container runtimes via the start --container-runtime flag
  • Configuration API server and kubelet options via command-line flags
  • Add-ons

Getting ready

There are some prerequisites to install before you can create the cluster itself. These include VirtualBox, the kubectl command-line interface to Kubernetes, and, of course, Minikube itself. Here is a list of the latest versions at the time of writing:

On Windows

Install VirtualBox and make sure kubectl and Minikube are on your path. I personally just throw all command-line programs I use into c:. You may prefer another approach. I use the excellent ConEMU to manage multiple consoles, terminals, and SSH sessions. It works with Command Prompt, PowerShell, PuTTY, Cygwin, msys, and Git-Bash. It does not get much better than that on Windows.

With Windows 10 Pro, you have the option to use the Hyper-V hypervisor. This is technically a better solution than VirtualBox, but it requires the Pro version of Windows and is completely Windows-specific. By using VirtualBox, these instructions are universal and will be easy to adapt to other versions of Windows, or other operating systems altogether. If you have Hyper-V enabled, you must disable it because VirtualBox cannot coexist with Hyper-V.

I recommend using PowerShell in administrator mode. You can add the following alias and function to your PowerShell profile:

Set-Alias -Name k -Value kubectl
function mk
{
  minikube-windows-amd64 `
  --show-libmachine-logs `
  --alsologtostderr      `
  @args
}

On macOS

On macOS, you have the option of using HyperKit instead of VirtualBox:

$ curl -LO https://storage.googleapis.com/minikube/releases/latest/docker-machine-driver-hyperkit \
  && chmod +x docker-machine-driver-hyperkit \
  && sudo mv docker-machine-driver-hyperkit /usr/local/bin/ \
  && sudo chown root:wheel /usr/local/bin/docker-machine-driver-hyperkit \
  && sudo chmod u+s /usr/local/bin/docker-machine-driver-hyperkit

You can add aliases to your .bashrc file (similar to the PowerShell alias and function on Windows):

alias k='kubectl'
alias mk='/usr/local/bin/minikube'

If you chose HyperKit instead of VirtualBox, you need to add the flag --vm-driver=hyperkit when starting the cluster.

It is also important to disable any VPN when using HyperKit.

Now, you can use k and mk and type less. The flags to Minikube in the mk function provide better logging and direct it to the console in addition to files (similar to tee).

Type mk version to verify Minikube is correctly installed and functioning:

$ mk version
minikube version: v1.10.1

Type k version to verify kubectl is correctly installed and functioning:

$ k version
Client Version: version.Info{Major:"1", Minor:"18", GitVersion:"v1.18.3", GitCommit:"641856db18352033a0d96dbc99153fa3b27298e5", GitTreeState:"clean", BuildDate:"2020-05-20T12:52:00Z", GoVersion:"go1.13.9", Compiler:"gc", Platform:"darwin/amd64"}
The connection to the server localhost:8080 was refused — did you specify the right host or port?
Unable to connect to the server: dial tcp 192.168.99.100:8443: getsockopt: operation timed out

Do not worry about the error on the last line. There is no cluster running, so kubectl cannot connect to anything. That is expected.

You can explore the available commands and flags for both Minikube and kubectl. I will not go over each command, only the commands I use.

Creating the cluster

The Minikube tool supports multiple versions of Kubernetes. At the time of writing, the latest version is 1.18.0, which is also the default:

$ mk start
  minikube v1.10.1 on darwin (amd64)
  Creating virtualbox VM (CPUs=2, Memory=2048MB, Disk=20000MB) ...
  Configuring environment for Kubernetes v1.18.0 on Docker 19.03.8
  Pulling images ...
  Launching Kubernetes ...
  Verifying: apiserver proxy etcd scheduler controller dns
  Done! kubectl is now configured to use "minikube"

When you restart an existing stopped cluster, you will see the following output:

$ mk start
  minikube v1.10.1 on darwin (amd64)
  Tip: Use 'minikube start -p <name>' to create a new cluster, or 'minikube delete' to delete this one.
  Restarting existing virtualbox VM for "minikube" ...
  Waiting for SSH access ...
  Configuring environment for Kubernetes v1.18.0 on Docker 19.03.8
  Relaunching Kubernetes v1.18.0 using kubeadm ...
  Verifying: apiserver proxy etcd scheduler controller dns
  Done! kubectl is now configured to use "minikube"

Let us review what Minikube did behind the curtains for you. You will need to do a lot of it when creating a cluster from scratch:

  1. Start a VirtualBox VM
  2. Create certificates for the local machine and the VM
  3. Download images
  4. Set up networking between the local machine and the VM
  5. Run the local Kubernetes cluster on the VM
  6. Configure the cluster
  7. Start all the Kubernetes control plane components
  8. Configure kubectl to talk to the cluster

Troubleshooting

If something goes wrong during the process, try to follow the error messages. You can add the --alsologtostderr flag to get detailed error info to the console. Everything Minikube does is organized neatly under ~/.minikube. Here is the directory structure:

$ tree ~/.minikube -L 2 
/Users/gigi.sayfan/.minikube 
├── addons 
├── apiserver.crt 
├── apiserver.key 
├── ca.crt 
├── ca.key 
├── ca.pem 
├── cache 
│   ├── images 
│   ├── iso 
│   └── v1.15.0 
├── cert.pem 
├── certs 
│   ├── ca-key.pem 
│   ├── ca.pem 
│   ├── cert.pem 
│   └── key.pem 
├── client.crt 
├── client.key 
├── config 
├── files 
├── key.pem 
├── logs 
├── machines 
│   ├── minikube 
│   ├── server-key.pem 
│   └── server.pem 
├── profiles 
│   └── minikube 
├── proxy-client-ca.crt 
├── proxy-client-ca.key 
├── proxy-client.crt 
└── proxy-client.key
 13 directories, 19 files

Checking out the cluster

Now that we have a cluster up and running, let's peek inside.

First, let's ssh into the VM:

$ mk ssh
                         _             _             
            _         _ ( )           ( )            
  ___ ___  (_)  ___  (_)| |/')  _   _ | |_      __   
/' _ ` _ `\| |/' _ `\| || , <  ( ) ( )| '_`\  /'__`\ 
| ( ) ( ) || || ( ) || || |\`\ | (_) || |_) )(  ___/ 
(_) (_) (_)(_)(_) (_)(_)(_) (_)`\___/'(_,__/'`\____) 
$ uname -a
Linux minikube 4.19.107 #1 SMP Mon May 11 14:51:04 PDT 2020 x86_64 GNU/Linux 
$

Great! That works. The weird marks symbols are ASCII art for "minikube." Now, let us start using kubectl, because it is the Swiss Army knife of Kubernetes and will be useful for all clusters (including federated clusters).

Disconnect from the VM via Ctrl + D or by typing:

$ logout

We will cover many of the kubectl commands throughout our journey. First, let us check the cluster status using cluster-info:

$ k cluster-info
Kubernetes master is running at https://192.168.99.103:8443
KubeDNS is running at https://192.168.99.103:8443/api/v1/namespaces/kube-system/services/kube-dns:dns/proxy
To further debug and diagnose cluster problems, use kubectl cluster-info dump.

You can see that the master is running properly. To see a much more detailed view of all the objects in the cluster as JSON, type k cluster-info dump. The output can be a little daunting, so let us use more specific commands to explore the cluster.

Let us check out the nodes in the cluster using get nodes:

$ k get nodes
NAME       STATUS   ROLES    AGE   VERSION
minikube   Ready    master   28m   v1.16.3

So, we have one node called minikube. To get a lot more information about it, type k describe node minikube.

The output is verbose; I will let you try it yourself.

Doing work

We have a nice empty cluster up and running (well, not completely empty as the DNS service and dashboard run as pods in the kube-system namespace). It is time to deploy some pods:

$ k create deployment echo --image=gcr.io/google_containers/echoserver:1.8
deployment.apps/echo created

Let us check out the pod that was created:

$ k get pods
NAME                   READY   STATUS    RESTARTS   AGE
echo-855975f9c-r6kj8   1/1     Running   0          2m11s

To expose our pod as a service, type the following:

$ k expose deployment echo --type=NodePort --port=8080
service/echo exposed

Exposing the service as type NodePort means that it is exposed to the host on some port. But it is not the 8080 port we ran the pod on. Ports get mapped in the cluster. To access the service, we need the cluster IP and the exposed port:

$ mk ip
192.168.99.103
$ k get service echo --output="jsonpath='{.spec.ports[0].nodePort}'"
31800

Now, we can access the echo service, which returns a lot of information.

Replace the IP address and port with the results of the previous commands:

$ curl http://192.168.99.103:31800/hi
    Hostname: echo-855975f9c-r6kj8
    
   Pod Information:
        -no pod information available-
    
   Server values:
        server_version=nginx: 1.13.3 - lua: 10008
    
   Request Information:
        client_address=172.17.0.1
        method=GET
        real path=/hi
        query=
        request_version=1.1
        request_uri=http://192.168.99.103:8080/hi
    
   Request Headers:
        accept=*/*
        host=192.168.99.103:31800
        user-agent=curl/7.64.0
    
   Request Body:
        -no body in request-

Congratulations! You just created a local Kubernetes cluster, deployed a service, and exposed it to the world.

Examining the cluster with the dashboard

Kubernetes has a very nice web interface, which is deployed, of course, as a service in a pod. The dashboard is well designed and provides a high-level overview of your cluster. It also lets you drill down into individual resources, view logs, edit resource files, and more. It is the perfect weapon when you want to check out your cluster manually. To launch it, type:

$ mk dashboard
  Enabling dashboard ...
  Verifying dashboard health ...
  Launching proxy ...
  Verifying proxy health ...
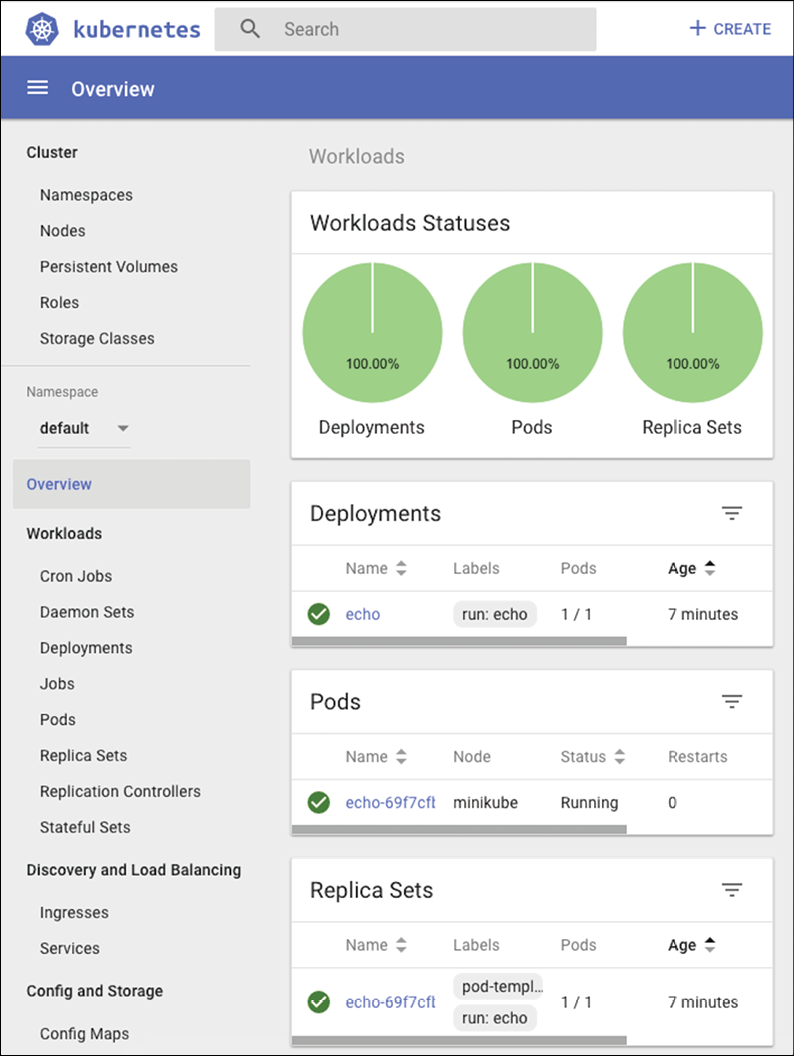
  Opening http://127.0.0.1:56853/api/v1/namespaces/kube-system/services/http:kubernetes-dashboard:/proxy/ in your default browser...

Minikube will open a browser window with the dashboard UI. Note that, on Windows, Microsoft Edge cannot display the dashboard. I had to run it myself on a different browser.

Here is the workloads view, which displays deployments, replica sets, replication controllers, and pods:

Figure 2.2: Kubernetes dashboard UI

It can also display daemon sets, stateful sets, and jobs, but we do not have any in this cluster.

In this section, we created a local single-node Kubernetes cluster on Windows, explored it a little bit using kubectl, deployed a service, and played with the web UI. In the next section, we will move on to a multi-node cluster.