
Python Pexpect library
Pexpect is a pure Python module for spawning child applications, controlling them, and responding to expected patterns in their output. Pexpect works like Don Libes' Expect. Pexpect allows your script to spawn a child application and control it as if a human were typing commands.
Read the Pexpect docs at https://pexpect.readthedocs.io/en/stable/index.html
Let's take a look at the Python Pexpect library. Similar to the original Tool Command Language (TCL) Expect module by Don Libe, Pexpect launches or spawns another process and watches over it in order to control the interaction. The Expect tool was originally developed to automate interactive processes such as FTP, Telnet, and rlogin, and was later expanded to include network automation. Unlike the original Expect, Pexpect is entirely written in Python, which does not require TCL or C extensions to be compiled. This allows us to use the familiar Python syntax and its rich standard library in our code.
Python virtual environment
Let us start by using the Python virtual environment, which allows us to manage separate package installations for different projects. This is accomplished by creating a "virtual" isolated Python installation and installing packages into that virtual installation and we would not need to worry about breaking the packages installed globally or from other virtual environments. We will start by installing the Python pip tool, then create the virtual environment:
$ sudo apt update
$ sudo apt install python3-pip
$ python3 -m venv venv
$ source venv/bin/activate
(venv) $
(venv) $ which python
/home/echou/venv/bin/python
(venv) $ deactivate
As you can see from the output, we use the venv package from the Python 3 standard library, create the directory containing our environment, then activate it. While the virtual environment is activated, you will see the (venv) label in front of your hostname, indicating that you are in that virtual environment. When finished, you can use the deactivate command to exit the virtual environment. If interested, you can learn more about Python virtual environments here: https://packaging.python.org/guides/installing-using-pip-and-virtual-environments/#installing-virtualenv.
Python 2's usage and installation of a virtual environment is slightly different. You can find a number of tutorials online for Python 2 virtual environments.
Pexpect installation
Pexpect installation process is pretty straight forward:
(venv) $ pip install pexpect
If you are installing Python packages in the global environment, you will need to use root privilege, such as sudo pip install pexpect.
Do a quick to test to make sure the package is usable, make sure we start the Python interactive shell from the virtual environment:
(venv) $ python
Python 3.6.8 (default, Oct  7 2019, 12:59:55)
[GCC 8.3.0] on linux
Type "help", "copyright", "credits" or "license" for more information.
>>> import pexpect
>>> dir(pexpect)
['EOF', 'ExceptionPexpect', 'Expecter', 'PY3', 'TIMEOUT', '__all__', '__builtins__', '__cached__', '__doc__', '__file__', '__loader__', '__name__', '__package__', '__path__', '__revision__', '__spec__', '__version__', 'exceptions', 'expect', 'is_executable_file', 'pty_spawn', 'run', 'runu', 'searcher_re', 'searcher_string', 'spawn', 'spawnbase', 'spawnu', 'split_command_line', 'sys', 'utils', 'which']
Pexpect overview
For our first lab, we will construct a simple network with two IOSv devices connected back to back:

Figure 9: Lab topology
The devices will each have a loopback address in the 192.16.0.x/24 range and the management IP will be in the 172.16.1.x/24 range. The VIRL topology file is included in the accompanying downloadable files as well as on the GitHub repository (https://github.com/PacktPublishing/Mastering-Python-Networking-Third-Edition) for the book. You can import the topology to your own VIRL software. If you do not have VIRL, you can also view the necessary information by opening the topology file with a text editor. The file is simply an XML file with each node's information under the node element:
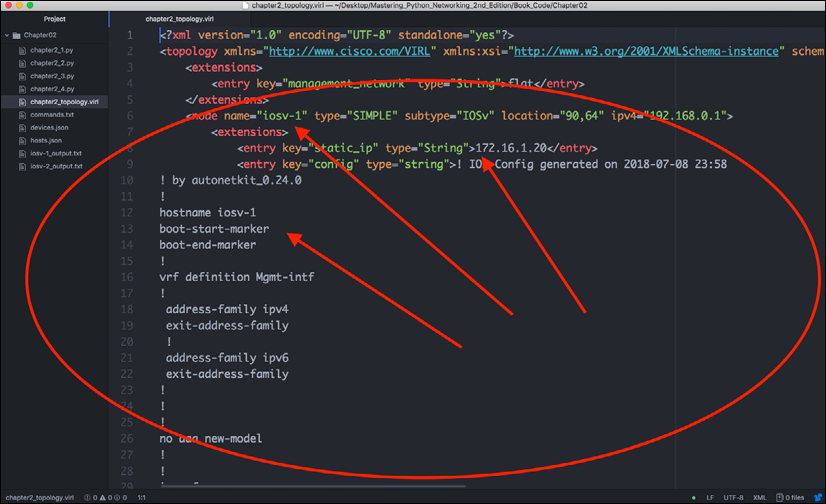
Figure 10: Lab node information
With the devices ready, let's take a look at how you would interact with the router if you were to telnet into the device:
(venv) $ telnet 172.16.1.20
Trying 172.16.1.20...
Connected to 172.16.1.20.
Escape character is '^]'.
<skip>
User Access Verification
Username: cisco
Password:
I used VIRL AutoNetKit to automatically generate the initial configuration of the routers, which generated the default username cisco, and the password cisco. Notice that the user is already in privileged mode because of the privilege assigned in the configuration:
iosv-1#sh run | i cisco
enable password cisco
username cisco privilege 15 secret 5 $1$SXY7$Hk6z8OmtloIzFpyw6as2G.
 password cisco
 password cisco
The auto-config also generated vty access for both telnet and SSH:
line con 0
 password cisco
line aux 0
line vty 0 4
 exec-timeout 720 0
 password cisco
 login local
 transport input telnet ssh
!
Let's see a Pexpect example using the Python interactive shell:
>>> import pexpect
>>> child = pexpect.spawn('telnet 172.16.1.20')
>>> child.expect('Username')
0
>>> child.sendline('cisco')
6
>>> child.expect('Password')
0
>>> child.sendline('cisco')
6
>>> child.expect('iosv-1#')
0
>>> child.sendline('show version | i V')
19
>>> child.before
b": \r\n**************************************************************************\r\n* IOSv is strictly limited to use for evaluation, demonstration and IOS  *\r\n* education. IOSv is provided as-is and is not supported by Cisco's      *\r\n* Technical Advisory Center. Any use or disclosure, in whole or in part, *\r\n* of the IOSv Software or Documentation to any third party for any       *\r\n* purposes is expressly prohibited except as otherwise authorized by     *\r\n* Cisco in writing.                                                      *\r\n**************************************************************************\r\n"
>>> child.sendline('exit')
5
>>> exit()
In the previous interactive example, Pexpect spawns off a child process and watches over it in an interactive fashion. There are two important methods shown in the example, expect() and sendline(). The expect() line indicates that the string in the Pexpect process looks for is an indicator for when the returned string is considered done. This is the expected pattern. In our example, we knew the router had sent us all the information when the hostname prompt (iosv-1#) was returned. The sendline() method indicates which words should be sent to the remote device as the command. There is also a method called send() but sendline() includes a linefeed, which is similar to pressing the Enter key at the end of the words you sent in your previous telnet session. From the router's perspective, it is just as if someone typed in the text from a Terminal. In other words, we are tricking the routers into thinking they are interfacing with a human being when they are actually communicating with a computer.
The before and after properties will be set to the text printed by the child application. The before properties will be set to the text printed by the child application up to the expected pattern. The after string will contain the text that was matched by the expected pattern. In our case, the before text will be set to the output between the two expected matches (iosv-1#), including the show version command. The after text is the router hostname prompt:
>>> child.sendline('show version | i V')
19
>>> child.expect('iosv-1#')
0
>>> child.before
b'show version | i V\r\nCisco IOS Software, IOSv Software (VIOS-ADVENTERPRISEK9-M), Version 15.6(3)M2, RELEASE SOFTWARE (fc2)\r\nProcessor board ID 9Y0KJ2ZL98EQQVUED5T2Q\r\n'
>>> child.after
b'iosv-1#'
If you are wondering about the b' in front of the return, it is a Python byte string (https://docs.python.org/3.7/library/stdtypes.html)
What would happen if you expected the wrong term? For example, if you typed in username with the lowercase "u" instead of Username after spawning the child application, then the Pexpect process would look for a string of username from the child process. In that case, the Pexpect process would just hang because the word username would never be returned by the router. The session would eventually time out, or you could manually exit out via Ctrl + C.
The expect() method waits for the child application to return a given string, so in the previous example, if you wanted to accommodate both lowercase and uppercase u, you could use the following term:
>>> child.expect('[Uu]sername')
The square bracket serves as an or operation that tells the child application to expect a lowercase or uppercase "u" followed by sername as the string. What we are telling the process is that we will accept either Username or username as the expected string.
For more information on Python regular expressions, go to: https://docs.python.org/3.7/library/re.html
The expect() method can also contain a list of options instead of just a single string; these options can also be regular expressions themselves. Going back to the previous example, you can use the following list of options to accommodate the two different possible strings:
>>> child.expect(['Username', 'username'])
Generally speaking, use the regular expression for a single expect string when you can fit the different hostname in a regular expression, whereas use the possible options if you need to catch completely different responses from the router, such as a password rejection. For example, if you use several different passwords for your login, you want to catch % Login invalid as well as the device prompt.
One important difference between Pexpect regular expressions and Python regular expressions is that Pexpect matching is non-greedy, which means they will match as little as possible when using special characters. Because Pexpect performs regular expressions on a stream, you cannot look ahead, as the child process generating the stream may not be finished. This means the special dollar sign character $ typically matching the end of the line is useless because .+ will always return no characters, and the .* pattern will match as little as possible. In general, just keep this in mind and be as specific as you can be on the expect match strings.
Let's consider the following scenario:
>>> child.sendline('show run | i hostname')
22
>>> child.expect('iosv-1')
0
>>> child.before
b'show version | i V\r\nCisco IOS Software, IOSv Software (VIOS-ADVENTERPRISEK9-M), Version 15.6(3)M2, RELEASE SOFTWARE (fc2)\r\nProcessor board ID 9Y0KJ2ZL98EQQVUED5T2Q\r\n'
>>>
Hmm... Something is not quite right here. Compare it to the Terminal output before; the output you expect would be hostname iosv-1:
iosv-1#sh run | i hostname
hostname iosv-1
Taking a closer look at the expected string will reveal the mistake. In this case, we were missing the hash (#) sign behind the iosv-1 hostname. Therefore, the child application treated the second part of the return string as the expected string:
>>> child.sendline('show run | i hostname')
22
>>> child.expect('iosv-1#')
0
>>> child.before
b'#show run | i hostname\r\nhostname iosv-1\r\n'
You can see a pattern emerging from the usage of Pexpect after a few examples. The user maps out the sequence of interactions between the Pexpect process and the child application. With some Python variables and loops, we can start to construct a useful program that will help us gather information and make changes to network devices.
Our first Pexpect program
Our first program, chapter2_1.py, extends what we did in the last section with some additional code:
#!/usr/bin/env python
import pexpect
devices = {'iosv-1': {'prompt': 'iosv-1#', 'ip': '172.16.1.20'},
           'iosv-2': {'prompt': 'iosv-2#', 'ip': '172.16.1.21'}}
username = 'cisco'
password = 'cisco'
for device in devices.keys():
    device_prompt = devices[device]['prompt']
    child = pexpect.spawn('telnet ' + devices[device]['ip'])
    child.expect('Username:')
    child.sendline(username)
    child.expect('Password:')
    child.sendline(password)
    child.expect(device_prompt)
    child.sendline('show version | i V')
    child.expect(device_prompt)
    print(child.before)
    child.sendline('exit')
We use a nested dictionary in line 5:
devices = {'iosv-1': {'prompt': 'iosv-1#', 'ip': '172.16.1.20'},
           'iosv-2': {'prompt': 'iosv-2#', 'ip': '172.16.1.21'}}
The nested dictionary allows us to refer to the same device (such as iosv-1) with the appropriate IP address and prompt symbol. We can then use those values for the expect() method later on in the loop.
The output prints out the show version | i V output on the screen for each of the devices:
(venv) $ python chapter2_1.py
b'show version | i V\r\nCisco IOS Software, IOSv Software (VIOS-ADVENTERPRISEK9-M), Version 15.6(3)M2, RELEASE SOFTWARE (fc2)\r\nProcessor board ID 9Y0KJ2ZL98EQQVUED5T2Q\r\n'
b'show version | i V\r\nCisco IOS Software, IOSv Software (VIOS-ADVENTERPRISEK9-M), Version 15.6(3)M2, RELEASE SOFTWARE (fc2)\r\n'
Now that we have seen a basic example of Pexpect, let us go deeper into more features of the library.
More Pexpect features
In this section, we will look at more Pexpect features that might come in handy when certain situations arise.
If you have a slow or fast link to your remote device, the default expect() method timeout is 30 seconds, which can be increased or decreased via the timeout argument:
>>> child.expect('Username', timeout=5)
You can choose to pass the command back to the user using the interact() method. This is useful when you just want to automate certain parts of the initial task:
>>> child.sendline('show version | i V')
19
>>> child.expect('iosv-1#')
0
>>> child.before
b'show version | i VrnCisco IOS Software, IOSv Software (VIOS- ADVENTERPRISEK9-M), Version 15.6(2)T, RELEASE SOFTWARE (fc2)rnProcessor board ID 9MM4BI7B0DSWK40KV1IIRrn'
>>> child.interact()
show version | i V
Cisco IOS Software, IOSv Software (VIOS-ADVENTERPRISEK9-M), Version 15.6(3)M2, RELEASE SOFTWARE (fc2)
Processor board ID 9Y0KJ2ZL98EQQVUED5T2Q
iosv-1#sh run | i hostname
hostname iosv-1
iosv-1#exit
Connection closed by foreign host.
>>>
You can get a lot of information about the child.spawn object by printing it out in string format:
>>> str(child)
"<pexpect.pty_spawn.spawn object at 0x7f95f25ff780>\ncommand: /usr/bin/telnet\nargs: ['/usr/bin/telnet', '172.16.1.20']\nbuffer (last 100 chars): b''\nbefore (last 100 chars): b'                     *\\r\\n**************************************************************************\\r\\n'\nafter: b'iosv-1#'\nmatch: <_sre.SRE_Match object; span=(612, 619), match=b'iosv-1#'>\nmatch_index: 0\nexitstatus: 1\nflag_eof: False\npid: 5676\nchild_fd: 5\nclosed: False\ntimeout: 30\ndelimiter: <class 'pexpect.exceptions.EOF'>\nlogfile: None\nlogfile_read: None\nlogfile_send: None\nmaxread: 2000\nignorecase: False\nsearchwindowsize: None\ndelaybeforesend: 0.05\ndelayafterclose: 0.1\ndelayafterterminate: 0.1"
>>>
The most useful debug tool for Pexpect is to log the output in a file:
>>> child = pexpect.spawn('telnet 172.16.1.20')
>>> child.logfile = open('debug', 'wb')
Use child.logfile = open('debug', 'w') for Python 2. Python 3 uses byte strings by default. For more information on Pexpect features, check out: https://pexpect.readthedocs.io/en/stable/api/index.html
We have been working with telnet so far in our examples, which leave our communication in clear text during the session. In modern networks, we typically use secure shells (SSH) for management. In the next section, we will take a look at Pexpect with SSH.
Pexpect and SSH
If you try to use the previous Telnet example and plug it into an SSH session instead, you might find yourself pretty frustrated with the experience. You always have to include the username in the session, answering the ssh new key question, and much more mundane tasks. There are many ways to make SSH sessions work, but luckily, Pexpect has a subclass called pxssh, which specializes in setting up SSH connections. The class adds methods for login, logout, and various tricky things to handle the different situations in the ssh login process.
Let's generate the ssh-key for iosv-1 for ssh:
iosv-1(config)#crypto key generate rsa general-keys
The name for the keys will be: iosv-1.virl.info
Choose the size of the key modulus in the range of 360 to 4096 for your
General Purpose Keys. Choosing a key modulus greater than 512 may take a few minutes
How many bits in the modulus [512]: 2048
% Generating 2048 bit RSA keys, keys will be non-exportable...
[OK] (elapsed time was 2 seconds)
The procedures are mostly the same, with the exception of login() and logout():
>>> from pexpect import pxssh
>>> child = pxssh.pxssh()
>>> child.login('172.16.1.20', 'cisco', 'cisco', auto_prompt_reset=False)
True
>>> child.sendline('show version | i V')
19
>>> child.expect('iosv-1#')
0
>>> child.before
b'show version | i VrnCisco IOS Software, IOSv Software (VIOS- ADVENTERPRISEK9-M), Version 15.6(2)T, RELEASE SOFTWARE (fc2) Processor board ID 9MM4BI7B0DSWK40KV1IIRrn'
>>> child.logout()
>>>
Notice the auto_prompt_reset=False argument in the login() method. By default, pxssh uses the shell prompt to synchronize the output. But since it uses the PS1 option for most of bash-shell or c-shell, they will error out on Cisco or other network devices.
Putting things together for Pexpect
As the final step, let's put everything you have learned so far about Pexpect into a script. Putting code into a script makes it easier to use in a production environment, as well as easier to share with your colleagues. We will write our second script, chapter2_2.py.
You can download the script from the book GitHub repository, https://github.com/PacktPublishing/Mastering-Python-Networking-Third-Edition.
If ssh key has not been generated on the other routers, iosv-2, we should do so now:
iosv-2(config)#crypto key generate rsa general-keys
The name for the keys will be: iosv-2.virl.info
Choose the size of the key modulus in the range of 360 to 4096 for your General Purpose Keys.Choosing a key modulus greater than 512 may take a few minutes
How many bits in the modulus [512]: 2048
% Generating 2048 bit RSA keys, keys will be non-exportable...
[OK] (elapsed time was 2 seconds)
#!/usr/bin/env python
import getpass
from pexpect import pxssh
devices = {'iosv-1': {'prompt': 'iosv-1#', 'ip': '172.16.1.20'},
           'iosv-2': {'prompt': 'iosv-2#', 'ip': '172.16.1.21'}}
commands = ['term length 0', 'show version', 'show run']
username = input('Username: ')
password = getpass.getpass('Password: ')
# Starts the loop for devices
for device in devices.keys():
    outputFileName = device + '_output.txt'
    device_prompt = devices[device]['prompt']
    child = pxssh.pxssh()
    child.login(devices[device]['ip'], username.strip(), password.strip(), auto_prompt_reset=False)
    # Starts the loop for commands and write to output
    with open(outputFileName, 'wb') as f:
        for command in commands:
            child.sendline(command)
            child.expect(device_prompt)
            f.write(child.before)
    child.logout()
The script further expands from our first Pexpect program with the following additional features:
- It uses SSH instead of Telnet
- It supports multiple commands instead of just one by making the commands into a list (line 8) and loops through the commands (starting at line 20)
- It prompts the user for their username and password instead of hardcoding them in the script
- It writes the output in two files,
iosv-1_output.txtandios-2_output.txt, to be further analyzed