
This section guides you through implementing Access Gateway with XenApp or XenDesktop. The AGEE appliance is used to establish SSL VPN in many modes, such as clientless and full-client VPN.
Note
The Access Gateway Enterprise VPX Edition is a stripped-down version of NetScaler that will help provide VPN access to XA/XD.
ICA is a Citrix proprietary protocol for application server systems; it works at Layer 6 (presentation layer). It uses TCP port 1494 to establish connections, and the server responds with a dynamically allocated port (in the case of a session reliability being used, the port would change to 2598.)
Session reliability is for keeping the session alive when there is loss of connectivity. ICA has keepalives that work exactly like TCP keepalives, except that they work on Layer 6 and are not enabled by default. ICA keepalives are used when session reliability is not enabled.
Basic versus smart access: these are the two modes provided by Access Gateway to the users. The difference between the two modes is that basic has unlimited ICA connections and only a platform license is required; for smart access, both Platform and universal licenses are needed. The smart access mode allows full VPN connectivity, EPA, clientless VPN, and so on, while using Citrix Receiver to access the applications through the VPN.
AGEE acts as an ICA proxy for XenApp and XenDesktop; it seals the traffic with HTTPS before it is sent to the client. Only full SSL certificates signed by a trusted certificate authority (CA) are required by the AGEE Vserver for the VPN to work; self-signed certificates cannot be used.
EPA (endpoint analyses) scans can be configured on the Access Gateway to implement security on hosted desktops and applications, and user access can be controlled based on this.
Consider the cases discussed in this section:
First we are going to set up the VPN in basic mode access:
Set up an AGEE Vserver, bind the appropriate SSL certificate to it, and select the access mode as basic.
SSL is the only protocol available while configuring the AGEE Vserver.

If there is a root and intermediate certificate for the server certificate obtained, they also need to be loaded onto the box and linked to each other.
The following screenshot shows the server certificate linked with the intermediate root CA, which in turn is linked to the root CA certificate:

Configure bookmarks and FTP share links to local intranet sites and applications.
Under Access Gateway, go to Global Settings.
There will be four tabs namely Network Configuration, Security, Client Experience, and Published Applications.
Under Network Configurations, there is an option to set the DNS IP, which enables you to use any internal FQDN, and advanced options on the same tab let you configure how to use IIPs (Intranet IPs), and so on.
The Security tab has a default operation, ALLOW/DENY, that can be set, and advanced options where we can restrict the users based on EPA scans and policies.
Under the Client Experience tab, options such as SplitTunnel (which has two options, ON or OFF, that define whether the traffic from the client should completely go through the tunnel or use both the VPN tunnel and local inter-network), Session, and Client idle timeout, and an option to specify a homepage (optional) are available. Single sign-on to web applications and client cleanup prompt (prompts when logging out of VPN) are also available.
Published Applications are also available to set ICA proxy to ON or OFF and to set the web interface link address. The ICA proxy settings come into the picture, when deciding between full, clientless, and full-client VPN.
Access the fully qualified doman name (FQDN) specified in the certificate, using HTTPS, and make sure you do not get the security warning. If you do get, please check if the certificates are loaded in your local machine along with the intermediate certificate, if any (Go to Start | Run and type
mmc). After loading the certificates, please verify that the certificates can be seen under Tools | Internet Options | Content | Certificates.
An intranet IP (IIP) pool can be configured, if you require the client connecting with only the range of IP addresses specified:
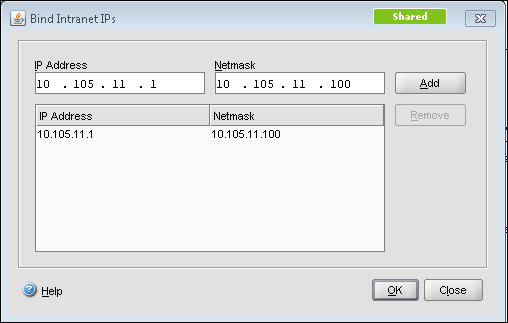
This IIP pool can be set in Global Settings or under AGEE Vserver | Intranet IPs. The preceding screenshot shows the Intranet IP configuration and the following screenshot shows the Global Settings page. The Intranet IP is used to assign IP address to the users connecting to the VPN. If the range of IP addresses is exhausted by the users, either an IP address can be reclaimed from a user who is in a logged off state or there is a setting that allows MIP to be used as IIP when no other address is available:

So, instead of global settings, if customized per user or per application, we can configure session profile and policy under Access Gateway | Policies | Session.
In this case study, the focus will be on customizing the VPN configuration per user group, in turn making it more secure.
First we will set up the VPN in smart mode access. Smart Access is used for advanced VPN configurations such as EPA scans, access to XenApp using web interface, and pre-authentication and post-authentication scans.
We will be seeing how to configure each in this section.
Smart Access provides Full VPN connectivity and to enable that we need to set the ICA proxy and Clientless Access options to OFF for full VPN. There is also the possibility of setting the VPN to full for certain users and clientless for the rest or vice versa, using session policies.
Session policies can be configured by using regular expressions, as you would configure any other policies on NetScaler. Session policies can be configured based on the users:
Network subnet (network based)
The version of the antivirus software running on the client machine
The set of processes that is required to be running/existing for the VPN to work (client security)
Client's connection type/speed (client security)
Client certificate scan (general)
Hard disk encryption and even date and time
The session policy configuration can be anywhere between simple expressions such as URL = ="/*.asp" or HTTP.REQ.URL.CONTAINS"/mycompany" and compound expressions such as "CLIENT.APPLICATION.PROCESS (notepad.exe).EXISTS".
Session policies can be bound globally, at the vserver level or the user level, and the preference works from the user level to groups to the vserver and finally to the global level. These policies are evaluated after the client is authenticated as it is more towards the client connection settings and so on.
The next step towards setting up smart access is traffic policy. Traffic policy is used to configure the file type associations for hosted applications on XenApp or XenDesktop.
File type associations help users in editing any document on the server itself instead of downloading it to the client and changing it. Traffic policies can be created for this, however, only with HTTP as protocol.
The session and traffic policies, after their creation, are bound at the vserver level:
add vpn url test test "http://10.105.225.201"
add vpn intranetApplication Remote-Desktop TCP 10.105.225.216 -destPort 3389 -interception PROXY -srcIP 127.0.0.1 -srcPort 3389
add vpn intranetApplication Test-1.1.1.1 ANY 1.1.1.1 -destPort 1-65535 -interception TRANSPARENT
add vpn vserver packtAGvserver SSL 10.105.225.206 443 -appflowLog DISABLED
add vpn sessionAction testpro -splitTunnel ON -defaultAuthorizationAction ALLOW -SSO ON -clientlessVpnMode OFF -clientlessModeUrlEncoding TRANSPARENT -clientlessPersistentCookie ALLOW
EPA scans can also be configured as a part of the pre-authentication policy and bound to the vserver, thereby letting the CAG scan the client before sending the authentication request.
In the case of configuring pre-authentication policy, checks related to the client's registry values, and so on, can be done. A sample config is as follows:
CLIENT.REG(HKEY_LOCAL_MACHINE\\Software\\Symantec\\Norton\
AntiVirus_Version).EXISTS
Whenever an EPA scan takes place, an EPA plugin is downloaded to the client to scan according to the policy set on the CAG.
The benefit of EPA, as we can see, is that users can connect from anywhere while still maintaining the internal network risk free.
Traffic policies as discussed earlier are used to configure the file type associations, and for implementing that we require the Citrix XenApp plugin. Once the traffic policy is bound to the AGEE Vserver, each of the file extensions in the published application's (that is, on the presentation server) content redirection properties should be enabled.
Another point to be noted is, if there are any routes that need to be loaded onto the client who is connecting to the VPN for accessing any intranet network, the intranet applications are configured for that particular network/subnet.
Moving onto the web interface part of the configuration, the web interface link address can be specified under Global Settings or in the Session profile, and it can be bound to the vserver. The latter is preferred if a customized config is required. To integrate Access Gateway with the web interface, we will begin by configuring a default site PNAgent. The site should be configured for the Gateway Direct mode. You would also need to enter the FQDN of the URL that you want the users to hit.
For example, for http://www.webpackt.com, the FQDN would be www.webpackt.com.
While accessing through mobile devices, it is recommended not to enable session reliability (if unsure whether the mobile device has support for the feature or not). The last action item is to add the STA (Secure Ticketing Authority). The STA's main function is to generate a ticket for a session as well as to validate that ticket.
Now, let's discuss how to specify STA:
When the ticket is generated and sent to the web interface (WI), the WI includes the STA ticket in the ICA file that is sent to the client. When this ICA session is launched, the STA validates the ticket. Refer to the following screenshot of applications and other options present in a full VPN client or XenApp plugin:

This is used, if the server name is on a different port that should also be specified.
The following screenshot shows the STA config screen. As we can see in the following screenshot, the textbox where we add the URL has the format clearly given:

Once the STA is configured on web interface, it needs to be configured on the Access Gateway under Vserver | Published Applications | Secure Ticket Authority-Add.
The following diagram shows the working of CAG in smart access mode:
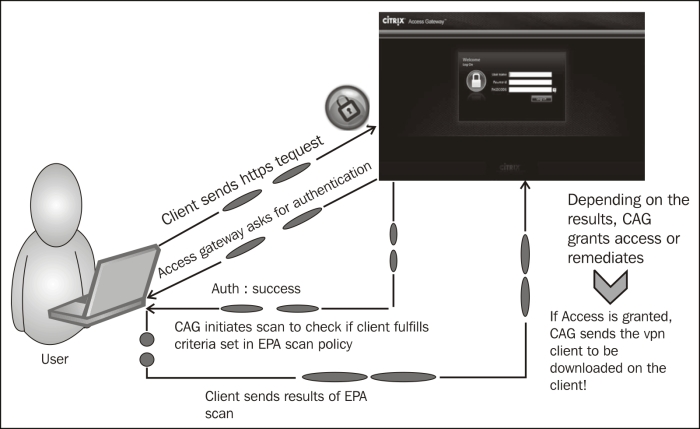
In smart access mode, after the authentication of the client, the Access Gateway will forward the authentication to the web interface (this is configurable during the site creating process, where you require the authentication to take place at the CAG or WI). The XenApp services' site that is created will appear to the user when he/she is met with all the eligibility criteria (scan).
How this works is briefly explained in the following steps:
Client sends the HTTPS request to the FQDN of the AGEE Vserver.
Authentication credentials are obtained from the user (either two-factor authentication or simple AD or OTP).
Once the client is authenticated, the CAG scans for the necessary processes or antivirus updates and so on that are available.
The results of the scans are sent to the CAG. After that, depending on what is configured as the action, the user is dropped or redirected to another site, during which the user can check what went wrong and rectify it (that is, if it is a valid user).
Once the access is granted, the VPN client is downloaded if full VPN is configured, or else the clientless VPN session gets established.
While launching any applications from the Citrix XenApp plugin or online plugin, the applications should always be in the
.icaformat.
In this section, we will see a few tips and important points to remember while deploying Access Gateway Enterprise Edition.
Primarily, a lot of issues are based on the certificates that are bound to the AGEE Vserver.
No self-signed certificate will work with AGEE.
If there is more than one root CA certificate, the intermediates should be linked on both the NetScaler as well as the client machines.
The STA URL configured on Access Gateway and the web interface should match, otherwise the STA servers will not come up.
If STA URL is configured with FQDN, make sure the FQDN is resolvable on NetScaler before going ahead with the configuration; this is yet another cause for the STA servers not coming up.
Whenever we configure bookmarks to be bound to the AGEE Vserver with clientless access configuration, there is a checkbox that says Use Access Gateway as a reverse proxy. When this checkbox is enabled, users go through the CAG to reach the website; however, if it is disabled, the connections go directly from client to the website.
Check if the domain CA certificates are present in the web interface, if not, we would need to install them in the WI as well.
The same STA servers can be configured across the XenApp farms.
Do not forget to check Trust requests sent to the XML service and make sure only trusted services are used.
Mobile users that use Citrix Receiver to connect can segregate the policies based on HTTP user-agent header.
Many improvisations such as multiple STA servers for load balancing, web interface being configured as an LB Vserver, and the LB Vserver being pointed at the AGEE Published Application tab are available. The AGEE login page is also customized to suit the needs of the organization; however, care should be taken to keep a backup of the files that are modified, and too much of customizations can also break the VPN connection.