
It is convenient to install packages from the official Oracle repository, but access to the Internet could become very intensive if in the company, there are a lot of installed machines with Oracle Solaris 11 that repeat the same routine to install packages. In this case, it is very handy to create a local IPS repository with the same packages from the official repository but have them available on a local network.
To follow this recipe, it's necessary that we have a machine (physical or virtual) running Oracle Solaris 11; we log in to the system as the root user and open a terminal. Additionally, our system must be able to access the Internet. There are further requirements, such as extra disk (physical or virtual), to create a Z File System (ZFS), and we have to download the repository image.
To download the repository image, go to http://www.oracle.com/technetwork/server-storage/solaris11/downloads/index.html, click on Create a Local Repository, and download all the available parts (at the time of this writing, there are four parts). Extract and concatenate them by executing the following:
root@solaris11:~# cat part1 part2 part3 part4 ... > solaris-11-repo-full.iso
We can create the repository in a separated disk to get some performance and maintenance advantage. Indeed, we aren't obliged to do this, but it is greatly recommended. To list the disks that are available (the format command), we create a new pool and then a new ZFS filesystem in this pool, and execute the following command:
  root@solaris11:~# format
Searching for disks...done

AVAILABLE DISK SELECTIONS:
       0. c8t0d0 <VBOX-HARDDISK-1.0-80.00GB>
          /pci@0,0/pci1000,8000@14/sd@0,0
       1. c8t1d0 <VBOX-HARDDISK-1.0 cyl 2086 alt 2 hd 255 sec 63>
          /pci@0,0/pci1000,8000@14/sd@1,0
Specify disk (enter its number): 1
selecting c8t1d0
[disk formatted]
No Solaris fdisk partition found.
We realize that if the second disk (c8t1d0) doesn't have any partitions, then the following sequence of commands creates a pool (the zpool create command). We list it (the zpool list command) and create a new ZFS filesystem (the zfs create command), as follows:
root@solaris11:~# zpool create repo_pool c8t1d0
root@solaris11:~# zpool status repo_pool
  pool: repo_pool
  state: ONLINE
  scan: none requested
  config:

    NAME      STATE     READ WRITE CKSUM
repo_pool  ONLINE       0     0     0
    c8t1d0  ONLINE       0     0     0

    errors: No known data errors

root@solaris11:~# zfs create repo_pool/repoimage
root@solaris11:~# zfs list repo_pool/repoimage
    NAME                 USED  AVAIL  REFER  MOUNTPOINT
    repo_pool/repoimage  31K   15.6G  31K    /repo_pool/repoimage
It's time to use the repository image (solaris-11-repo-full.iso from the Getting ready section) to create our local repository, and to do this, we need to mount this image and copy all of its contents (about 6.8 GB) to the repository filesystem that we created. Therefore, in the first step, we create a mount point:
root@solaris11:~# mkdir /software
Now, we create a device file that points to the repository image using the lofiadm command and mount it:
root@solaris11:~# lofiadm -a sol-11-repo-full.iso
/dev/lofi/1
root@solaris11:~# mount -F hsfs /dev/lofi/1 /software
To copy the image content to the local repository, we run the following:
root@solaris11:~# rsync -aP  /software/repo  /repo_pool/repoimage
root@solaris11:/repo_pool/repoimage# ls -al
total 37
drwxr-xr-x   3 root     root           6 Oct 15 19:31 .
drwxr-xr-x   3 root     root           3 Oct 14 19:25 ..
-rw-r--r--   1 root     root        3247 Sep 20  2012 COPYRIGHT
-rwxr-xr-x   1 root     root        1343 Sep 20  2012 NOTICES
-rw-r--r--   1 root     root        7531 Sep 28  2012 README
drwxr-xr-x   3 root     root           4 Sep 19  2012 repo
Configure the repository server service in Service Management Facility (SMF). If you still aren't comfortable with SMF, I suggest reading Chapter 5, Playing with Oracle Solaris 11 Services, later. So, the use of the svcprop command makes it possible to verify some service properties. Likewise, the svccfg command is appropriate if you wish to change a specific property from a service.
To verify what the current repository directory is, we execute the following command:
root@solaris11:~# svcprop -p pkg/inst_root application/pkg/server
/var/pkgrepo
We change the repository directory and make it read-only by running the following command:
root@solaris11:~# svccfg -s application/pkg/server setprop
pkg/inst_root=/repo_pool/repoimage/repo
root@solaris11:~# svccfg -s application/pkg/server setprop pkg/readonly=true
We quickly check our changes by running the following:
root@solaris11:~# svcprop -p pkg/inst_root application/pkg/server
/repo_pool/repoimage/repo
To avoid a TCP port collision with any existing service that is configured on port 80, we change it to 9999:
root@solaris11:~# svccfg -s application/pkg/server setprop pkg/port=9999
Now, we reload the repository configuration, start it, and then index the repository catalog for a better package search operation:
root@solaris11:~# svcadm refresh application/pkg/server
root@solaris11:~# svcadm enable application/pkg/server
root@solaris11:~# svcs | grep -i pkg/server
online         20:06:43 svc:/application/pkg/server:default
root@solaris11:~# pkgrepo refresh -s /repo_pool/repoimage/repo
Initiating repository refresh.
We list the current configured publisher and configure Oracle Solaris 11 for a new one:
root@solaris11:~# pkg publisher
PUBLISHER                   TYPE     STATUS P LOCATION
solaris                     origin   online F http://pkg.oracle.com/solaris/release/
root@solaris11:~# pkg set-publisher -G '*' -g http://solaris11.example.com solaris
We need to take care. In the preceding command, the -G option removed any existing origins (repositories) of the solaris publisher, and the -g option set a new URI that points to the local repository of the same publisher (solaris). Furthermore, the URL, solaris.example.com, points to the local system address of the repository machine (it could be 127.0.0.1).
We now have the opportunity to test our new repository:
root@solaris11:~# pkg search nmap
INDEX           ACTION VALUE                                                                                                                   PACKAGE
pkg.description set    Nmap is useful for inventorying the network, managing service upgrade schedules, and monitoring host or service uptime. pkg:/diagnostic/[email protected]
basename        dir    usr/share/nmap                                                                                                          pkg:/diagnostic/[email protected]
basename        file   usr/bin/nmap                                                                                                            pkg:/diagnostic/[email protected]
pkg.fmri        set    solaris/diagnostic/nmap                                                                                                 pkg:/diagnostic/[email protected]

root@solaris11:~# pkg publisher
PUBLISHER                   TYPE     STATUS P LOCATION
solaris                     origin   online F http://solaris11.example.com/
root@solaris11:~# pkgrepo info -s /repo_pool/repoimage/repo
PUBLISHER PACKAGES STATUS           UPDATED
solaris   4401     online           2012-09-27T22:22:59.530981Z
Wow! We've listed the configured publishers and changed the solaris publisher URI. Additionally, we are able to collect more information about the local repository by running the following command:
root@solaris11:~# pkgrepo get -s /repo_pool/repoimage/repo
SECTION    PROPERTY    VALUE
publisher  prefix      solaris
repository description This\ repository\ serves\ a\ copy\ of\ the\ Oracle\ Solaris\ 11.1\ Build\ 24b\ Package\ Repository.
repository name        Oracle\ Solaris\ 11.1\ Build\ 24b\ Package\ Repository
repository version     4
We can change any attribute of the repository, and afterwards, verify our changes by executing the following command:
root@solaris11:~# pkgrepo set -s /repo_pool/repoimage/repo
repository/description="My local Oracle Solaris 11 repository" repository/name="LOCAL SOLARIS 11 REPO"

root@solaris11:~# pkgrepo get -s /repo_pool/repoimage/repo
SECTION    PROPERTY    VALUE
publisher  prefix      solaris
repository description My\ local\ Oracle\ Solaris\ 11\ repository
repository name        LOCAL\ SOLARIS\ 11\ REPO
repository version     4
Sometimes, we'll need to update our local repository from a reliable and updated source (Oracle). We execute the following command to accomplish this task:
root@solaris11:~# pkgrecv -s http://pkg.oracle.com/solaris/release/ -d /repo_pool/repoimage/repo '*'
Processing packages for publisher solaris ...
Retrieving and evaluating 4401 package(s)...
PROCESS                                 ITEMS     GET (MB)    SEND (MB)
Completed                                 7/7  241.2/241.2  617.1/617.1
By contrast, the most impressive fact is that we could have used this same command to copy the entire repository from the official Oracle repository at the beginning of this recipe instead of downloading the entire repository, concatenating the parts, creating a device using the lofiadm command, executing the rsync command, and so on. I had a personal experience when using this particular command in which, for some reason, there was a download error while I was getting packages. To continue with a download that was initially interrupted, we run the following command:
root@solaris11:~# pkgrecv -c -s http://pkg.oracle.com/solaris/release/ -d /repo_pool/repoimage/repo '*'
It's almost the same command, but we use the -c option here instead.
In some situations, we want to access our local repository to get some packages, but by using another interface. To interact with our own repository, we need to open a web browser and navigate to our local repository (in my test environment, the IP address is 192.168.1.133—solaris11.example.com—and the port is 9999):
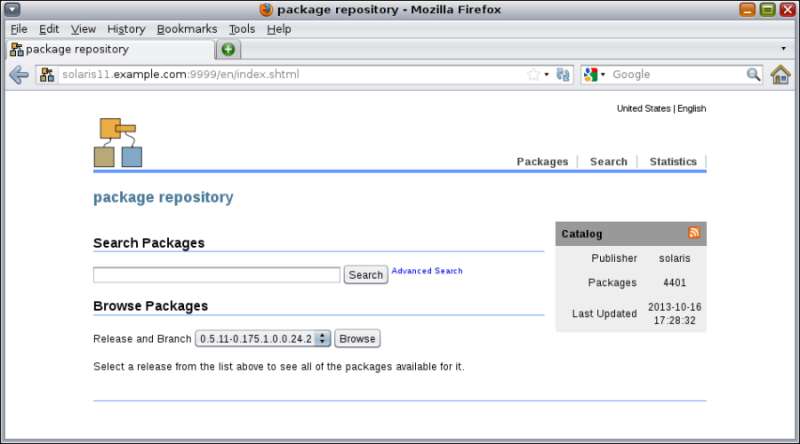
In the preceding screenshot, we searched for the nmap package, and the interface showed us that the specified package is already installed. If this is the case, we take a separate filesystem to improve the read/write performance.