

In this recipe, we will look at starting multiple servers on the same host but as a cluster. Starting a single Mongo server is enough for development purposes or applications that are not mission-critical. For crucial production deployments, we need the availability to be high where, if one server instance fails, another instance takes over and the data remains available for querying, inserting, or updating. Clustering is an advanced concept, and we won't be doing it justice by covering this whole concept in one recipe. In this recipe, we will touch the surface and get into more details in other recipes in Chapter 4, Administration, later in the book. In this recipe, we will start multiple Mongo server processes on the same machine for testing purpose. In the production environment, they will be running on different machines (or virtual machines) in the same or different data centers.
Let's see in brief exactly what a replica set is. As the name suggests, it is a set of servers that are replicas of each other in terms of data. Looking at how they are kept in sync with each other and other internals is something we will defer to some later recipes in Chapter 4, Administration, but one thing to remember is that write operations will happen only on one node, the primary one. All the querying also happens from the primary node by default, though we might permit read operations on secondary instances explicitly. An important fact to remember is that replica sets are not meant to achieve scalability by distributing the read operations across various nodes in a replica set. Their sole objective is to ensure high availability.
Though not a prerequisite, taking a look at the Starting a single node instance using command-line options recipe will definitely make things easier, just in case you are not aware of the various command-line options and their significance while starting a Mongo server. Also, the necessary binaries and setup as mentioned in the Single node installation of MongoDB recipe must be mastered before we continue with this recipe. Let's sum up what we need to do.
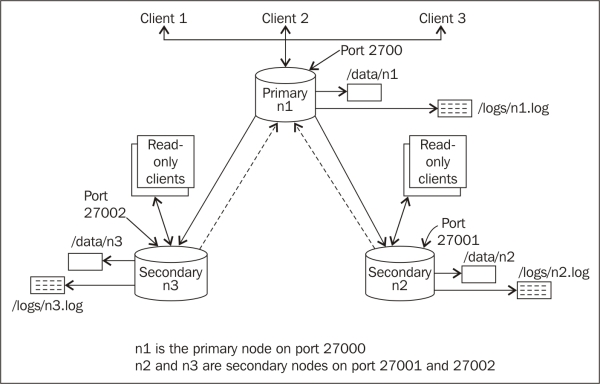
We will start three mongod processes (Mongo server instances) on our localhost. Then, we will create three data directories, /data/n1, /data/n2, and /data/n3, for node 1, node 2, and node 3, respectively. Similarly, we will redirect the logs to /logs/n1.log, /logs/n2.log, and /logs/n3.log. The following diagram will give you an idea as to how the cluster will look like:
Let's take a look at the steps in detail:
Create the
/data/n1,/data/n2, and/data/n3directories,/logsfor data, and logs of the three nodes. On the Windows platform, you can choose thec:\data\n1,c:\data\n2,c:\data\n3, orc:\logs\directory (or any other directory of your choice) for data and logs, respectively. Ensure that these directories have appropriate write permissions for the Mongo server to write the data and logs.Start the three servers as follows (note that users on the Windows platform need to skip the
--forkoption, as it is not supported):$ mongod --replSet repSetTest --dbpath /data/n1 --logpath /logs/n1.log --port 27000 --smallfiles --oplogSize 128 --fork $ mongod --replSet repSetTest --dbpath /data/n2 --logpath /logs/n2.log --port 27001 --smallfiles --oplogSize 128 --fork $ mongod --replSet repSetTest --dbpath /data/n3 --logpath /logs/n3.log --port 27002 --smallfiles --oplogSize 128 --fork
Start the Mongo shell and connect to any of the Mongo servers that are running. In this case, we will connect to the first one (the one listening to port
27000). Execute the following command:$ mongo localhost:27000Try to execute an
insertoperation from the Mongo shell after connecting to it as follows:> db.person.insert({name:'Fred', age:35})This operation should fail as the replica set is not initialized yet. More information can be found in the How it works… section of this recipe.
The next step is to start configuring the replica set. We will start by preparing a JSON configuration in the shell:
cfg = {
   '_id':'repSetTest',
  'members':[
       {'_id':0, 'host': 'localhost:27000'},
       {'_id':1, 'host': 'localhost:27001'},
       {'_id':2, 'host': 'localhost:27002'}
   ]
}
The last step is to initiate the replica set with the preceding configuration as follows:
> rs.initiate(cfg)
Execute rs.status() after a few seconds on the shell to see the status. In a few seconds, one of them should become primary, and the remaining two should become secondary.
We described the common options and all these command-line options in the Starting a single node instance using command-line options recipe in detail.
As we are starting three independent mongod services, we have three dedicated database paths on the filesystem. Similarly, we have three separate logfile locations for each of the processes. We then started three mongod processes with the database and logfile path specified. As this setup is for test purposes and started on the same machine, we used the --smallfiles and --oplogSize options. Avoid using these options in the production environment. As these are running on the same host, we also choose the ports explicitly to avoid port conflicts. The ports we chose here are 27000, 27001, and 27002. When we start the servers on different hosts, we might or might not choose a separate port. We can very well choose to use the default one whenever possible.
The --fork option demands some explanation. By choosing this option, we started the server as a background process from our operating system's shell and got the control back in the shell, where we can then start more such mongod processes or perform other operations. In the absence of the --fork option, we cannot start more than one process per shell and will need to start three mongod processes in three separate shells. This option, however, doesn't work on the Windows platform, and we need to start one process per shell. We can, however, execute the following command to spawn a new shell and then start the new Mongo service in this newly spawned shell:
start mongod --replSet repSetTest --dbpath c:\data\c1 --logpath c:\logs\n1.log --port 27000 --smallfiles --oplogSize 128
The preceding command allows us to have a batch file (a .bat file) that contains all the logic to create the relevant directories and then spawn three mongod processes in three shells.
Let's get back to the replica set creation; we are not yet done with setting up a replica set. If we take a look at the logs generated in the log directory, we will see the following lines in it:
[rsStart] replSet can't get local.system.replset config from self or any seed (EMPTYCONFIG)
[rsStart] replSet info you may need to run replSetInitiate -- rs.initiate() in the shell -- if that is not already done
Though we started three mongod processes with the --replSet option, we still haven't configured them to work with each other as a replica set. This command-line option is just used to tell the server on startup that this process will be running as part of a replica set. The name of the replica set is the same as the value of this option passed on the command prompt. This also explains why the insert operation executed on one of the nodes failed before the replica set was initialized. In mongo replica sets, only one node is the primary node where all the inserts and querying happen. In the preceding diagram, node n1 is shown as the primary node and listens to port 27000 for client connections. All the other nodes are slave/secondary instances that sync themselves up with the primary node; hence, querying too is disabled on them by default. It is only when the primary node goes down that one of the secondaries takes over and becomes a primary node. It is, however, possible to query the secondary instances for data, as we showed in the preceding diagram. We will see how to query from a secondary instance in the next recipe.
Well, all that is left now is to configure the replica set by grouping the three processes we started. This is done by first defining a JSON object as follows:
cfg = {
   '_id':'repSetTest',
  'members':[
       {'_id':0, 'host': 'localhost:27000'},
       {'_id':1, 'host': 'localhost:27001'},
       {'_id':2, 'host': 'localhost:27002'}
   ]
}
There are two fields, _id and members, for the unique ID of the replica set and an array of the hostnames and port numbers of the mongod server processes as part of this replica set, respectively. Using the localhost to refer to the host is not a very good idea and is usually discouraged. However, in this case, we started all the processes on the same machine; thus, we are OK with it. It is, however, preferred to refer to the hosts by their hostnames even if they are running on the localhost. Note that you cannot mix referring the instances using the localhost and hostnames both in the same config. You can use either the hostnames or the localhost. To configure the replica set, we then connect to any one of three running mongod processes; in this case, we will connect to the first one and then execute the following command from the shell:
> rs.initiate(cfg)
The _id in the cfg object passed has the same value as the value we gave to the --replSet option in the command prompt when we started the server processes. Not giving the same value will throw the following error:
{
        "ok" : 0,
        "errmsg" : "couldn't initiate : set name does not match the set name host Amol-PC:27000 expects"
}
If all goes well and the initiate call is successful, you will see something like the following JSON response on the shell:
{
       "info" : "Config now saved locally.  Should come online in about a minute.","ok" : 1
}
In a few seconds, you should see a different prompt for the shell from which we executed this command. It should now become a primary or secondary node. The following command is an example of the shell connected to a primary member of the replica set:
repSetTest:PRIMARY>
Executing rs.status() should give us some stats on the replica set status. The stateStr field here is important, and it contains the text PRIMARY, SECONDARY, and so on.
If you are looking to convert a standalone instance to a replica set, the instance with data needs to become a primary instance first, and then empty secondary instances will be added, to which the data will be synchronized. For more information on how to perform this operation, visit http://docs.mongodb.org/manual/tutorial/convert-standalone-to-replica-set/.
The Connecting to the replica set from the shell to query and insert data recipe to perform more operations from the shell after connecting to a replica set
Chapter 4, Administration, for more advanced recipes on replication