
Before diving into the subject of the book you should have all the relevant tools installed on your computer. We will give you some advice and recommend tools that you might want to use. We only describe public domain and free tools.
There are currently two major versions of Python; the 2.x branch and the new 3.x branch. There are language incompatibilities between these branches and one has to be aware of which one to use. This book is based on the 3.x branch, considering the language up to release 3.5.
For this book you need to install the following:
- The interpreter: Python 3.5 (or later)
- The modules for scientific computing: SciPy with NumPy
- The module for graphical representation of mathematical results: matplotlib
- The shell: IPython
- A Python related editor: Spyder (refer to the following Figure 1.1, Spyder), Geany
The installation of these is eased by the so-called distribution packages. We recommend that you use Anaconda. The default screen of Spyder consists of an editor window on left, a console window in the lower right corner which gives access to an IPython shell and a help window in the upper right corner as shown in the following figure:
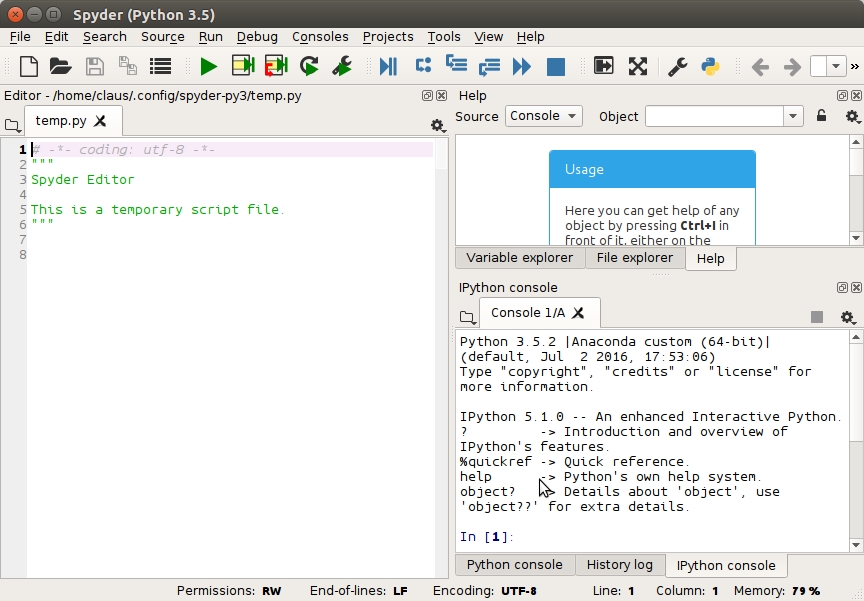
Figure 1.1: The default screen of Spyder consists of an editor window on left, a console window in the lower right corner which gives access to an IPython shell and a help window in the upper right corner.
Even if you have Python pre-installed on your computer, we recommend that you create your personal Python environment that allows you to work without the risk of accidentally affecting the software on which your computer's functionality might depend. With a virtual environment, such as Anaconda, you are free to change language versions and install packages without the unintended side-effects.
If the worst happens and you screw things up totally, just delete the Anaconda directory and start again. Running the Anaconda installer will install Python, a Python development environment and editor (Spyder), the shell IPython, and the most important packages for numerical computations, for example SciPy, NumPy, and matplotlib.
You can install additional packages with conda install within your virtual environment created by Anaconda (refer for official documentation from[2]).
Most Python codes will be collected in files. We recommend that you use the following header in all your Python files:
from scipy import *
from matplotlib.pyplot import *
With this, you make sure that all standard modules and functions used in this book, such as SciPy, are imported. Without this step, most of the examples in the book would raise errors. Many editors, such as Spyder, provide the possibility to create a template for your files. Look for this feature and put the preceding header into a template.
The Python shell is good but not optimal for interactive scripting. We therefore recommend using IPython instead (refer to [26] for the official documentation). IPython can be started in different ways:
- In a terminal shell by running the following command:
ipython - By directly clicking on an icon called Jupyter QT Console

- When working with Spyder you should use an IPython console (refer to Figure 1.1, Spyder).
You often want to execute the contents of a file. Depending on the location of the file on your computer, it is necessary to navigate to the correct location before executing the contents of a file.
- Use the command
cdin IPython in order to move to the directory where your file is located. - To execute the contents of a file named
myfile.py, just run the following command in the IPython shell
run myfile
Here are some tips on how to use IPython:
- To get help on an object, just type
?after the object's name and thenreturn. - Use the arrow keys to reuse the last executed commands.
- You may use the Tab key for completion (that is, you write the first letter of a variable or method and IPython shows you a menu with all the possible completions).
- Use Ctrl+D to quit.
- Use IPython's magic functions. You can find a list and explanations by applying
%magicon the command prompt.
Tip
You can find out more about IPython in its online documentation, [15].
The Jupyter notebook is a fantastic tool for demonstrating your work. Students might want to use it to make and document homework and exercises and teachers can prepare lectures with it, even slides and web pages.
If you have installed Python via Anaconda, you already have everything for Jupyter in place. You can invoke the notebook by running the following command in the terminal window:
jupyter notebook
A browser window will open and you can interact with Python through your web browser.