Book Image

Ensemble Machine Learning Cookbook

By : Dipayan Sarkar, Vijayalakshmi Natarajan
Book Image

Ensemble Machine Learning Cookbook

By: Dipayan Sarkar, Vijayalakshmi Natarajan

Overview of this book

Ensemble modeling is an approach used to improve the performance of machine learning models. It combines two or more similar or dissimilar machine learning algorithms to deliver superior intellectual powers. This book will help you to implement popular machine learning algorithms to cover different paradigms of ensemble machine learning such as boosting, bagging, and stacking. The Ensemble Machine Learning Cookbook will start by getting you acquainted with the basics of ensemble techniques and exploratory data analysis. You'll then learn to implement tasks related to statistical and machine learning algorithms to understand the ensemble of multiple heterogeneous algorithms. It will also ensure that you don't miss out on key topics, such as like resampling methods. As you progress, you’ll get a better understanding of bagging, boosting, stacking, and working with the Random Forest algorithm using real-world examples. The book will highlight how these ensemble methods use multiple models to improve machine learning results, as compared to a single model. In the concluding chapters, you'll delve into advanced ensemble models using neural networks, natural language processing, and more. You’ll also be able to implement models such as fraud detection, text categorization, and sentiment analysis. By the end of this book, you'll be able to harness ensemble techniques and the working mechanisms of machine learning algorithms to build intelligent models using individual recipes.
Table of Contents (14 chapters)

Data manipulation with Python

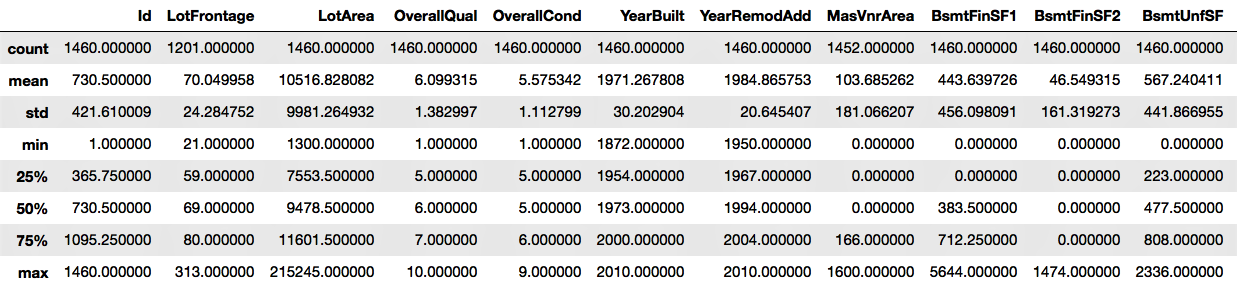
In real life, it is often hard to get a complete and clean dataset formatted exactly as we need it. The data we receive often cannot be directly used in statistical or machine learning algorithms. We need to manipulate the raw data so that the processed data can be used for further analysis and modelling purposes. To begin with, we need to import the required packages, such as pandas, and read our dataset into Python.

Getting ready

We will use the os package in the operating system's dependent functionality, and the pandas package for data manipulation.

Let's now take a look at the data definitions to understand our variables. In the following code, we list the data definition for a few variables. The dataset and the complete data definitions are available on GitHub. Here is an abridged version of the data description file:

MS SubClass (Nominal): Identifies the type of dwelling involved in the sale
Lot Frontage (Continuous): Linear feet of street connected to property
Alley (Nominal): Type of alley access to property
Overall Qual (Ordinal): Rates the overall material and finish of the house
Overall Cond (Ordinal): Rates the overall condition of the house
Year Built (Discrete): Original construction date
Mas Vnr Type (Nominal): Masonry veneer type
Mas Vnr Area (Continuous): Masonry veneer area in square feet
Garage Type (Nominal): Garage location
Garage Yr Blt (Discrete): Year garage was built
Garage Finish (Ordinal): Interior finish of the garage
Garage Cars (Discrete): Size of garage in car capacity
Garage Area (Continuous): Size of garage in square feet
Garage Qual (Ordinal): Garage quality
Garage Cond (Ordinal): Garage condition
...
...
SalePrice (Continuous): Sale price $$

We will then import the os and pandas packages and set our working directory according to our requirements, as seen in the following code block:

import os
import pandas as pd

# Set working directory as per your need
os.chdir(".../.../Chapter 1")
os.getcwd()

The next step is to download the dataset from GitHub and copy it to your working directory.

How to do it...

Now, let's perform some data manipulation steps:

  1. First, we will read the data in HousePrices.csv from our current working directory and create our first DataFrame for manipulation. We name the DataFrame housepricesdata, as follows:
housepricesdata = pd.read_csv("HousePrices.csv")
  1. Let's now take a look at our DataFrame and see how it looks:
# See first five observations from top
housepricesdata.head(5)

You might not be able to see all the rows; Jupyter will truncate some of the variables. In order to view all of the rows and columns for any output in Jupyter, execute the following commands:

# Setting options to display all rows and columns
pd.options.display.max_rows = None
pd.options.display.max_columns = None

  1. We can see the dimensions of the DataFrame with shape. shape is an attribute of the pandas DataFrame:
housepricesdata.shape

With the preceding command, we can see the number of rows and columns, as follows:

(1460, 81)

Here, we can see that the DataFrame has 1460 observations and 81 columns.

  1. Let's take a look at the datatypes of the variables in the DataFrame:
housepricesdata.dtypes

In the following code block, we can see the datatypes of each variable in the DataFrame:

Id                 int64
MSSubClass         int64
MSZoning          object
LotFrontage      float64
LotArea            int64
LotConfig         object
LandSlope         object
                  ...   
BedroomAbvGr       int64
KitchenAbvGr       int64
KitchenQual       object
TotRmsAbvGrd       int64
SaleCondition     object
SalePrice          int64
Length: 81, dtype: object

We're now all ready to start with our data manipulation, which we can do in many different ways. In this section, we'll look at a few ways in which we can manipulate and prepare our data for the purpose of analysis.

Let's start by summarizing our data.

  1. The describe() function will show the statistics for the numerical variables only:
housepricesdata.describe()

We can see the output in the following screenshot:

  1. We will remove the id column, as this will not be necessary for our analysis:
# inplace=True will overwrite the DataFrame after dropping Id column
housepricesdata.drop(['Id'], axis=1, inplace=True)
  1. Let's now look at the distribution of some of the object type variables, that is, the categorical variables. In the following example, we are going to look at LotShape and LandContour. We can study the other categorical variables of the dataset in the same way as shown in the following code block:
# Name the count column as "count"
lotshape_frequencies = pd.crosstab(index=housepricesdata["LotShape"], columns="count")

landcountour_frequencies = pd.crosstab(index=housepricesdata["LandContour"], columns="count") # Name the count column as "count"

print(lotshape_frequencies)
print("\n") # to keep a blank line for display
print(landcountour_frequencies)
  1. We will now see how to perform a conversion between datatypes. What we notice is that the data definition of variables such as MSSubClass, OverallQual, and OverallCond are all categorical variables. After importing the dataset, however, they appear as integers.
Prior to typecasting any variable, ensure that there are no missing values.

Here, we'll convert the variables to a categorical datatype:

# Using astype() to cast a pandas object to a specified datatype
housepricesdata['MSSubClass'] = housepricesdata['MSSubClass'].astype('object')
housepricesdata['OverallQual'] = housepricesdata['OverallQual'].astype('object')
housepricesdata['OverallCond'] = housepricesdata['OverallCond'].astype('object')


# Check the datatype of MSSubClass after type conversion
print(housepricesdata['MSSubClass'].dtype)
print('\n') # to keep a blank line for display

# Check the distribution of the levels in MSSubClass after conversion
# Make a crosstab with pd.crosstab()
# Name the count column as "count"
print(pd.crosstab(index=housepricesdata["MSSubClass"], columns="count"))

We can see the count of observations for each category of houses, as shown in the following code block:

category

col_0       count
MSSubClass       
20            536
30             69
40              4
45             12
50            144
60            299
70             60
75             16
80             58
85             20
90             52
120            87
160            63
180            10
190            30

There are many variables that might not be very useful by themselves, but transforming them gives us a lot of interesting insights. Let's create some new, meaningful variables.

  1. YearBuilt and YearRemodAdd represent the original construction date and the remodel date respectively. However, if they can be converted into age, these variables will tell us how old the buildings are and how many years it has been since they were remodeled. To do this, we create two new variables, BuildingAge and RemodelAge:
# Importing datetime package for date time operations
import datetime as dt

# using date time package to find the current year
current_year = int(dt.datetime.now().year)

# Subtracting the YearBuilt from current_year to find out the age of the building
building_age = current_year - housepricesdata['YearBuilt']

# Subtracting the YearRemonAdd from current_year to find out the age since the
# building was remodelled
remodelled_age = current_year - housepricesdata['YearRemodAdd']
  1. Now, let's add the two variables to our dataset:
# Adding the two variables to the DataFrame
housepricesdata['building_age'] = building_age
housepricesdata['remodelled_age'] = remodelled_age

# Checking our DataFrame to see if the two variables got added
housepricesdata.head(5)

We notice that building_age and remodelled_age are now added to the DataFrame, as shown in the following screenshot:

Variables that contain label data need to be converted into a numerical form for machine learning algorithms to use. To get around this, we will perform encoding that will transform the labels into numerical forms so that the algorithms can use them.

  1. We need to identify the variables that need encoding, which include Street, LotShape, and LandContour. We will perform one-hot encoding, which is a representation of categorical variables as binary vectors. We will use the pandas package in Python to do this:
# We use get_dummies() function to one-hot encode LotShape
one_hot_encoded_variables = pd.get_dummies(housepricesdata['LotShape'],prefix='LotShape')

# Print the one-hot encoded variables to see how they look like
print(one_hot_encoded_variables)

We can see the one-hot encoded variables that have been created in the following screenshot:

  1. Add the one-hot encoded variables to our DataFrame, as follows:
# Adding the new created one-hot encoded variables to our DataFrame
housepricesdata = pd.concat([housepricesdata,one_hot_encoded_variables],axis=1)

# Let's take a look at the added one-hot encoded variables
# Scroll right to view the added variables
housepricesdata.head(5)

We can see the output that we get after adding the one-hot encoded variables to the DataFrame in the following screenshot:

  1. Now, let's remove the original variables since we have already created our one-hot encoded variables:
# Dropping the original variable after one-hot encoding the original variable
# inplace = True option will overwrite the DataFrame

housepricesdata.drop(['LotShape'],axis=1, inplace=True)

How it works...

The pandas module is a part of the Python standard library – it is one of the key modules for data manipulation. We have also used other packages, such as os and datetime. After we set our working directory and read the CSV file into Python as a pandas DataFrame, we moved on to looking at a few data manipulation methods.

Step 1 to Step 5 in the preceding section showed us how to read the data from a CSV file in Python using pandas, and also how to use functions such as dtypes.

The pandas package also provides methods for reading data from various file types. For example, pandas.read_excel() reads an Excel table into a pandas DataFrame; pandas.read_json() converts a JSON string into apandas object; and pandas.read_parquet() loads a parquet object from a file path and returns the pandas DataFrame. More information on this can be found at https://bit.ly/2yBqtvd.

You can also read HDF5 format files in Python using the h5py package. The h5py package is a Python interface to the HDF5 binary data format. HDF® supports n-dimensional datasets, and each element in the dataset may itself be a complex object. There is no limit on the number or size of data objects in the collection. More info can be found at https://www.hdfgroup.org/. A sample code block looks like this:

import h5py

# With 'r' passed as a parameter to the h5py.File()
# the file will be read in read-only mode
data = h5py.File('File Name.h5', 'r')

We look at the datatypes of the variables, and use describe() to see the summary statistics for the numerical variables. We need to note that describe() works only for numerical variables and is intelligent enough to ignore non-numerical variables. In Step 6, we saw how to look at the count of each level for categorical variables such as LotShape and LandContour. We can use the same code to take a look at the distribution of other categorical variables.

In Step 7, we took a look at the distribution of the LotShape and LandContour variables using pd.crosstab().

One common requirement in a crosstab is to include subtotals for the rows and the columns. We can display subtotals using the margins keyword. We pass margins=True to the pd.crosstab() function. We can also give a name to subtotal columns using the margins_name keyword. The default value for margins_name is All.

We then moved on to learning how to convert datatypes. We had a few variables that were actually categorical, but appeared to be numerical in the dataset. This is often the case in a real-life scenario, hence we need to learn how to typecast our variables. Step 8 showed us how to convert a numerical variable, such as MSSubClass, into a categorical type. In Step 8, we converted a few variables into a categorical datatype. We then created a crosstab to visualize the frequencies of each level of categorical variables.

In Step 9, we created new meaningful variables from existing variables. We created the new variables, BuildingAge and RemodelAge, from YearBuilt and YearRemodAdd respectively, to represent the age of the building and the number of years that have passed since the buildings were remodeled. This method of creating new variables can provide better insights into our analysis and modeling. This process of creating new features is called feature engineering. In Step 10, we added the new variables to our DataFrame.

From there, we moved on to encoding our categorical variables. We needed to encode our categorical variables because they have named descriptions. Many machine learning algorithms cannot operate on labelled data because they require all input and output variables to be numeric. In Step 12, we encoded them with one-hot encoding. In Step 11, we learned how to use the get_dummies() function, which is a part of the pandas package, to create the one-hot encoded variables. In Step 12, we added the one-hot_encoded_variables to our DataFrame. And finally, in Step 13, we removed the original variables that are now one-hot encoded.

There's more...

The types of data manipulation required depend on your business requirements. In this first recipe, we saw a few ways to carry out data manipulation, but there is no limit to what you can do and how you can manipulate data for analysis.

We have also seen how to convert a numerical variable into a categorical variable. We can do this kind of typecasting in many ways. For example, we can convert a categorical variable into a numerical variable, if required, with the following code:

# Converting a categorical variable to numerical
# Using astype() to cast a pandas object to a specified datatype

# Here we typecast GarageYrBlt from float64 type to int64 type
housepricesdata['GarageYrBlt'] = housepricesdata['GarageYrBlt'].astype('int64')

You can only convert the GarageYrBlt variable if it does not contain any missing values. The preceding code will throw an error, since GarageYrBlt contains missing values.

We have looked at how we can use one-hot encoding to convert categorical variables to numerical variables, and why we do this. In addition to one-hot encoding, we can perform other kinds of encoding, such as label encoding, frequency encoding, and so on. An example code for label encoding is given in the following code block:

# We use sklearn.preprocessing and import LabelEncoder class
from sklearn.preprocessing import LabelEncoder

# Create instance of LabelEncoder class
lb_make = LabelEncoder()

# We create a new variable LotConfig_code to hold the new numerical labels
# We label encode LotConfig variable
housepricesdata["LotConfig_Code"] = lb_make.fit_transform(housepricesdata["LotConfig"])

# Display the LotConfig variable and its corresponding label encoded numerical values
housepricesdata[["LotConfig", "LotConfig_Code"]]

See also