

Let's proceed with the development. In the preceding section, we built a blank window and now we are going to add the menu bar, toolbar, image display component, and the status bar to the window.
First, instead of using the QMainWindow class, we will define a class ourselves, named MainWindow, which extends the QMainWindow class. Let's see its declaration in mainwindow.h:
    class MainWindow : public QMainWindow
    {
        Q_OBJECT

    public:
        explicit MainWindow(QWidget *parent = nullptr);
        ~MainWindow();

    private:
        void initUI();

    private:
        QMenu *fileMenu;
        QMenu *viewMenu;

        QToolBar *fileToolBar;
        QToolBar *viewToolBar;

        QGraphicsScene *imageScene;
        QGraphicsView *imageView;

        QStatusBar *mainStatusBar;
        QLabel *mainStatusLabel;
    };
Everything is straightforward. Q_OBJECT is a crucial macro provided by the Qt library. If we want to declare a class that has customized signals and slots of its own, or that uses any other facility from the Qt meta-object system, we must incorporate this crucial macro in our class declaration, or, more precisely, in the private section of our class, like we just did. The initUI method initializes all widgets that are declared in the private section. The imageScene and imageView widgets will be placed in the main area of the window to display images. Other widgets are self-explanatory from their type and name, so I will not say too much about them in order to keep the chapter concise.
Another key aspect is the implementation of the initUI method in mainwindow.cpp as follows:
    void MainWindow::initUI()
    {
        this->resize(800, 600);
        // setup menubar
        fileMenu = menuBar()->addMenu("&File");
        viewMenu = menuBar()->addMenu("&View");

        // setup toolbar
        fileToolBar = addToolBar("File");
        viewToolBar = addToolBar("View");

        // main area for image display
        imageScene = new QGraphicsScene(this);
        imageView = new QGraphicsView(imageScene);
        setCentralWidget(imageView);

        // setup status bar
        mainStatusBar = statusBar();
        mainStatusLabel = new QLabel(mainStatusBar);
        mainStatusBar->addPermanentWidget(mainStatusLabel);
        mainStatusLabel->setText("Image Information will be here!");
    }
As you can see, at this stage, we don't create every item and button for the menu and toolbar; we just set up the main skeleton. In the preceding code, the imageScene variable is a QGraphicsSence instance. Such an instance is a container for 2D graphical items. According to its design, it only manages graphics items but doesn't have a visual appearance. In order to visualize it, we should create an instance of the QGraphicsView class with it, which is why the imageView variable is there. In our application, we use these two classes to display images.
After implementing all the methods of the MainWindow class, it's time to compile the sources. Before doing this, a number of changes need to be made to the ImageViewer.pro project file, as follows:
- We just write a new source file, and it should be known by qmake:
     # in ImageViewer.pro
     SOURCES += main.cpp mainwindow.cpp
- The header file, mainwindow.h, has a special macro, Q_OBJECT, which indicates that it has something that cannot be dealt with by a standard C++ preprocessor. That header file should be correctly handled by a Qt-provided preprocessor named moc, the Meta-Object Compiler, to generate a C++ source file that contains some code relating to the Qt meta-object system. So, we should tell qmake to check this header file by adding the following line to ImageViewer.pro:
HEADERS += mainwindow.h
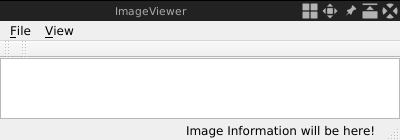
OK. Now that all of that is complete, let's run qmake -makefile and make again, and then run the new executable. You should see the following window:
Well, so far so good. Now, let's go on to add the items that should appear in the menus as we intended. In Qt, each item in a menu is represented by an instance of QAction. Here, we take the action, which is to open a new image as an example. First, we declare a pointer to a QAction instance as a private member of our MainWindow class:
QAction *openAction;
Then, in the body of the initUI method, we create the action as a child widget of the main window by calling the new operator, and add it to the File menu as follows:
    openAction = new QAction("&Open", this);
    fileMenu->addAction(openAction);
Fortunately, buttons on the toolbar can also be represented by QAction, so we can add openAction directly to the file toolbar:
fileToolBar->addAction(openAction);
As mentioned previously, we have seven actions to create: open, save as, exit, zoom in, zoom out, previous image, and next image. All of them can be added in the same way as we added the open action. Also, given that many lines of code are required to add these actions, we can do a little refactoring of the code—create a new private method named createActions, insert all the code of the action into that method, and then call it in initUI.
All actions are now created in a separate method, createActions, after the refactoring. Let's compile the sources and see what the window looks like now:
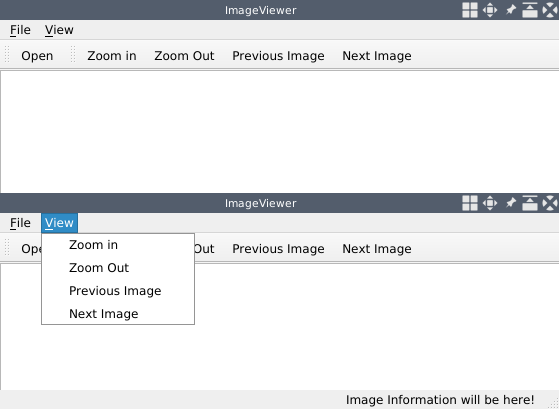
Great! The window looks just like the wireframe we designed, and we can now expand the menu by clicking on the items on the menu bar!