Configuring Snapshot Replication Using SQL Server Management Studio
Throughout this book, we will be using SQL Server Management Studio. You should already be familiar with this. Installation instructions are available in the preface, and all exercises can be completed on the free tier.
Configuring snapshot replication is a two-step process: the first step is to create the publication and the second step is to create the subscription. We will first create the publication.
Exercise 1: Creating a Publication
In this exercise, we will create a publication for our snapshot replication:
Open SQL Server Management Studio and connect to the Object Explorer (press F8 to open and connect to Object Explorer).
Find and expand the Replication node and right-click on the Local Publication node. In the context menu, select New Publication:
In the New Publication Wizard introduction page, click Next to continue:
The New Publication Wizard | Distributor page defines where the distribution database will be created. The first option specifies that the publisher server will act as the distribution server and will host the distribution database and distributor jobs.
The second option allows you to add a new server to act as the distribution server.
Leave the first option checked and click Next to continue:
In the New Publication Wizard | Snapshot Folder window, specify the location where snapshots (schema: .sch files and data) are stored. This needs to be a network path, and both the distributor and the subscriber should have access to this path.
Create a new folder in any location on your computer and share it with everyone by modifying the sharing settings of the new folder that's been created.
Copy the shared path in the Snapshot folder box, as shown in the following screenshot. Click Next to continue:
In the New Publication Wizard | Publication Database window, choose the database you wish to publish or replicate. Click Next to continue:
In the New Publication Wizard | Publication Type window, select Snapshot publication and click Next to continue:
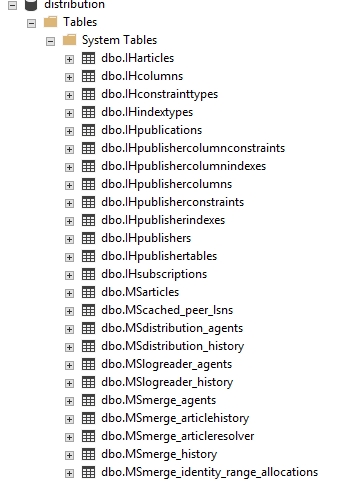
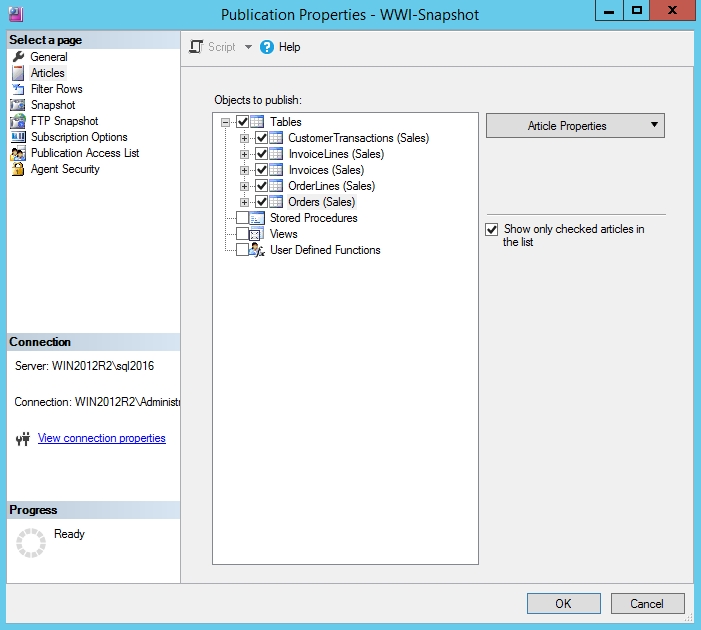
In the New Publication Wizard | Articles window, select the database objects to be replicated.
Expand Tables and select the required tables, as shown in the following screenshot:
Note
Make sure you don't select any temporal tables. Temporal tables aren't supported for replication at the time of writing this book. Temporal tables are the ones with the _archive postfix, for example, Customers_Archive.
Do not select any other objects for now.
Select the BuyingGroups table and then click Article Properties. Then, select Set properties of Highlighted Table Article.
The Article Properties window lists multiple article properties that you may have to change as and when required. For example, you can change the table name and owner at the subscriber database or you can copy the non-clustered Columnstore index from the publisher to the subscriber. This property is disabled by default:
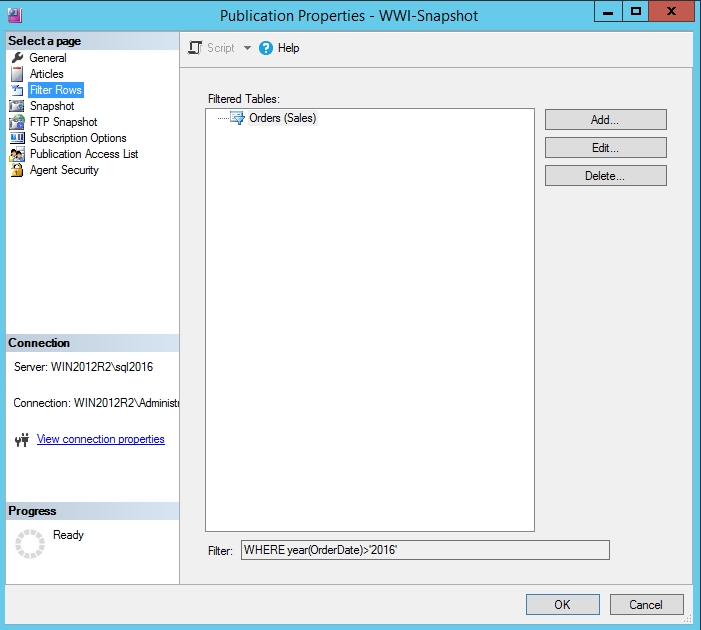
The New Publication Wizard | Filter Table Rows window allows you to filter out data to be replicated to the subscriber:
In the Filter Table Rows window, click on the Add button to add filters. In the Add Filter window, add the filter, as shown in the following screenshot:
The shown filter will filter out any order with an order year of less than 2016 and will replicate all orders made after the year 2016.
Click OK to go back to the Filter Table Rows window:
Observe that the filter has been added.
You can't add filters by joining one or more tables. The filter only works on a single table. It is therefore advised that you add the filter to other tables as well. Otherwise, all tables other than the Orders table will have data for all the years. This example, however, applies the filter on the Orders table only.
Click Next to continue.
In the New Publication Wizard | Snapshot Agent window, check the Create a snapshot immediately and keep the snapshot available to initialize subscriptions option.
This will generate the snapshot in the snapshot folder that's specified:
Click Next to continue.
Note
It is recommended that you schedule the snapshot agent during off business hours so as to avoid performance degradation that occurs as a result of snapshot generation.
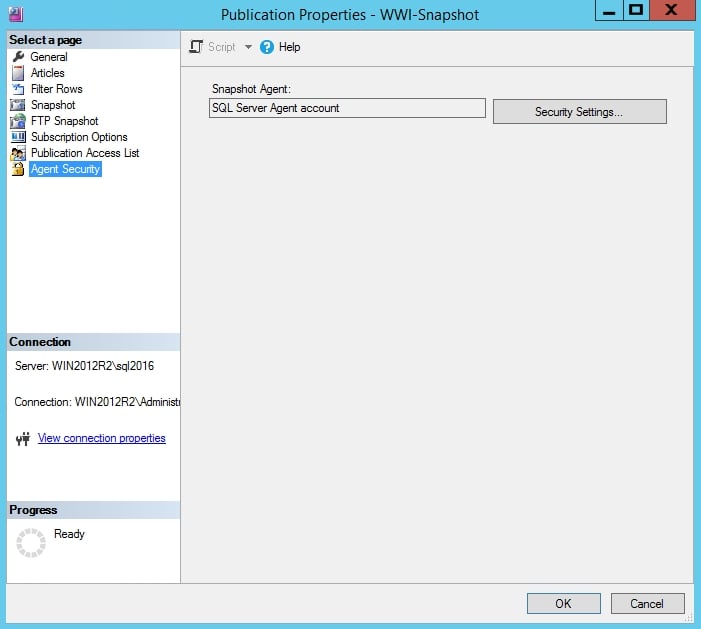
In the New Publication Wizard | Agent Security window, specify the service account under which the snapshot agent process will run and how it connects to the publisher:
Click on Security Settings to continue.
In the Snapshot Agent Security window, choose options, as shown in the following screenshot:
Note
Running the snapshot agent process under a SQL agent service account isn't a good practice on production environments as a SQL agent service account has more privileges than required by the snapshot agent. However, we are only using it for demonstrative purposes.
The minimum permissions required by the Windows account under which the snapshot agent process runs are db_owner rights on the distribution database, db_owner rights on the publisher database, and read, write, and modify rights on the shared snapshot folder.
Click OK to continue. You'll be redirected to the Agent Security window. In this window, click Next to continue:
In the Wizard Actions window, select Create the publication, and then click Next to continue:
In the Complete the Wizard window, provide the publication name, as shown in the following screenshot, and then click on Finish to complete the wizard and create the publication:
The wizard creates the publication, adds the selected articles, and creates and starts the snapshot agent job:
After the publication is created, click on Close to exit the wizard.
Now, let's look at the objects or components that are created as part of creating the publication.
Exercise 2: Exploring the Distribution Database
In step 4 of the previous exercise, we specified that the publisher will act as its own distributor. This results in the creation of a distribution database and snapshot agent job on the publisher itself. We can also use a different instance for distribution, however, let's keep it simple for this demonstration.
In SQL Server Management Studio, connect to the Object Explorer, expand Databases, and then expand System Database. Observe that a new system database distribution has been added as a result of the previous exercise:
The distribution database has system tables that keep track of replication metadata. Let's explore the metadata tables that are related to snapshot replication.
Open a new query window in SSMS and execute the following queries one by one:
To get publication information, run this query:
You should see the following output:
You can get the publication details from Object Explorer as well:
To get the article information, run this query:
You should get the following output:
To get the snapshot agent information, run this query:
You should get the following output:
Note
The preceding output is also useful in identifying which snapshot agent job belongs to which publication when there are multiple snapshot agent jobs configured on a SQL Server instance.
To get the snapshot agent's execution history, run this query:
You should get the following output:
You can also get the snapshot agent and its history from the Object Explorer under the SQL Server Agent node:
Right-click on the snapshot agent job and select View History from the context menu.
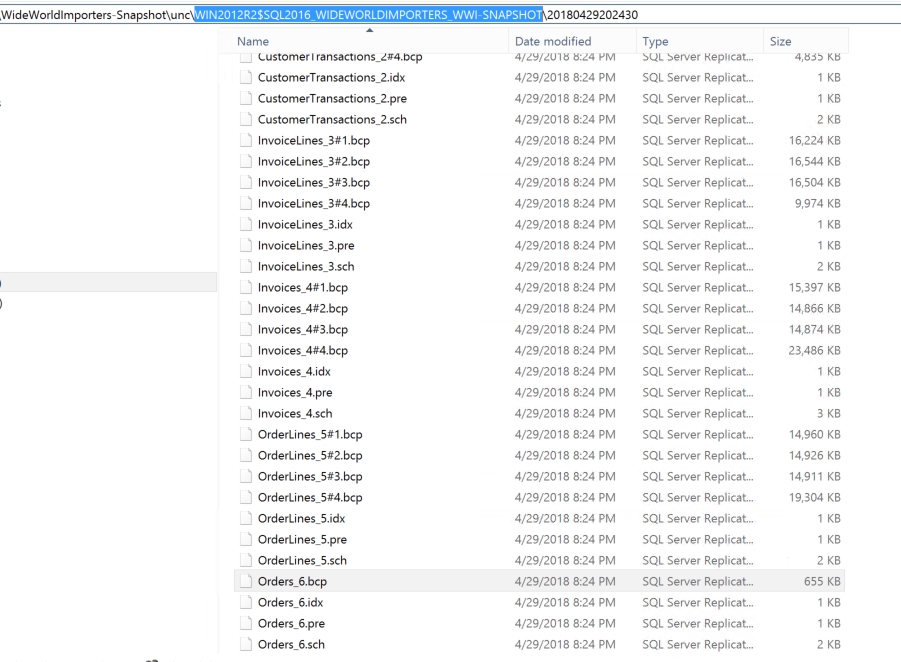
Navigate to the snapshot folder (WideWorldImporters-Snapshot) that was provided in step 5 of the previous exercise. This contains the snapshot files for the articles that were selected for replication.
Observe that this folder acts as a base and has a subfolder named WIN2012R2$SQL2016_WIDEWORLDIMPORTERS_WWI-SNAPSHOT. The subfolder is named by concatenating the SQL Server instance name and the publication name to the base snapshot folder. This is done to separate out snapshots for different publications; the base snapshot folder can therefore have snapshots from multiple publications.
Every time a snapshot agent is run, a new folder is created inside WIN2012R2$SQL2016_WIDEWORLDIMPORTERS_WWI-SNAPSHOT. This is named by the timestamp when the snapshot agent ran and contains the schema and data files. This is shown in the following screenshot:
Observe that the snapshot folder has .sch, .idx, .pre, and .bcp files. Let's see what these files are used for.
.pre Files
The .pre files are the pre-snapshot scripts that drop the object at the subscriber if it exists. This is because every time a snapshot runs, it initializes the tables from scratch. Therefore, the objects are first dropped at the subscriber. Let's look at an example:
The preceding query is from the customertransactions.pre file. It first drops foreign keys, if any, for the CustomerTransactions table and then drops the CustomerTransactions table.
Note
Another way to do this is to set the Action if name is in use option in the Article Properties window to the value Drop existing object and create a new one.
.sch Files
The .sch files contain the creation script for the articles to be replicated. Let's look at an example:
This query is from the customertransactions.sch file.
.idx Files
The .idx files contain the indexes and constraints on the tables to be created at the subscriber. Let's look at an example:
This query is from the customertransactions.idx file.
.bcp Files
The .bcp files contain the table data to be inserted into the tables at the subscriber. There can be multiple .bcp files, depending on the table size.
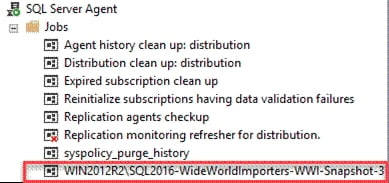
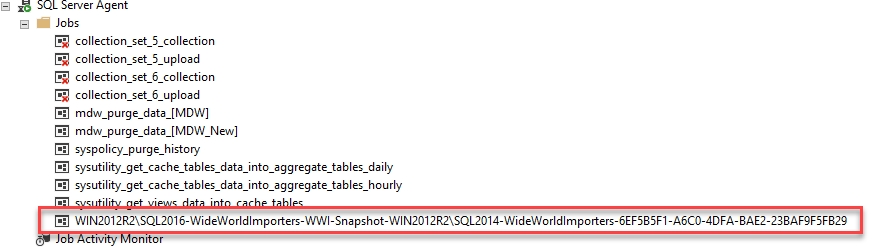
The snapshot agent job is a SQL Server agent job that executes snapshot.exe to generate the snapshot (these are the files we discussed earlier: .sch, .pre, .idx, and .bcp).
The snapshot agent job is created as part of creating the snapshot publication. You can locate the job in Object Explorer under the SQL Server Agent | Jobs node:
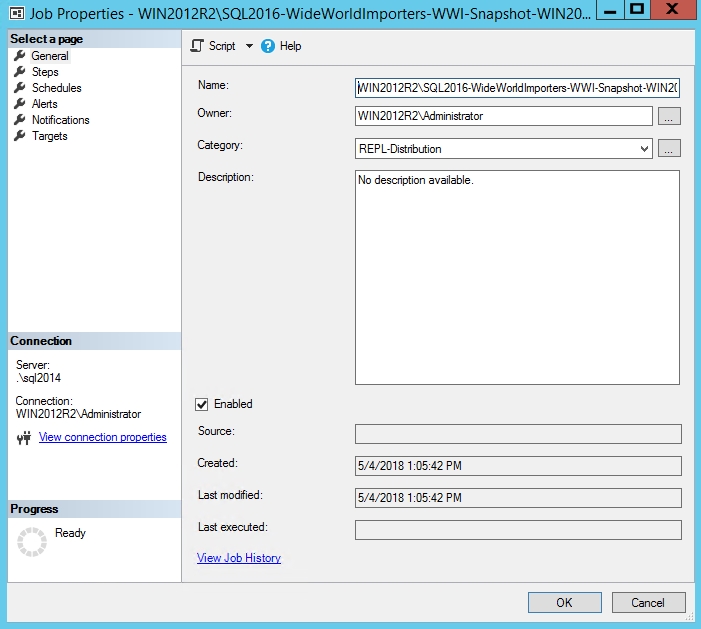
Double-click on the job to open it.
Note
The job name may be different in your case.
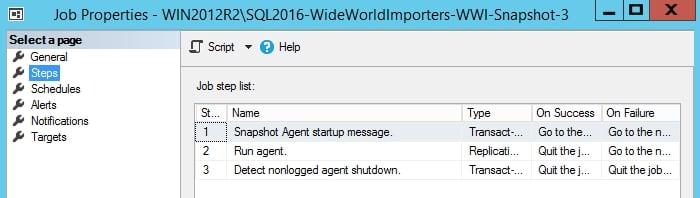
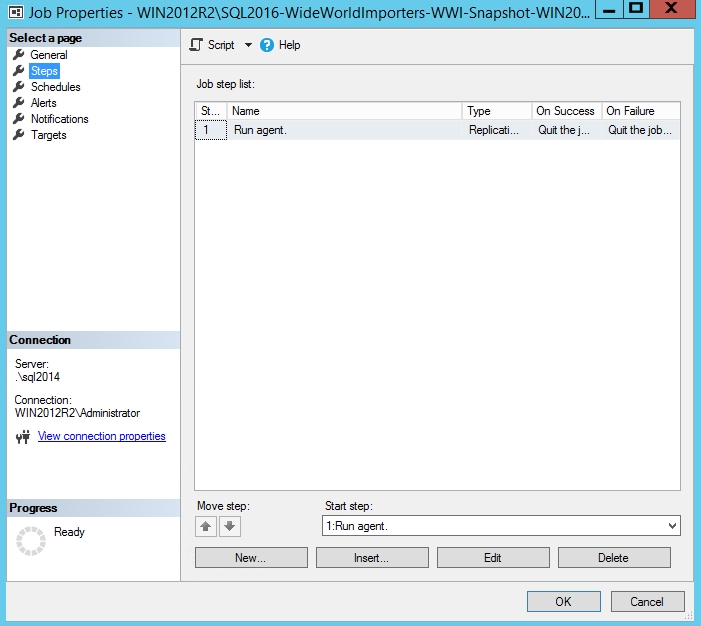
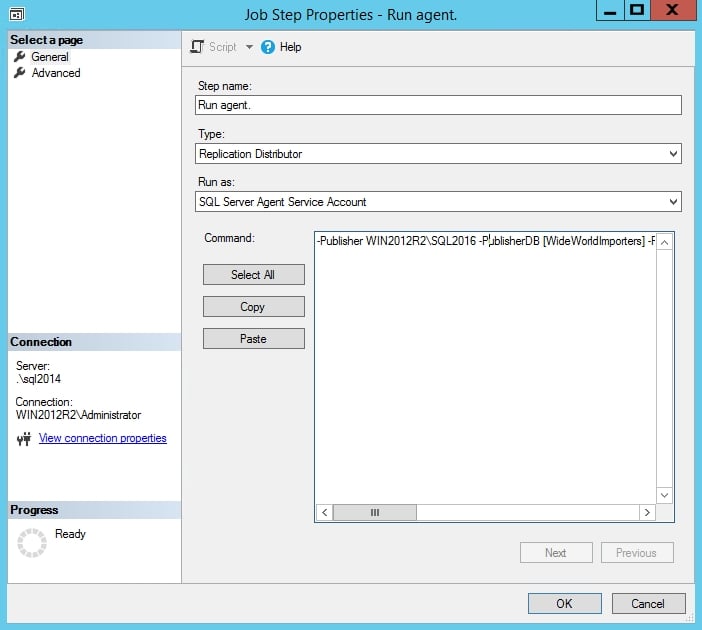
In the Job Properties window, click on Steps on the left-hand side in the Select a page pane:
This job has three steps.
Step 1 - Snapshot Agent startup message: This inserts the Starting Agent message in the Msnapshot_history table in the distribution database:
It uses the system-stored sp_MSadd_snapshot_history procedure to insert a row in the Msnapshot_history table, indicating the start of the snapshot agent.
Step 2 - Run agent: This runs the snapshot.exe command with the required parameters to generate the snapshot:
Observe that the Type parameter shows Replication Snapshot (this points to snapshot.exe). The Command text is the list of parameters that are passed to the snapshot.exe process. Similar to the previous step, where the Starting Agent status is written to the MSsnapshot_history table, snapshot.exe also logs the progress to the MSsnapshot_history table.
Step 3 - Detect nonlogged agent shutdown: This step uses the systems-stored sp_MSdetect_nonlogged_shutdown procedure to check if the agent is shut down without logging any message to the MSsnapshot_history table. It then checks and logs a relevant message for the agent that was shut down to the MSsnapshot_history table:
This completes the objects and components that were created as part of creating a publication.
We'll now look into the snapshot.exe process in detail.
Replication Snapshot (snapshot.exe)
The snapshot.exe process is installed with SQL Server (if you choose to install replication when installing SQL Server) and is stored in the C:\Program Files\Microsoft SQL Server\130\COM folder (for SQL Server 2016 installation).
The snapshot.exe process accepts quite a few parameters that are used to generate snapshots and to tune snapshot generation.
The snapshot.exe process can be run independently from the command line by passing the relevant parameters.
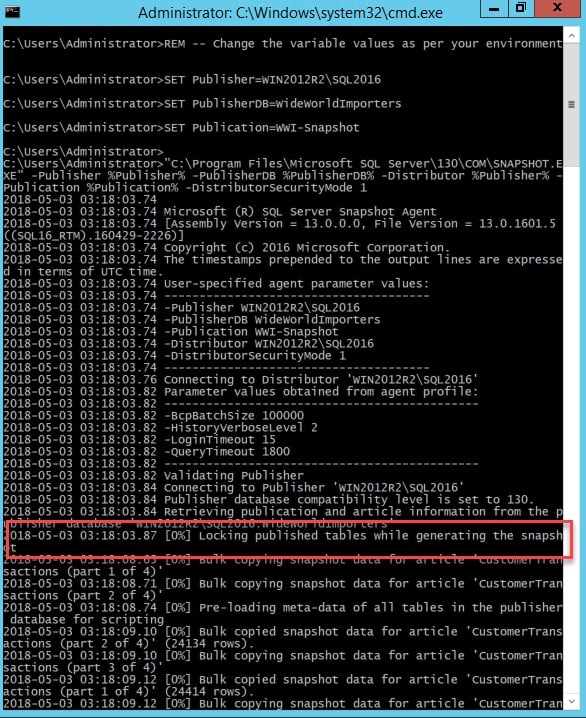
Execute the following commands in a command-line window to run snapshot.exe with the default parameters, as specified in step 2 of the snapshot agent job that we discussed previously:
Note
You can also copy the code from the C:\Code\Lesson01\snapshot.txt file.
You will have to change the Publisher variable with the SQL Server instance you created in the snapshot publication. You may have to change the PublisherDB and Publication parameters if you chose a different database and publication name when creating the snapshot publication in Exercise 1: Creating a Publication.
Once it runs successfully, it generates the following output:
The snapshot agent also logs the progress status in the distribution.dbo.MSsnapshot_history table. You can query the table to verify these steps.
An important thing to note here is that the snapshot agent locks the published tables (schema lock and exclusive locks) while generating the snapshot. This is to make sure that no changes are made to the schema when a snapshot is being generated. Any changes to the schema during snapshot generation will leave the snapshot in an inconsistent state and it will error out when applying the snapshot to the subscriber.
For example, when the snapshot agent generated a .sch file, a table had two columns; however, when it exports the data for that table, another transaction modifies the table by adding one more column to it. Therefore, the table creation script, .sch, has two columns and .bcp, which is the data file, has three columns. This will error out when applied to the subscriber.
This also means that for large databases, generating snapshots may result in blocking issues.
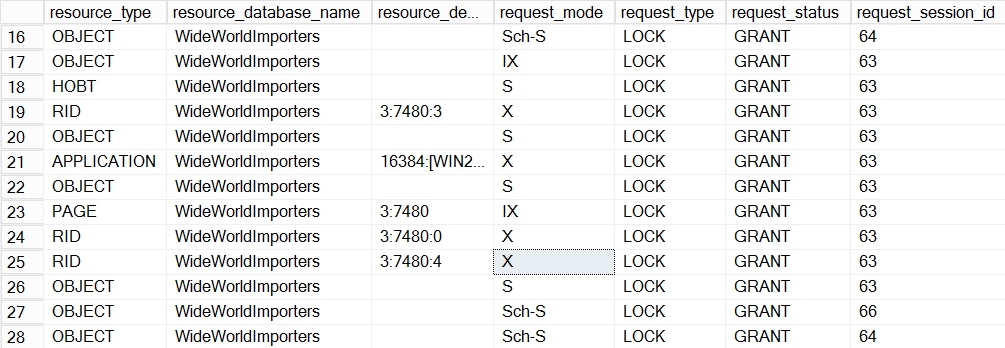
To review the locks being applied during snapshot generation, run the snapshot.exe process, as described earlier. Then, quickly switch to SQL Server Management Studio and execute the following query to get lock details:
You should get an output similar to what is shown in the following screenshot:
Observe that the IX, X, and Sch-S locks are applied on the WideWorldImporters database during snapshot generation.
Note
The relevant snapshot.exe switches/parameters will be discussed in the Optimizing Snapshot Replication section.
Modifying an Existing Publication
This section explores existing publication properties and how to modify an existing publication so that you can add or remove articles, change agent security settings, and more.
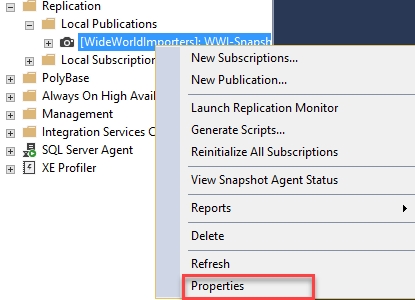
To view publication properties, connect to Object Explorer, expand Replication, and then expand Local Publications.
Right-click on the snapshot (WWI-Snapshot) and select Properties from the context menu:
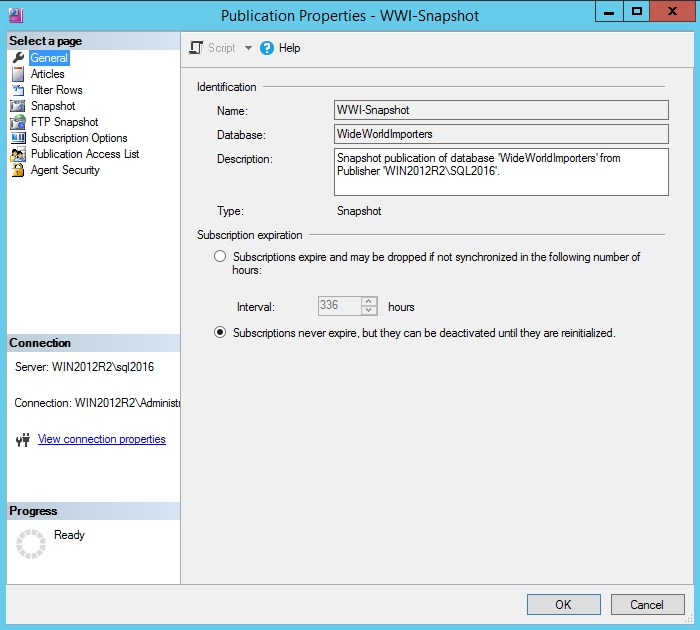
This opens the Publication Properties window:
The Publication Properties window has different options on the left-hand side (Select a page) pane to modify or change publication properties. We'll now look at these options in detail.
Articles
The Articles page allows you to add or remove an article to or from the publication. Once you add or remove one, you'll have to generate a snapshot for the changes to take effect:
Adding or removing an article is very simple. Uncheck the Show only checked articles in the list option to display all database objects.
Note
When adding a new article, the article properties can be changed if required using the Article Properties dropdown, as shown earlier. The article properties can, however, be changed later if required.
Then, select or remove the objects as required and click on OK to apply the changes.
Filter Rows
The Filter Rows page allows you to add or remove row filters to the tables. This is similar to step 9 of Exercise 1: Creating a Publication:
Snapshot
The Snapshot page allows you to do the following:
Modify the snapshot format to Native SQL Server or Character.
Modify the location of the snapshot folder.
Compress the snapshot files in the snapshot folder. This saves storage for large publications. When compression is specified, a single cabinet (compressed) file is generated. However, if an article file size exceeds 2 GB, cab compression can't be used.
Run additional scripts before and after applying the snapshot at the subscriber:
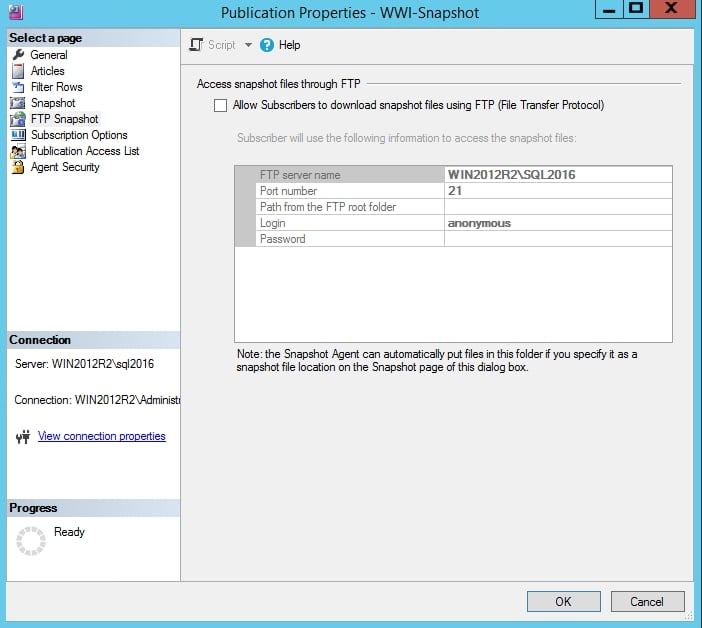
FTP Snapshot
The FTP Snapshot page allows subscribers to download snapshots using FTP. You'll have to specify the FTP folder as the snapshot folder:
You'll have to set up the FTP by specifying the connection details so that the snapshot agent can then push and pull snapshot files to and from the specified FTP folder.
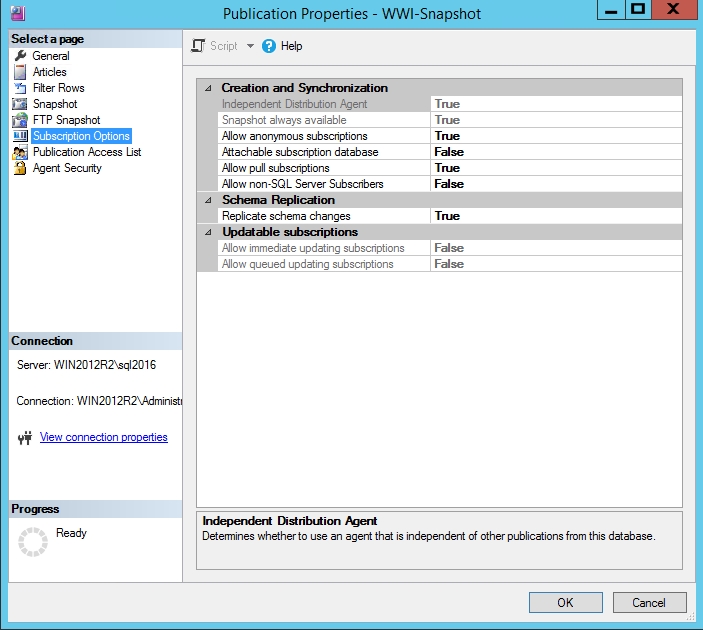
Subscription Options
The Subscription Options page lets you control subscriber-level settings:
The important settings for snapshot replication are as follows:
Allow pull subscriptions: This determines whether or not to allow pull subscriptions. The default value is True. Pull subscription is the only option available when an FTP snapshot is used.
Allow non-SQL Server Subscribers: This determines whether or not to allow non-SQL Server, that is, Oracle, MySQL, and so on, subscribers. The default value is False.
Replication schema changes: This determines whether or not to replicate schema changes to the published articles. The default value is True.
Publication Access List
The Publication Access List (PAL) page is a list of logins that have permission to create and synchronize subscriptions. Any login that has access to the publication database (WideWorldImporter) and is defined in both the publisher and distributor can be added to PAL:
Note
Do not remove the distributor_admin login as it's used by replication.
Agent Security
In the Agent Security page, you can modify the agent security settings, as defined in step 11 of Exercise 1: Creating a Publication:
To change or modify security settings, click on the Security Settings button and change as required.
Exercise 3: Creating a Subscription
In this exercise, we'll create the subscription at the subscriber end. A subscriber is usually a separate SQL Server instance.
To create a new subscription for the publication, follow these steps:
Connect to Object Explorer in SSMS. Expand Replication | Local Publications.
Right-click on the [WideWorldImporters]: WWI-Snapshot publication and select New Subscriptions:
This will open the New Subscription Wizard. Click Next to continue:
In the Publication window, under the Publisher dropdown, select the publisher server and then the publication:
Click on Next to continue.
In the Distribution Agent Location window, select pull subscriptions:
Pull subscriptions will create the distribution job at the subscriber server. This option reduces overhead at the distributor, and this becomes more important when the publisher acts as the distributor.
Note
We are using pull subscription as this will cause jobs to be created at the subscriber, making it easy to understand different jobs.
Moreover, if you have a lot of published databases and the publisher is being used as a distributor, it's advised to use pull subscription so as to offload jobs from the publisher, that is, the distributor, to subscribers.
Click Next to continue.
In the Subscribers window, click on Add SQL Server Subscriber to connect to the subscriber server. This is the server where the data will be replicated:
In the Connect to Server window, enter the subscriber server name and credentials. Click on Connect to continue:
You'll be taken back to the Subscribers window:
Under Subscription Database, select WideWorldImporters. Although you can replicate data to a different database name, it's advised that you use the same database name.
If the database doesn't exist at the subscriber, create one.
Click Next to continue.
In the Distribution Agent Security window, you can specify the distribution agent process account and how the distribution agent connects to the distributor and the subscriber. Select the button with three dots:
This opens the following window:
Select Run under the SQL Server Agent service account as the distribution agent process account.
Select By impersonating the process account under Connect to the Distributor and Connect to the Subscriber.
The By impersonating the process account option uses the SQL Server service account to connect to the distributor. However, as discussed earlier, this should not be done in production as the process account has the maximum set of privileges on the SQL Server instance.
The minimum set of permissions required by a Windows account under which the distribution agent runs are as follows.
The account that connects to the distributor should have the following permissions: be a part of the db_owner fixed database role on the distribution database, be a member of the publication access list, have read permission on the shared snapshot folder, and have write permission on the C:\Program Files\Microsoft SQL Server\InstanceID\COM folder for replication LOB data.
The account that connects to the subscriber should be a member of the db_owner fixed database role on the subscriber database.
Click OK to continue.
You'll be taken back to the Distribution Agent Security window:
Click Next to continue.
In the Synchronization Schedule window, select Run on demand only under Agent Schedule.
The synchronization schedule specifies the schedule at which the distribution agent will run to replicate the changes:
Click Next to continue.
In the Initialize Subscriptions window, check the Initialize box and then select At first synchronization under the Initialize When option:
The initialize process applies the snapshot to the subscriber to bring it in sync with the publisher. If the Initialize checkbox is left unchecked, the subscription isn't initialized. If it's checked, then there are two options available: Immediately and At first synchronization. The Immediately option will start the initialization as soon as the wizard is complete, and the At first synchronization option will start the initialization when the distribution agent runs for the first time.
In the Wizard Actions window, check the Create the subscription(s) option and click on Next to continue:
In the Complete the Wizard window, review the subscription settings and click on Finish to create the subscription:
This ends the wizard. The wizard creates the subscription and the distributor agent job. At this point, the snapshot is not yet applied to the subscriber as we chose to run the distribution agent on demand.
Now, let's look at the objects that were created as part of creating the subscription.
Exercise 4: Exploring the Distribution Database (Metadata)
Let's look at the changes that are made to the distribution tables after creating the subscription.
Open SSMS and connect to the distribution database on the publisher server. You can execute the following queries to find out how the subscription details are stored:
Subscriber information is stored in the distribution.dbo.subscriber_info table. Execute the following query to return the subscriber details:
You should get a similar output to the following:
The publisher and subscriber will be different in your case.
Note
The MSsubscriber_info table will be deprecated in a future version of SQL Server.
Execute the following query to get all of the information about the articles being replicated:
You should get a similar output to the following:
Execute the following query to get the distribution run history:
You should get a similar output to the following:
Observe that the duration is 0 as the agent hasn't run until now.
The distribution agent job that was created at the subscriber (pull subscription) runs the distribution.exe process to apply the snapshot that was created by the snapshot agent on the subscriber database.
To view the job, you can open SSMS and connect to the subscriber server using Object Explorer. Then, you can expand the SQL Server Agent node.
You should see a job similar to what is shown in the following screenshot:
Note
The job name includes the publisher server, published database, and the publication name. This helps in identifying the publication the job is for. The job name also includes the subscriber server and database, as well as the job ID. This helps in identifying the publisher and subscriber when the job is on the distributor server and multiple replications have been configured.
You can double-click on the job to open its Job Properties window:
The Job Properties window lists out the general information about the job. You can select the Steps page from the Select a page pane on the left-hand side of the Job Properties window:
This job has only one step. You can double-click on the step name or select Edit at the bottom of the window to check the step details:
Observe that the Run agent step calls the distributor.exe executable with a set of parameters.
Note
The parameters are self-explanatory. It's advised to go through the parameters and understand what the distributor agent is doing.
The job wasn't run until now as we opted for Run on Demand when configuring the subscription. Close the Job Properties window.
Exercise 5: Running the Job
Now, let's run the job and replicate the data from the publisher to the subscriber. To run the job manually, navigate to the job on the Object Explorer, as mentioned earlier:
Right-click on the job and select Start Job at Step:
Once the job is successful, you'll get a Success message on the Start Jobs window, as shown in the following screenshot:
Click Close to close the Start Jobs window.
Right-click on the job under the SQL Server Agent | Jobs node and select View History from the context menu:
This opens the job's history:
Observe that the agent has completed successfully. An important thing to observe is the values for the distribution.exe parameters (highlighted in red). We'll discuss these later in this lesson.
The job history is also a good place to start troubleshooting snapshot replication. Errors, if any, show up in the job history, and we can then fix these issues based on the errors.
Note
You can also start/stop snapshot view history by right-clicking on Replication | Local Publications | Publication name (on publisher server) and selecting View Snapshot Agent Status.
Similarly, to start/stop the distribution agent and to view history, right-click on Replication | Local Subscription | Subscription Name and then select View Synchronization Status from the context menu.
In the Object Explorer, navigate to the Databases node and expand the WideWorldImporters database on the subscriber server.
Observe that it now has the replicated tables:
Note
You can query the MSdistribution_history table to review the distribution run status.
Exercise 6: Distribution Agent Process (distrib.exe)
distrib.exe is the executable that does the actual work of replicating the data from the publisher to the subscriber:
First, let's run the distribution agent from the command line (similar to how we ran snapshot.exe) and get familiar with the common parameters. As we have already applied the snapshot, let's modify the orders table and generate a new snapshot.
Execute the following query to update the orders table on the publisher database:
The preceding query will update four rows.
Note
If you perform a count operation on the orders table on the publisher and subscriber, the count won't match. Remember that we applied the year(orderdate)>2016 filter when creating the publication. This also explains why the year filter is applied on the preceding update query.
Generate the snapshot by running the following on the command line:
Note
You can also copy the code from the C:\Code\Lesson01\snapshot.txt file.
You should get an output similar to the following screenshot:
You can also verify the new snapshot generation by looking into the snapshot folder for the snapshot files dated to the date you ran the command. Moreover, you can query the MSsnapshot_history table in the distribution database for the run status.
We have a fresh snapshot now. Run distrib.exe to apply the snapshot to the subscriber database:
Note
You can also copy the code from the C:\Code\Lesson01\distributor.txt file.
You'll have to replace the publisher and subscriber SQL Server instance name in this command. If you are replicating a database other than WideWorldImporters and have a different publication name, replace those parameters as well.
You should get a similar output to what's shown in the following screenshot:
The distribution agent runs and applies the snapshot on the subscriber. Note that the replication agent runs under the security context of the administrator. This is because the command-line console is open as an administrator.
Note
If you run the distributor agent again, you'll get a message saying that there are no replicated transactions available. This is because a snapshot can only be applied once.
Now, query the orders table at the subscriber database to verify the changes made at the publisher database:
You should get the following output.
The changes are therefore replicated.


 Free Chapter