

Kubeflow: an end-to-end machine learning lab
As was described at the beginning of this chapter, there are many components of an end-to-end lab for machine learning research and development (Table 2.1), such as:
- A way to manage and version library dependencies, such as TensorFlow, and package them for a reproducible computing environment
- Interactive research environments where we can visualize data and experiment with different settings
- A systematic way to specify the steps of a pipeline – data processing, model tuning, evaluation, and deployment
- Provisioning of resources to run the modeling process in a distributed manner
- Robust mechanisms for snapshotting historical versions of the research process
As we described earlier in this chapter, TensorFlow was designed to utilize distributed resources for training. To leverage this capability, we will use the Kubeflow projects. Built on top of Kubernetes, Kubeflow has several components that are useful in the end-to-end process of managing machine learning applications. To install Kubeflow, we need to have an existing Kubernetes control plane instance and use kubectl to launch Kubeflow's various components. The steps for setup differ slightly depending upon whether we are using a local instance or one of the major cloud providers.
Running Kubeflow locally with MiniKF
If we want to get started quickly or prototype our application locally, we can avoid setting up a cloud account and instead use virtual machines to simulate the kind of resources we would provision in the cloud. To set up Kubeflow locally, we first need to install VirtualBox (https://www.virtualbox.org/wiki/Downloads) to run virtual machines, and Vagrant to run configurations for setting up a Kubernetes control plane and Kubeflow on VirtualBox VMs (https://www.vagrantup.com/downloads.html).
Once you have these two dependencies installed, create a new directory, change into it, and run:
vagrant init arrikto/minikf
vagrant up
This initializes the VirtualBox configuration and brings up the application. You can now navigate to http://10.10.10.10/ and follow the instructions to launch Kubeflow and Rok (a storage volume for data used in experiments on Kubeflow created by Arrikto). Once these have been provisioned, you should see a screen like this (Figure 2.5):
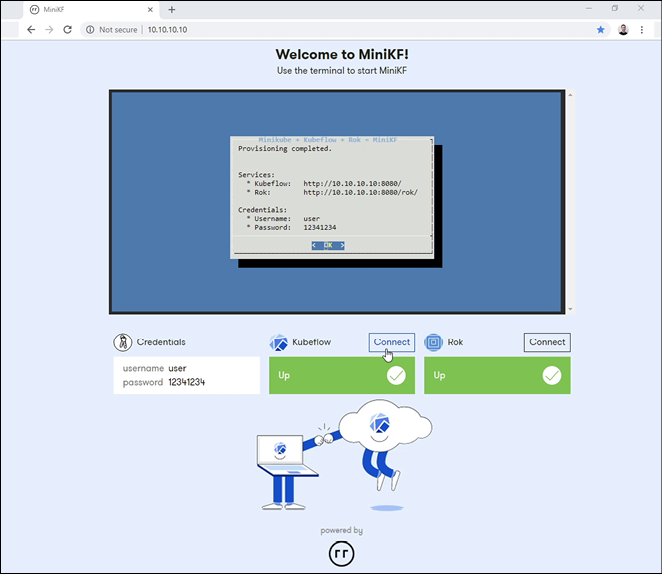
Figure 2.5: MiniKF install screen in virtualbox19
Log in to Kubeflow to see the dashboard with the various components (Figure 2.6):
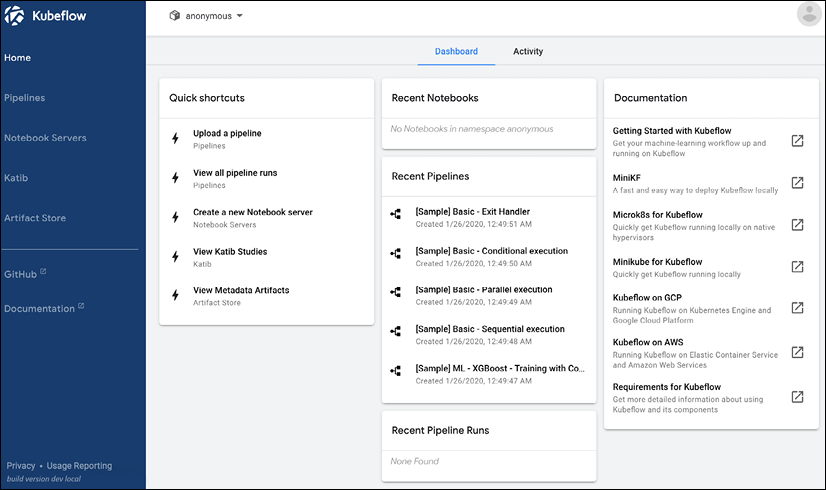
Figure 2.6: Kubeflow dashboard in MiniKF
We will return to these components later and go through the various functionalities available on Kubeflow, but first, let's walk through how to install Kubeflow in the cloud.
Installing Kubeflow in AWS
In order to run Kubeflow in AWS, we need a Kubernetes control plane available in the cloud. Fortunately, Amazon provides a managed service called EKS, which provides an easy way to provision a control plane to deploy Kubeflow. Follow the following steps to deploy Kubeflow on AWS:
- Register for an AWS account and install the AWS Command Line Interface
This is needed to interact with the various AWS services, following the instructions for your platform located at https://docs.aws.amazon.com/cli/latest/userguide/cli-chap-install.html. Once it is installed, enter:
aws configureto set up your account and key information to provision resources.
- Install eksctl
This command-line utility allows us to provision a Kubernetes control plane in Amazon from the command line. Follow instructions at https://docs.aws.amazon.com/cli/latest/userguide/cli-chap-install.html to install.
- Install iam-authenticator
To allow kubectl to interact with EKS, we need to provide the correct permissions using the IAM authenticator to modify our kubeconfig. Please see the installation instructions at https://docs.aws.amazon.com/eks/latest/userguide/install-aws-iam-authenticator.html.
- Download the Kubeflow command-line tool
Links are located at the Kubeflow releases page (https://github.com/kubeflow/kubeflow/releases/tag/v0.7.1). Download one of these directories and unpack the tarball using:
tar -xvf kfctl_v0.7.1_<platform>.tar.gz - Build the configuration file
After entering environment variables for the Kubeflow application director (
${KF_DIR}), the name of the deployment (${KF_NAME}), and the path to the base configuration file for the deployment (${CONFIG_URI}), which is located at https://raw.githubusercontent.com/kubeflow/manifests/v0.7-branch/kfdef/kfctl_aws.0.7.1.yaml for AWS deployments, run the following to generate the configuration file:mkdir -p ${KF_DIR} cd ${KF_DIR} kfctl build -V -f ${CONFIG_URI}This will generate a local configuration file locally named
kfctl_aws.0.7.1.yaml. If this looks like Kustomize, that's becausekfctlis using Kustomize under the hood to build the configuration. We also need to add an environment variable for the location of the local config file,${CONFIG_FILE}, which in this case is:export CONFIG_FILE=${KF_DIR}/kfctl_aws.0.7.1.yaml - Launch Kubeflow on EKS
Use the following commands to launch Kubeflow:
cd ${KF_DIR}
rm -rf kustomize/
kfctl apply -V -f ${CONFIG_FILE}
It will take a while for all the Kubeflow components to become available; you can check the progress by using the following command:
kubectl -n kubeflow get allOnce they are all available, we can get the URL address for the Kubeflow dashboard using:
kubectl get ingress -n istio-system
This will take us to the dashboard view shown in the MiniKF examples above. Note that in the default configuration, this address is open to the public; for secure applications, we need to add authentication using the instructions at https://www.kubeflow.org/docs/aws/authentication/.
Installing Kubeflow in GCP
Like AWS, Google Cloud Platform (GCP) provides a managed Kubernetes control plane, GKE. We can install Kubeflow in GCP using the following steps:
- Register for a GCP account and create a project on the console
This project will be where the various resources associated with Kubeflow will reside.
- Enable required services
The services required to run Kubeflow on GCP are:
- Compute Engine API
- Kubernetes Engine API
- Identity and Access Management (IAM) API
- Deployment Manager API
- Cloud Resource Manager API
- Cloud Filestore API
- AI Platform Training & Prediction API
- Set up OAuth (optional)
If you wish to make a secure deployment, then, as with AWS, you must follow instructions to add authentication to your installation, located at (https://www.kubeflow.org/docs/gke/deploy/oauth-setup/). Alternatively, you can just use the name and password for your GCP account.
- Set up the GCloud CLI
This is parallel to the AWS CLI covered in the previous section. Installation instructions are available at https://cloud.google.com/sdk/. You can verify your installation by running:
gcloud --help - Download the kubeflow command-line tool
Links are located on the Kubeflow releases page (https://github.com/kubeflow/kubeflow/releases/tag/v0.7.1). Download one of these directories and unpack the tarball using:
tar -xvf kfctl_v0.7.1_<platform>.tar.gz - Log in to GCloud and create user credentials
We next need to create a login account and credential token we will use to interact with resources in our account.
gcloud auth login gcloud auth application-default login - Set up environment variable and deploy Kubeflow
As with AWS, we need to enter values for a few key environment variables: the application containing the Kubeflow configuration files (
${KF_DIR}), the name of the Kubeflow deployment (${KF_NAME}), the path to the base configuration URI (${CONFIG_URI}– for GCP this is https://raw.githubusercontent.com/kubeflow/manifests/v0.7-branch/kfdef/kfctl_gcp_iap.0.7.1.yaml), the name of the Google project (${PROJECT}), and the zone it runs in (${ZONE}). - Launch Kubeflow
The same as AWS, we use Kustomize to build the template file and launch Kubeflow:
mkdir -p ${KF_DIR}
cd ${KF_DIR}
kfctl apply -V -f ${CONFIG_URI}
Once Kubeflow is launched, you can get the URL to the dashboard using:
kubectl -n istio-system get ingress
Installing Kubeflow on Azure
Azure is Microsoft Corporation's cloud offering, and like AWS and GCP, we can use it to install Kubeflow leveraging a Kubernetes control plane and computing resources residing in the Azure cloud.
- Register an account on Azure
Sign up at https://azure.microsoft.com – a free tier is available for experimentation.
- Install the Azure command-line utilities
See instructions for installation on your platform at https://docs.microsoft.com/en-us/cli/azure/install-azure-cli?view=azure-cli-latest. You can verify your installation by running the following on the command line on your machine:
azThis should print a list of commands that you can use on the console. To start, log in to your account with:
az loginAnd enter the account credentials you registered in Step 1. You will be redirected to a browser to verify your account, after which you should see a response like the following:
"You have logged in. Now let us find all the subscriptions to which you have access": … [ { "cloudName": … "id" …. … "user": { … } } ] - Create the resource group for a new cluster
We first need to create the resource group where our new application will live, using the following command:
az group create -n ${RESOURCE_GROUP_NAME} -l ${LOCATION} - Create a Kubernetes resource on AKS
Now deploy the Kubernetes control plane on your resource group:
az aks create -g ${RESOURCE_GROUP_NAME} -n ${NAME} -s ${AGENT_SIZE} -c ${AGENT_COUNT} -l ${LOCATION} --generate-ssh-keys - Install Kubeflow
First, we need to obtain credentials to install Kubeflow on our AKS resource:
az aks get-credentials -n ${NAME} -g ${RESOURCE_GROUP_NAME} - Install kfctl
Install and unpack the tarball directory:
tar -xvf kfctl_v0.7.1_<platform>.tar.gz - Set environment variables
As with AWS, we need to enter values for a few key environment variables: the application containing the Kubeflow configuration files (
${KF_DIR}), the name of the Kubeflow deployment (${KF_NAME}), and the path to the base configuration URI (${CONFIG_URI}– for Azure, this is https://raw.githubusercontent.com/kubeflow/manifests/v0.7-branch/kfdef/kfctl_k8s_istio.0.7.1.yaml). - Launch Kubeflow
The same as AWS, we use Kustomize to build the template file and launch Kubeflow:
mkdir -p ${KF_DIR}
cd ${KF_DIR}
kfctl apply -V -f ${CONFIG_URI}
Once Kubeflow is launched, you can use port forwarding to redirect traffic from local port
8080to port80in the cluster to access the Kubeflow dashboard atlocalhost:8080using the following command:kubectl port-forward svc/istio-ingressgateway -n istio-system 8080:80
Installing Kubeflow using Terraform
For each of these cloud providers, you'll probably notice that we have a common set of commands; creating a Kubernetes cluster, installing Kubeflow, and starting the application. While we can use scripts to automate this process, it would be desirable to, like our code, have a way to version control and persist different infrastructure configurations, allowing a reproducible recipe for creating the set of resources we need to run Kubeflow. It would also help us potentially move between cloud providers without completely rewriting our installation logic.
The template language Terraform (https://www.terraform.io/) was created by HashiCorp as a tool for Infrastructure as a Service (IaaS). In the same way that Kubernetes has an API to update resources on a cluster, Terraform allows us to abstract interactions with different underlying cloud providers using an API and a template language using a command-line utility and core components written in GoLang (Figure 2.7). Terraform can be extended using user-written plugins.
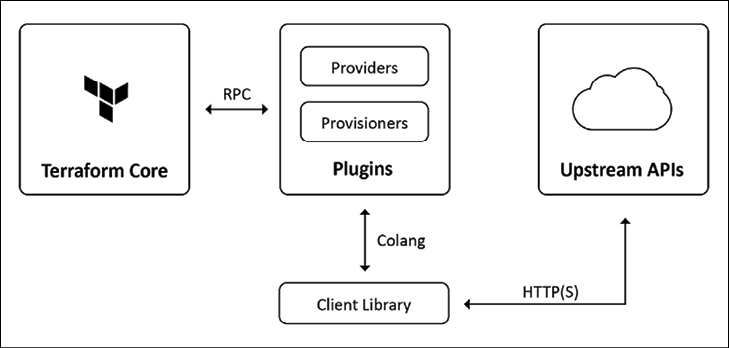
Figure 2.7: Terraform architecture20
Let's look at one example of installing Kubeflow using Terraform instructions on AWS, located at https://github.com/aws-samples/amazon-eks-machine-learning-with-terraform-and-kubeflow. Once you have established the required AWS resources and installed terraform on an EC2 container, the aws-eks-cluster-and-nodegroup.tf Terraform file is used to create the Kubeflow cluster using the command:
terraform apply
In this file are a few key components. One is variables that specify aspects of the deployment:
variable "efs_throughput_mode" {
   description = "EFS performance mode"
   default = "bursting"
   type = string
}
Another is a specification for which cloud provider we are using:
provider "aws" {
  region                  = var.region
  shared_credentials_file = var.credentials
resource "aws_eks_cluster" "eks_cluster" {
  name            = var.cluster_name
  role_arn        = aws_iam_role.cluster_role.arn
  version         = var.k8s_version

  vpc_config {
    security_group_ids = [aws_security_group.cluster_sg.id]
    subnet_ids         = flatten([aws_subnet.subnet.*.id])
  }

  depends_on = [
    aws_iam_role_policy_attachment.cluster_AmazonEKSClusterPolicy,
    aws_iam_role_policy_attachment.cluster_AmazonEKSServicePolicy,
  ]

  provisioner "local-exec" {
    command = "aws --region ${var.region} eks update-kubeconfig --name ${aws_eks_cluster.eks_cluster.name}"
  }

  provisioner "local-exec" {
    when    = destroy
    command = "kubectl config unset current-context"
  }

}
  profile   = var.profile
}
And another is resources such as the EKS cluster:
resource "aws_eks_cluster" "eks_cluster" {
  name     = var.cluster_name
  role_arn = aws_iam_role.cluster_role.arn
  version  = var.k8s_version

  vpc_config {
    security_group_ids = [aws_security_group.cluster_sg.id]
    subnet_ids         = flatten([aws_subnet.subnet.*.id])
  }

  depends_on = [
    aws_iam_role_policy_attachment.cluster_AmazonEKSClusterPolicy,
    aws_iam_role_policy_attachment.cluster_AmazonEKSServicePolicy,
  ]

  provisioner "local-exec" {
    command = "aws --region ${var.region} eks update-kubeconfig --name ${aws_eks_cluster.eks_cluster.name}"
  }

  provisioner "local-exec" {
    when    = destroy
    command = "kubectl config unset current-context"
  }

}
Every time we run the Terraform apply command, it walks through this file to determine what resources to create, which underlying AWS services to call to create them, and with which set of configuration they should be provisioned. This provides a clean way to orchestrate complex installations such as Kubeflow in a versioned, extensible template language.
Now that we have successfully installed Kubeflow either locally or on a managed Kubernetes control plane in the cloud, let us take a look at what tools are available on the platform.