

Exploring a Trained Neural Network
In this section, we'll explore a trained neural network. We'll do this to understand how a neural network solves a real-world problem (predicting handwritten digits) and to get familiar with the TensorFlow API. When exploring this neural network, we will recognize many components introduced in previous sections, such as nodes and layers, but we will also see many that we don't recognize (such as activation functions); we will explore those in further sections. We will then walk through an exercise on how that neural network was trained and then train that same network ourselves.
The network that we will be exploring has been trained to recognize numerical digits (integers) using images of handwritten digits. It uses the MNIST dataset (http://yann.lecun.com/exdb/mnist/), a classic dataset frequently used for exploring pattern recognition tasks.
The MNIST Dataset
The Modified National Institute of Standards and Technology (MNIST) dataset contains a training set of 60,000 images and a test set of 10,000 images. Each image contains a single handwritten number. This dataset, which is derived from one created by the US Government, was originally used to test different approaches to the problem of recognizing handwritten text by computer systems. Being able to do that was important for the purpose of increasing the performance of postal services, taxation systems, and government services. The MNIST dataset is considered too naïve for contemporary methods. Different and more recent datasets are used in contemporary research (for example, Canadian Institute for Advanced Research (CIFAR). However, the MNIST dataset is still very useful for understanding how neural networks work because known models can achieve a high level of accuracy with great efficiency.
Note
The CIFAR dataset is a machine learning dataset that contains images organized in different classes. Different than the MNIST dataset, the CIFAR dataset contains classes from many different areas including animals, activities, and objects. The CIFAR dataset is available at https://www.cs.toronto.edu/~kriz/cifar.html.
However, the MNIST dataset is still very useful for understanding how neural networks work because known models can achieve a high level of accuracy with great efficiency. In the following figure, each image is a separate 20x20-pixel image containing a single handwritten digit. You can find the original dataset at http://yann.lecun.com/exdb/mnist/.

Figure 1.9: An excerpt from the training set of the MNIST dataset
Training a Neural Network with TensorFlow
Now, let's train a neural network to recognize new digits using the MNIST dataset. We will be implementing a special-purpose neural network called a Convolutional Neural Network(CNN) to solve this problem (we will discuss those in more detail in later sections). Our complete network contains three hidden layers: two fully connected layers and a convolutional layer. The model is defined by the following TensorFlow snippet of Python code:
Note
The code snippet shown here uses a backslash ( \ ) to split the logic across multiple lines. When the code is executed, Python will ignore the backslash, and treat the code on the next line as a direct continuation of the current line.
model = Sequential()
model.add(Convolution2D(filters = 10, kernel_size = 3, \
                        input_shape=(28,28,1)))
model.add(Flatten())
model.add(Dense(128, activation = 'relu'))
model.add(Dropout(0.2))
model.add(Dense(10, activation = 'softmax'))
Note
Use the mnist.py file for your reference at https://packt.live/2Cuhj9w. Follow along by opening the script in your code editor.
We execute the preceding snippet of code only once during the training of our network.
We will go into a lot more detail about each one of those components using Keras in Chapter 2, Real-World Deep Learning: Predicting the Price of Bitcoin. For now, we'll focus on understanding that the network is altering the values of the Weights and Biases in each layer on every run. These lines of Python are the culmination of dozens of years of neural network research.
Now let's train that network to evaluate how it performs in the MNIST dataset.
Exercise 1.02: Training a Neural Network Using the MNIST Dataset
In this exercise, we will train a neural network for detecting handwritten digits from the MNIST dataset. Execute the following steps to set up this exercise:
- Open two Terminal instances.
- Navigate to https://packt.live/2BWNAWK. Ensure that your Python 3 virtual environment is active and that the requirements outlined in
requirements.txtare installed. - In one of them, start a TensorBoard server with the following command:
$ tensorboard --logdir logs/fit
The output is as follows:

Figure 1.10: The TensorBoard server
In the other, run the
mnist.pyscript from within that directory with the following command:$ python mnist.py
When you start running the script, you will see the progress bar as follows:

Figure 1.11: The result of the mnist.py script
- Open your browser and navigate to the TensorBoard URL provided when you start the server in step 3, it might be
http://localhost:6006/or similar. In the Terminal where you ran themnist.pyscript, you will see a progress bar with the epochs of the model. When you open the browser page, you will see a couple of graphs,epoch_accuracyandepoch_lossgraphs. Ideally, the accuracy should improve with each iteration and the loss should decrease with each iteration. You can confirm this visually with the graphs. - Click the
epoch_accuracygraph, enlarge it, and let the page refresh (or click on therefreshicon). You will see the model gaining accuracy as the epochs go by:
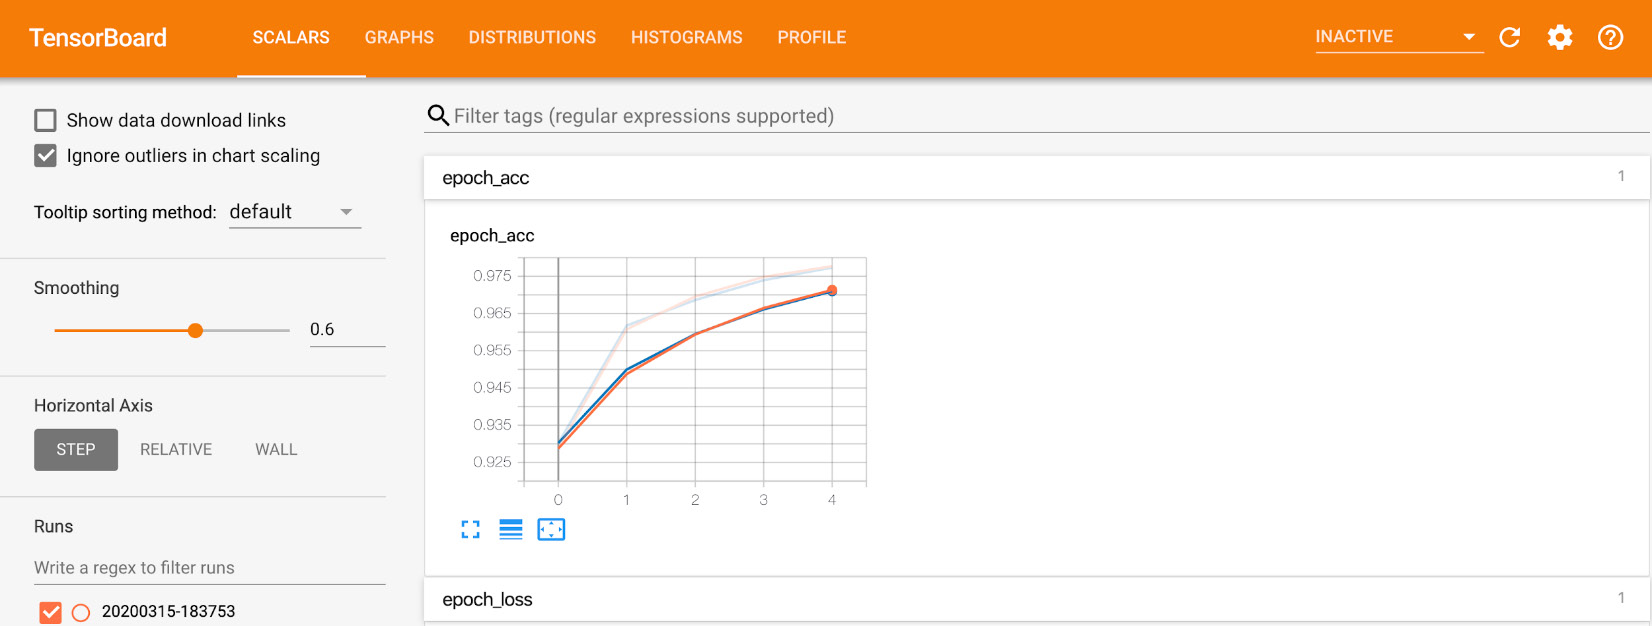
Figure 1.12: A visualization of the accuracy and loss graphs using TensorBoard
We can see that after about 5 epochs (or steps), the network surpassed 97% accuracy. That is, the network is getting 97% of the digits in the test set correct by this point.
Note
To access the source code for this specific section, please refer to https://packt.live/2Cuhj9w.
This section does not currently have an online interactive example, and will need to be run locally.
Now, let's also test how well those networks perform with unseen data.
Testing Network Performance with Unseen Data
Visit the website http://mnist-demo.herokuapp.com/ in your browser and draw a number between 0 and 9 in the designated white box:

Figure 1.13: A web application for manually drawing digits and testing the accuracy of two trained networks
Note
This web application we are using was created by Shafeen Tejani to explore whether a trained network can correctly predict handwritten digits that we create.
Source: https://github.com/ShafeenTejani/mnist-demo.
In the application, you can see the results of two neural networks – a Convolutional Neural Network (CNN) and a Fully Connected Neural Network. The one that we have trained is the CNN. Does it classify all your handwritten digits correctly? Try drawing numbers at the edge of the designated area. For instance, try drawing the number 1 close to the right edge of the drawing area, as shown in the following figure:
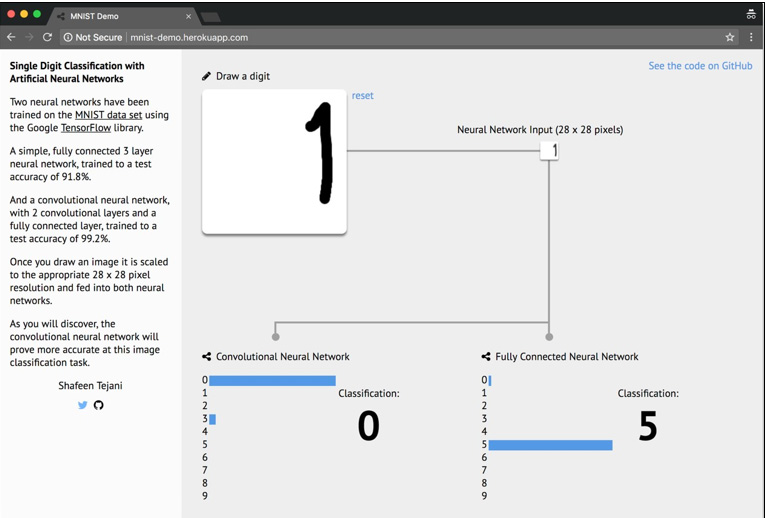
Figure 1.14: Both networks have a difficult time estimating values drawn on the edges of the area
In this example, we see the number 1 drawn to the right side of the drawing area. The probability of this number being a 1 is 0 in both networks.
The MNIST dataset does not contain numbers on the edges of images. Hence, neither network assigns relevant values to the pixels located in that region. Both networks are much better at classifying numbers correctly if we draw them closer to the center of the designated area. This is due to the fact that in the training set, we only had images with numbers drawn in the center of the image. This shows that neural networks can only be as powerful as the data that is used to train them. If the data used for training is very different than what we are trying to predict, the network will most likely produce disappointing results.
Activity 1.01: Training a Neural Network with Different Hyperparameters
In this section, we will explore the neural network that we trained during our work on Exercise 1.02, Training a Neural Network Using the MNIST Dataset, where we trained our own CNN on the MNIST dataset. We have provided that same trained network as binary files in the directory of this book. In this activity, we will just cover the things that you can do using TensorBoard and we will train several other networks by just changing some hyperparameters.
Here are the steps you need to follow:
- Open TensorBoard by writing the appropriate command.
- Open the TensorBoard accuracy graph and play with the values of smoothening sliders in scalar areas.
- Train another model by changing the hyperparameters.
- Try decreasing the learning rate and increasing the number of epochs.
- Now try to understand what effect this hyperparameter tuning has on the graphs generated on TensorBoard.
- Try increasing the learning rate and decreasing the number of epochs and repeat step 5.
Note:
The solution for this activity can be found via this link.