

Updating Tables
Over time, you may also need to modify a table by adding columns, adding new data, or updating existing rows. We will discuss how to do that in this section.
Adding and Removing Columns
To add new columns to an existing table, we use the ADD COLUMN statement, as shown in the following query:
ALTER TABLE {table_name}
ADD COLUMN {column_name} {data_type};
Say, for example, we wanted to add a new column to the products table that we will use to store the products' weights in kilograms called weight. We could do this by using the following query:
ALTER TABLE products
ADD COLUMN weight INT;
This query will make a new column called weight in the products table and will give it the integer data type so that only numbers can be stored within it.
If you want to remove a column from a table, you can use the DROP COLUMN statement:
ALTER TABLE {table_name}
DROP COLUMN {column_name};
Here, {table_name} is the name of the table you want to change, and {column_name} is the name of the column you want to drop.
Imagine that you decide to delete the weight column you just created. You could get rid of it using the following query:
ALTER TABLE products
DROP COLUMN weight;
Adding New Data
You can add new data to a table using several methods in SQL.
One method is to simply insert values straight into a table using the INSERT INTO…VALUES statement. It has the following structure:
INSERT INTO {table_name} (
  {column_1], {column_2}, …{column_last}
)
VALUES (
  {column_value_1}, {column_value_2},
   … {column_value_last}
);
Here, {table_name} is the name of the table you want to insert your data into, {column_1}, {column_2}, … {column_last} is a list of the columns whose values you want to insert, and {column_value_1}, {column_value_2}, … {column_value_last} is the list of row values you want to insert into the table. If a column in the table is not put into the INSERT statement, the column is assumed to have a NULL value.
As an example, let's say you wanted to insert a new scooter into the products table. This could be done with the following query:
INSERT INTO products (
  product_id, model, year,
  product_type, base_msrp,
  production_start_date, production_end_date
)
VALUES (
  13, 'Nimbus 5000', 2019,
  'scooter', 500.00,
  '2019-03-03', '2020-03-03'
);
This query changes the products table accordingly:

Figure 1.44: The products table after a successful single INSERT query
Another way to insert data into a table is to use the INSERT statement with a SELECT query using the following syntax:
INSERT INTO {table_name} ({column_1], {column_2}, …{column_last})
{select_query};
Here, {table_name} is the name of the table into which you want to insert the data, {column_1}, {column_2}, … {column_last} is a list of the columns whose values you want to insert, and {select query} is a query with the same structure as the values you want to insert into the table.
Take the example of the products_2014 table we discussed earlier. Imagine that instead of creating it with a SELECT query, we created it as a blank table with the same structure as the products table. If we wanted to insert the same data as we did earlier, we could use the following query:
INSERT INTO products 2014(
  product_id, model, year,
  product_type, base_msrp,
  production_start_date, production_end_date
)
SELECT
  *
FROM
  products
WHERE
  year=2014;
This query produces the following result:

Figure 1.45: The Products_2014 table after a successful INSERT INTO query
Next, we will learn how to update the content in a row.
Updating Existing Rows
Sometimes, you may need to update the values of the data present in a table. To do this, you can use the UPDATE statement:
UPDATE {table_name}
SET {column_1} = {column_value_1},
    {column_2} = {column_value_2},
    …
    {column_last} = {{column_value_last}}
WHERE
  {conditional};
Here, {table_name} is the name of the table with data that will be changed, {column_1}, {column_2},… {column_last} is the list of columns whose values you want to change, {column_value_1}, {column_value_2},… {column_value_last} is the list of new values you want to insert into those columns, and {WHERE} is a conditional statement like the one you would find in a SQL query.
To illustrate its use of the UPDATE statement, let's say that, for the rest of the year, the company has decided to sell all scooter models before 2018 for $299.99. We could change the data in the products table using the following query:
UPDATE
  products
SET
  base_msrp = 299.99
WHERE
  product_type = 'scooter'
  AND year<2018;
This query produces the following output:
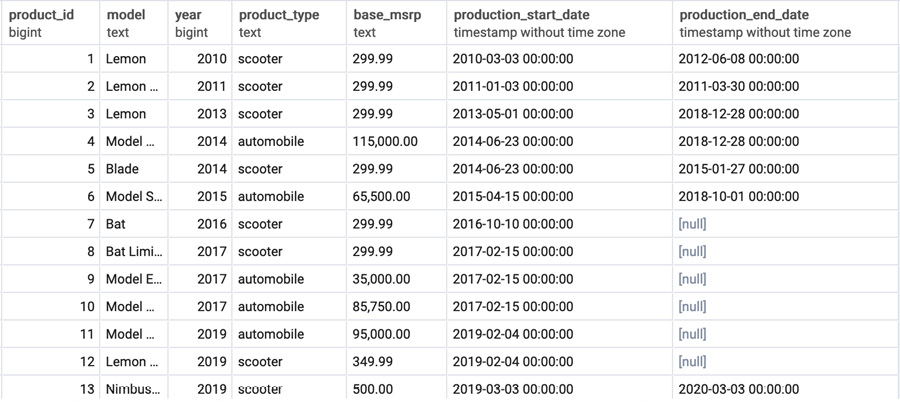
Figure 1.46: Successful update of the products table
We now take a closer look at how to use UPDATE statements in a SQL database in the next exercise.
Exercise 1.08: Updating the Table to Increase the Price of a Vehicle
In this exercise, we will update the data in a table using the UPDATE statement. Due to the higher cost of rare metals needed to manufacture an electric vehicle, the new 2019 Model Chi will need to undergo a price hike of 10%, the current price is 95,000. Update the products table to increase the price of this product.
Perform the following steps to complete the exercise:
- Open your favorite SQL client and connect to the
sqldadatabase. - Run the following query to update the price of
Model Chiin theproductstable:UPDATE products SET base_msrp = base_msrp*1.10 WHERE model='Model Chi' AND year=2019;
- Now write the
SELECTquery to check whether the price ofModel Chiin2019has been updated:SELECT * FROM products WHERE model='Model Chi' AND year=2019;
The following is the output of the preceding code:

Figure 1.47: The updated price of Model Chi in 2019
As you can see from the output, the price of Model Chi is now 104,500, which was previously 95,000.
Note
To access the source code for this specific section, please refer to https://packt.live/2XRJVl7.
In this exercise, we learned how to update a table using the UPDATE statement. We will now discuss how to delete tables and data from tables.