

Unit testing with Mocha and Chai
Writing tests for your application code is very important, but rarely talked about in most books. This is why we have decided to add this section on unit testing with Mocha. While you may not necessarily write verbose tests for every sample app you'll be building in this book, we will show you the basics you need to get by and you can even use them in your own project.
Testing, or automated testing, is used during development to check that our code actually behaves as expected. That is, you, the writer of a function, will generally know beforehand how the function behaves and therefore can test the outcome with the expected outcome.
Mocha is a popular and feature-rich test framework for JavaScript. It provides various testing functions, such as it and describe, which can be used to write and run tests automatically. The beautiful thing about Mocha is that it can run in both node and browser environments. Mocha also supports integration with various assertion libraries such as Chai (https://www.chaijs.com/), Expect.js (https://github.com/LearnBoost/expect.js), Should.js (https://github.com/shouldjs/should.js), or even Node.js' built-in assert (https://nodejs.org/api/assert.html) module. In this book, we'll use the Chai assertion library, as it is one of the most commonly used assertion libraries with Mocha.
Setting up a test environment
Before we begin writing tests, we'll set up a basic Node.js project. Perform the following steps to achieve this:
- In your current working directory, create a new folder called
unit-testing:$ mkdir unit-testing $ cd unit-testing
- Initialize a new Node.js project using
npm, as shown in the following command:$ npm init -y
- Install Mocha and Chai as development dependencies:
$ npm install mocha chai --save-dev
- Following successful installation, open your
package.jsonfile and change thetestcommand inscriptsto the following:{ ... "scripts": { "test": "mocha" }, ... }This means that we can run tests by running the
npm run testcommand in the terminal. - Create two folders,
srcandtest. Thesrcfolder will contain our source code/scripts, while thetestfolder will contain corresponding tests for our code. Your project tree should look like the following after creating the folders:├── package-lock.json ├── package.json ├── src └── test
- In the
srcfolder, create a script calledutils.js, and add the following functions:exports.addTwoNumbers = function (num1, num2) { if (typeof num1 == "string" || typeof num2 == "string"){ throw new Error("Cannot add string type to number") } return num1 + num2; }; exports.mean = function (numArray) { let n = numArray.length; let sum = 0; numArray.forEach((num) => { sum += num; }); return sum / n; };The preceding functions perform some basic computation. The first one adds two numbers and returns the result, while the second function computes the mean of numbers in an array.
Note
We are writing pre-ES16 JavaScript here. This is because we do not plan to set up any transpiler for this sample project. In a project using modern JavaScript, you'll typically transpile source code before testing it.
- In your
testfolder, add a new file, also calledutils.js. This naming convention is recommended, as different files should bear the same name as their corresponding source code. In theutils.jsfile in yourtestfolder, add the following code:const chai = require("chai"); const expect = chai.expect; const utils = require("../src/utils"); describe("Test addition of two numbers", () => { it("should return 20 for addition of 15 and 5", () => { expect(utils.addTwoNumbers(15, 5)).equals(20); }); it("should return -2 for addition of 10 and -12", () => { expect(utils.addTwoNumbers(10, -12)).equals(-2); }); it("should throw an error when string data type is passed", () => { expect(() => utils.addTwoNumbers("One", -12)).to.throw( Error, "Cannot add string type to number" ); }); }); describe("Test mean computation of an array", () => { it("should return 25 as mean of array [50, 25, 15, 10]", () => { expect(utils.mean([50, 25, 15, 10])).equals(25); }); it("should return 2.2 as mean of array [5, 2, 1, 0, 3]", () => { expect(utils.mean([5, 2, 1, 0, 3])).equals(2.2); }); });In the first three lines of the preceding code snippet, we are importing
chaiandexpect, as well as theutilsscripts, which contain our source code.Next, we use Mocha's
describeanditfunctions to define our test cases. Note that we have twodescribefunctions corresponding to the two functions we have in our source code. This means that eachdescribefunction will contain individual unit tests that test different aspects of our code.The first
describefunction tests theaddTwoNumberfunction and includes three unit tests, one of which tests whether the correct error is thrown on a passing string data type. The seconddescribefunction tests themeanfunction by providing different values. - To run our test, go to your terminal and run the following command:
$ npm test
This command executes the script test defined in your
package.jsonfile, and outputs a formatted test case report, as shown in the following screenshot:

Figure 1.4 – Mocha test output showing all tests passed
By following the preceding steps, we were able to write and run some tests that passed on the first run. This may not be the case most times, as your test will generally fail a lot before passing, especially when you have numerous unit tests for different edge cases.
As an example, we'll add a new test case that expects an error when the array passed to the mean function contains no element.
In the test script, under the second describe function, add the following unit test:
...
 it("should throw error on empty array arg", () => {
    expect(() => utils.mean([])).to.throw(Error, "Cannot compute mean of empty array")
  });
...
By running the test again, we'll see the following error:
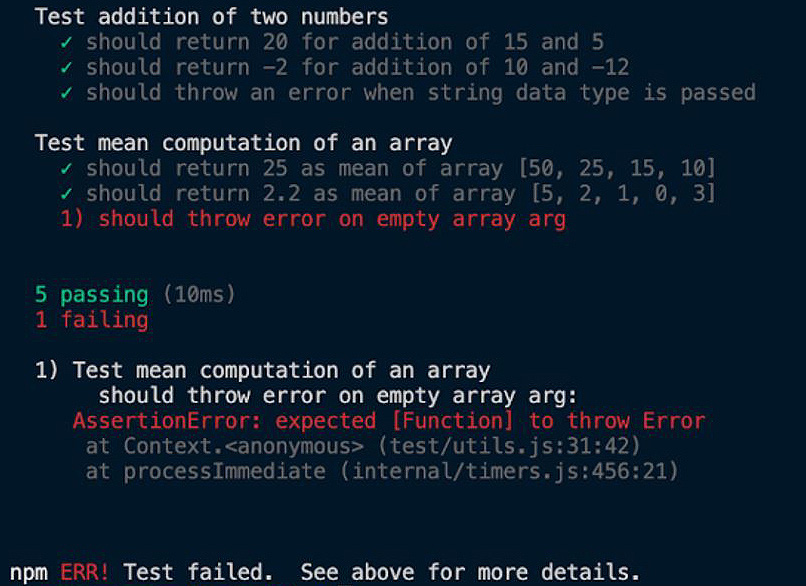
Figure 1.5 – Mocha test output showing one failed test
The error message provided by Mocha tells us that our function is expected to throw an error when an empty array is passed, but it is currently not doing that. To fix this error, we'll go to our source code and update the mean function, as shown in the following code block:
exports.mean = function (numArray) {
  if (numArray.length == 0){
    throw new Error("Cannot compute mean of empty array")
  }
  let n = numArray.length;
  let sum = 0;
  numArray.forEach((num) => {
    sum += num;
  });

  return sum / n;
};
Now, if we run the test again, we should see it pass successfully:
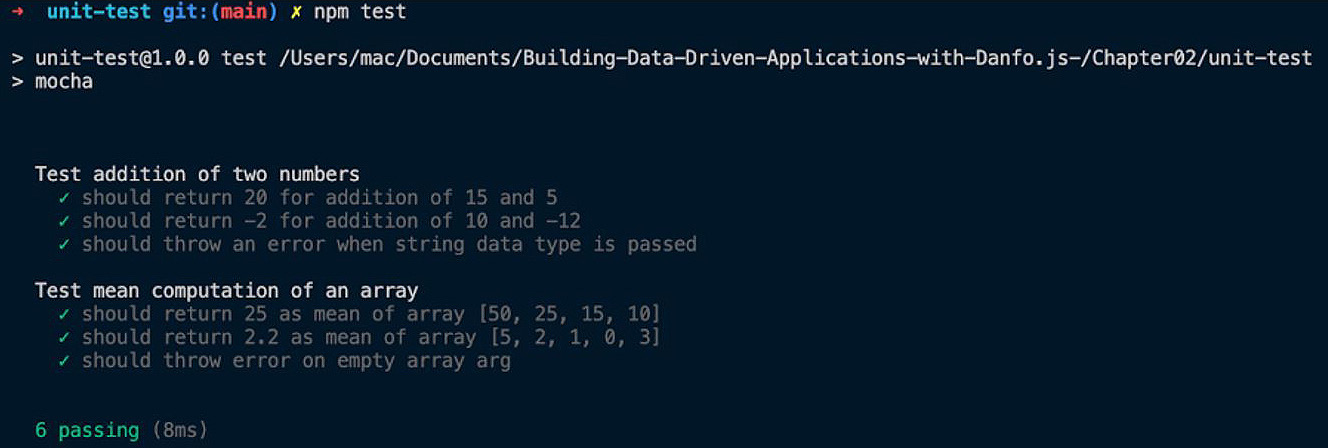
Figure 1.6 – Mocha test output showing that all tests passed
Further reading
Mocha is versatile and provides support for almost all test cases and scenarios you'll encounter. To learn more, you can visit the official documentation here: https://mochajs.org/.
Chai, on the other hand, provides numerous assertion statements and functions that you can use to enrich your test. You can learn more about these assertions here: https://www.chaijs.com/api/.
Congratulations on making it to the end of this chapter! It was a lengthy one, but the concepts covered are important, as they will help you build better data-driven products, as you'll see in future chapters.