

Getting started with workspaces, projects, experiments, and panels
Comet has a nested architecture, as shown in the following figure:
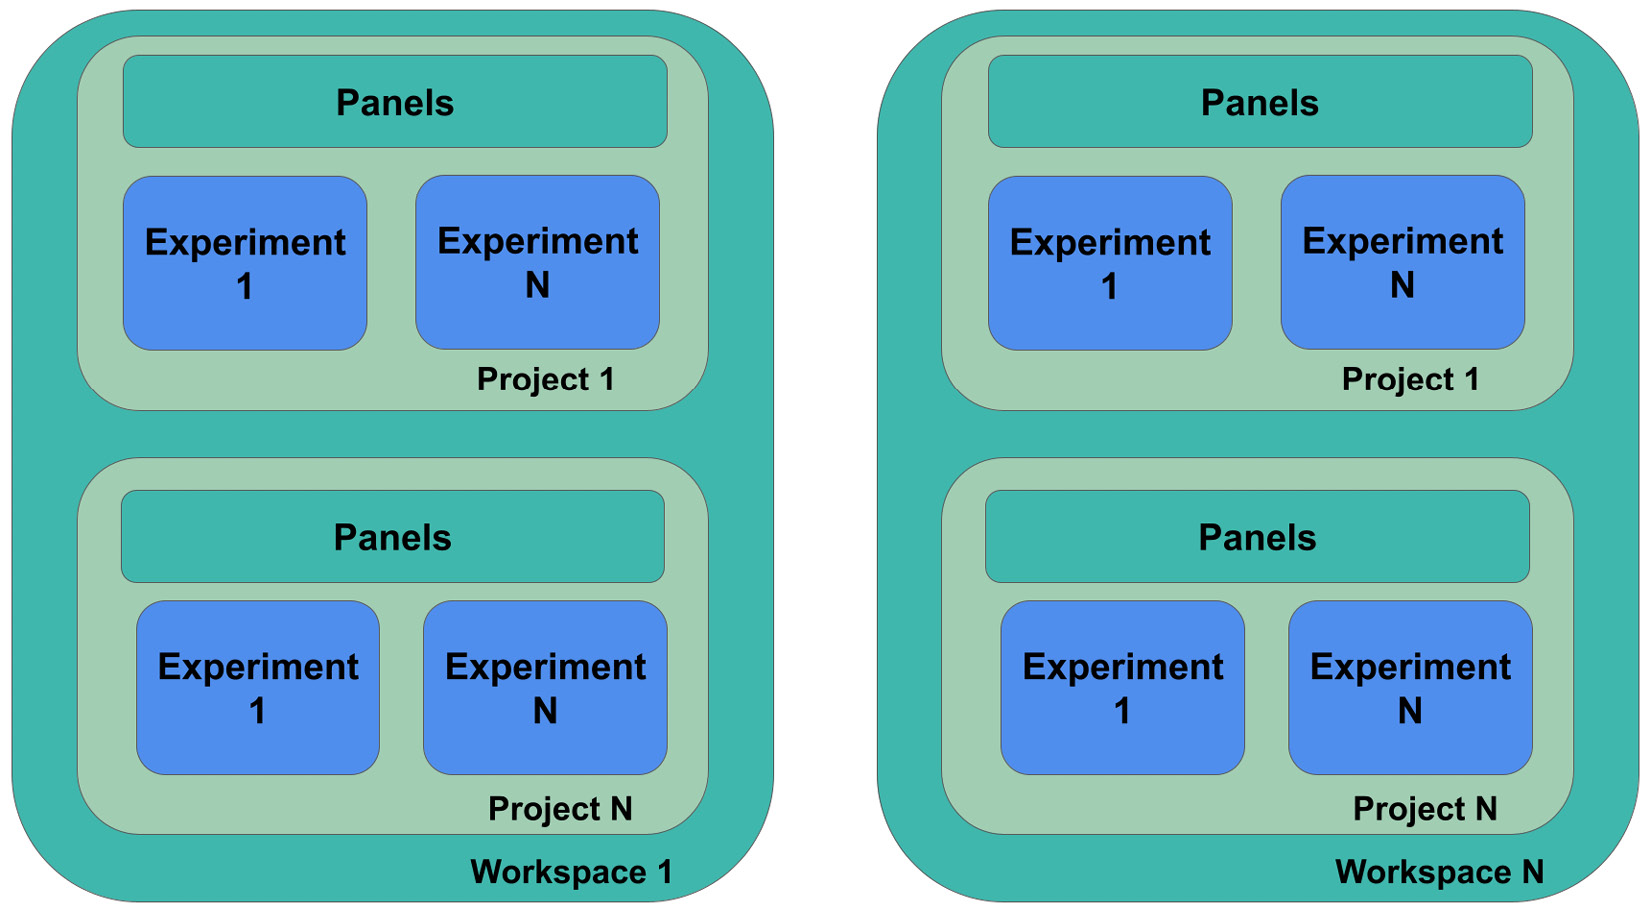
Figure 1.2 – The modular architecture in Comet
The main components of the Comet architecture include the following:
- Workspaces
- Projects
- Experiments
- Panels
Let's analyze each component separately, starting with the first one – workspaces.
Workspaces
A Comet workspace is a collection of projects, private or shared with your collaborators. When you create your account, Comet creates a default workspace, named with your username. However, you can create as many workspaces as you want and share them with different collaborators.
To create a new workspace, we can perform the following operations:
- Click on your username on the left side of the page on the dashboard.
- Select Switch Workspace | View all Workspaces.
- Click on the Create a workspace button.
- Enter the workspace name, which must be unique across the whole platform. We suggest prepending your username to the workspace name, thus avoiding conflicting names.
- Click the Save button.
The following figure shows an account with two workspaces:
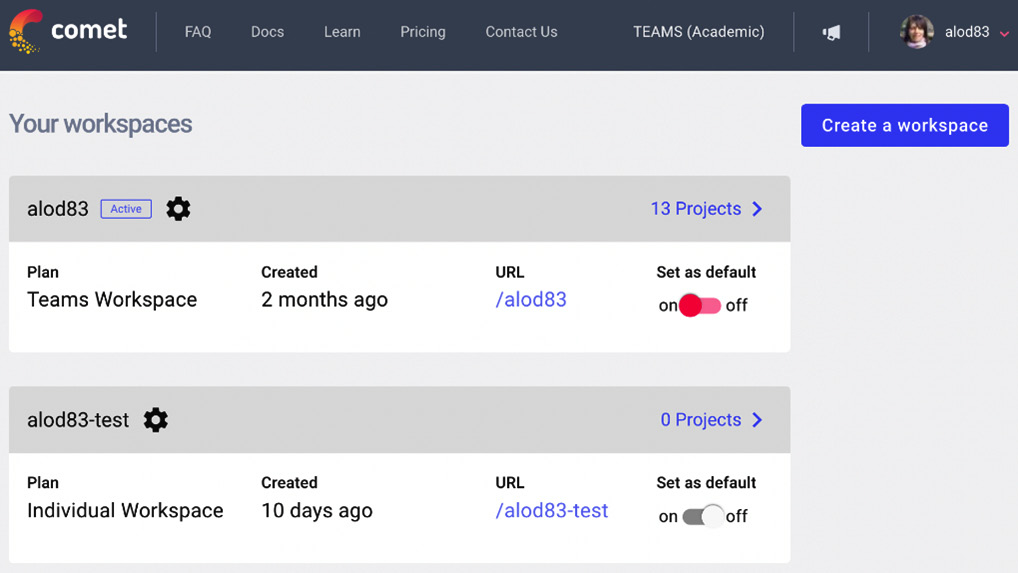
Figure 1.3 – An account with two workspaces
In the example, there are two workspaces, alod83, which is the default and corresponds to the username, and alod83-test.
Now that we have learned how to create a workspace, we can move on to the next feature: projects.
Projects
A Comet project is a collection of experiments. A project can be either private or public. A private project is visible only by the owner and their collaborator, while a public project can be seen by everyone.
In Comet, you can create as many projects as you want. A project is identified by a name and can belong only to a workspace, and you cannot move a project from one workspace to another.
To create a project, we perform the following operations:
- Launch the browser and go to https://www.comet.ml/.
- If you have not already created an account, click on the top-right Create a free account button and follow the procedure. If you already have an account, jump directly to step 3.
- Log in to the platform by clicking the Login button located in the top-right part of the screen.
- Select a Workspace.
- Click on the new project button in the top-right corner of the screen.
- A new window opens where you can enter the project information, as shown in the following figure:
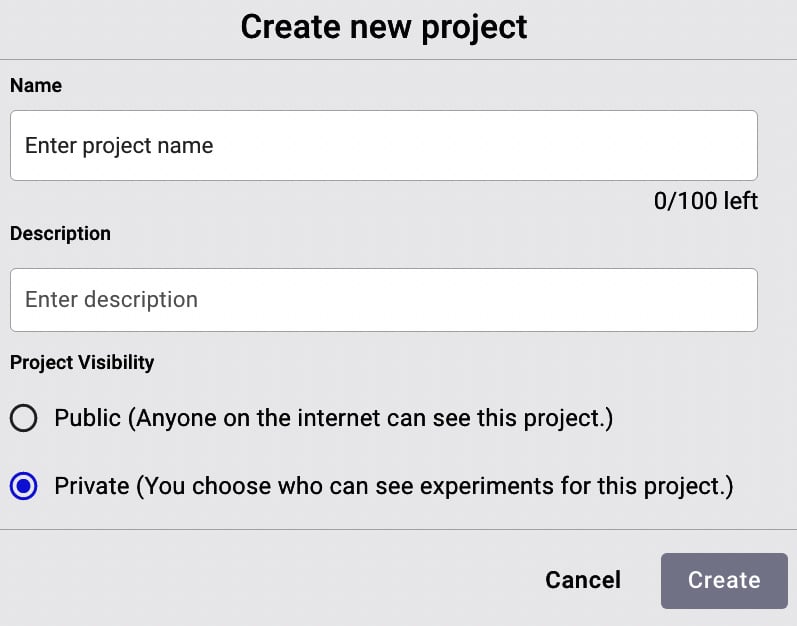
Figure 1.4 – The Create new project window
The window contains three sections: Name, where you write the project name, Description, a text box where you can provide a summary of the project, and Project Visibility, where you can decide to make the project either private or public. Enter the required information.
- Click on the Create button.
The following figure shows the just-created Comet dashboard:
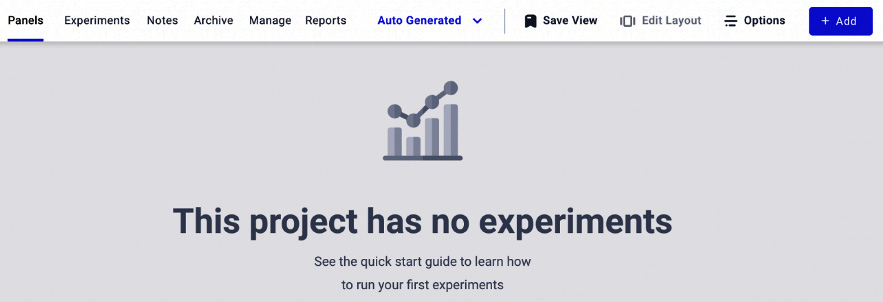
Figure 1.5 – A screenshot of an empty project in Comet
The figure shows the empty project, with a top menu where you can start adding objects.
Experiments
A Comet experiment is a process that tracks how some defined variables vary while changing the underlying conditions. An example of an experiment is hyperparameter tuning in a machine learning project. Usually, an experiment should include different runs that test different conditions.
Comet defines the Experiment class to track experiments. All the experiments are identified by the same API key. Comet automatically generates an API key. However, if for some reason you need to generate a new API key, you can perform the following steps:
- Click on your username on the left side of the page on the dashboard.
- Select Settings from the menu.
- Under the Developer Information section, click Generate API Key. This operation will override the current API key.
- Click Continue on the pop-up window. You can copy the value of the new API key by clicking on the API Key button.
We can add an experiment to a project by taking the following steps:
- Click on the Add button, located in the top-right corner.
- Select New Experiment from the menu.
- Copy the following code (Ctrl + C on Windows/Linux environments or Cmd + C on macOS) and then click on the Done button:
# import comet-ml at the top of your file
from comet-ml import Experiment
# Create an experiment with your api key
experiment = Experiment(
    api_key="YOUR API KEY",
    project_name="YOUR PROJECT NAME",
    workspace="YOUR WORKSPACE",
)
The previous code creates an experiment in Comet. Comet automatically sets the api_key, project_name, and workspace variables. We can paste the previous code after the code we have already written to load and clean the dataset.
In general, storing an API key in code is not secure, so Comet defines two alternatives to store the API key. Firstly, in a Unix-like console, create an environment variable called COMET_API_KEY, as follows:
export COMET_API_KEY="YOUR-API-KEY"
Then, you can access it from your code:
import os
API_KEY = os.environ['COMET_API_KEY']
The previous code uses the os package to extract the COMET_API_KEY environment variable.
As a second alternative, we can define a .comet.config file and put it in our home directory or our current directory and store the API key, as follows:
[comet]
api_key=YOUR-API-KEY
project_name=YOUR-PROJECT-NAME,
workspace=YOUR-WORKSPACE
Note that the variable values should not be quoted or double-quoted. In this case, when we create an experiment, we can do so as follows:
experiment = Experiment()
We can use the Experiment class to track DataFrames, models, metrics, figures, images, metrics, and artifacts. For each element to be tracked, the Experiment class provides a specific method. Every tracking function starts with log_. Thus, we have log_metric(), log_model(), log_image(), and so on.
To summarize it in one sentence, experiments are the bridge between your code and the Comet platform.
Experiments can also be used as context managers, for example, to split the training and test phases into two different contexts. We will discuss these aspects in more detail in Chapter 3, Model Evaluation in Comet.
Now that you are familiar with Comet experiments, we can describe the next element – panels.
Panels
A Comet panel is a visual display of data. It can be either static or interactive. You can choose whether to make a panel private, share it with your collaborators, or make it public. While charts refer to a single experiment, panels can display data across different experiments, so we can define a panel only within the Comet platform and not in our external code.
Comet provides different ways to build a panel:
- Use a panel template.
- Write a custom panel in Python.
- Write a custom panel in JavaScript.
Let's analyze the three ways separately, starting with the first one: Use a panel template.
From the main page of our project, we can perform the following operations:
- Click on the Add button located in the top-right corner of the page.
- Select New Panel.
- Choose the panel and select Add in the new window, as shown in the following figure:
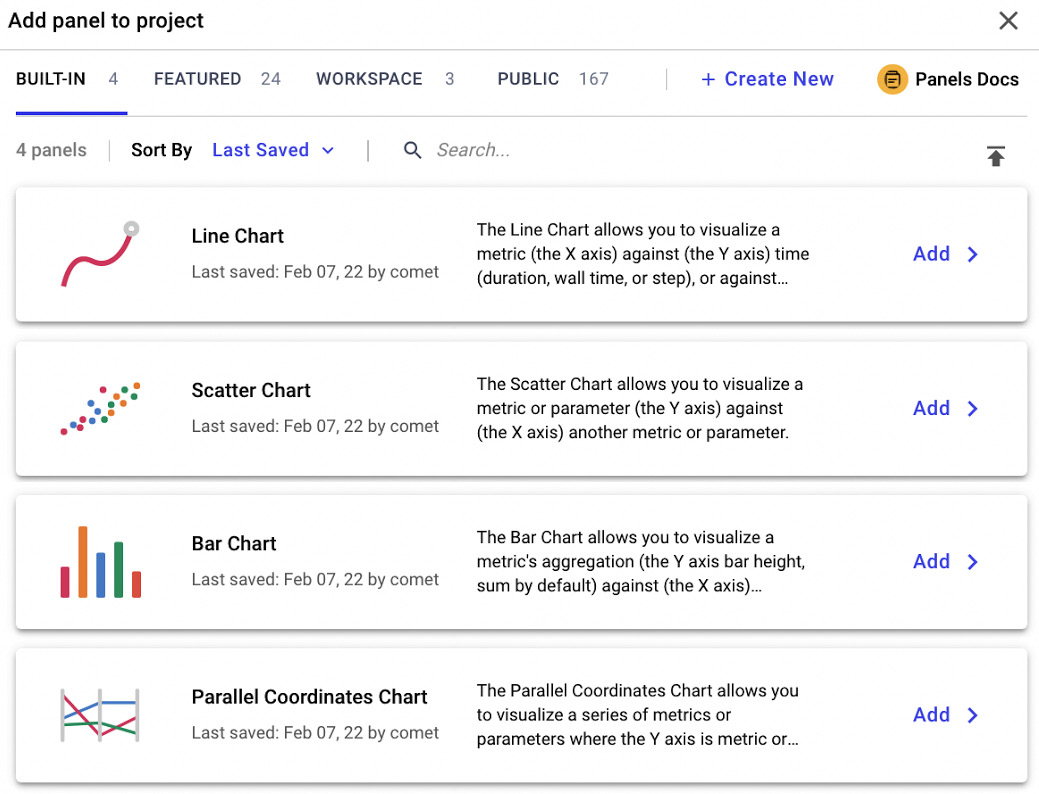
Figure 1.6 – The main window to add a panel in Comet
The figure shows the different types of available panels, divided into four main categories, identified by the top menu:
- BUILT-IN – Comet provides some basic panels.
- FEATURED – The most popular panels implemented by the Comet community and made available to everyone.
- WORKSPACE – Your private panels, if any.
- PUBLIC – All the public panels implemented by Comet users.
We can configure a built-in panel by setting some parameters in the Comet interface, as shown in the following figure:
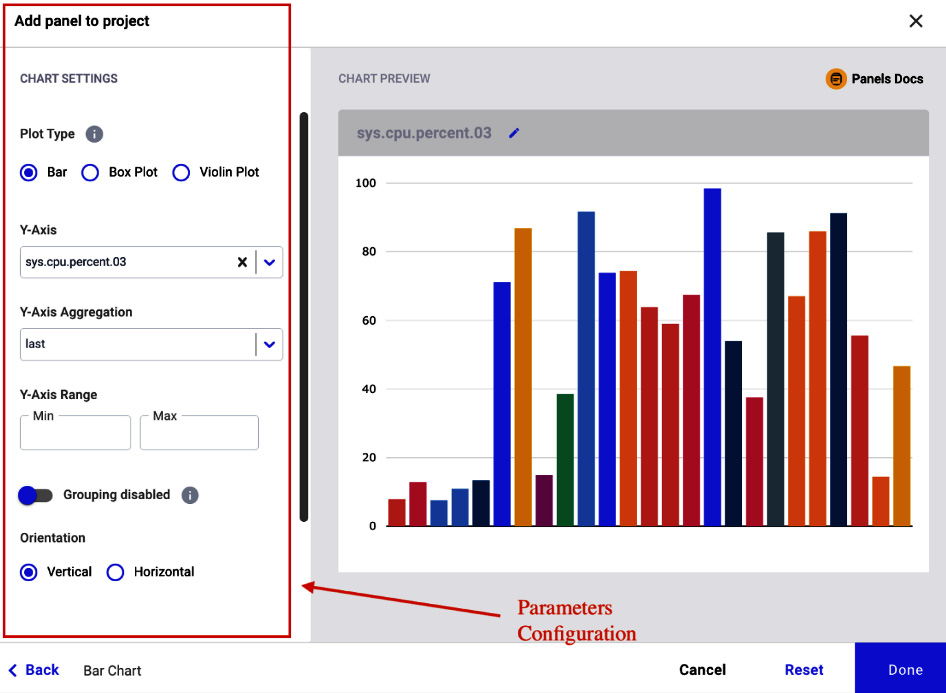
Figure 1.7 – Parameter configuration in a built-in Comet panel
The figure shows the form for parameter configuration on the left and a preview of the panel on the right.
While we can configure built-in panels through the Comet interface, we need to write some code to use the other categories of panels – featured, workspace, and public. In these cases, we select the type of panel, and then we configure the associated parameters, in the form of key-value pairs, as shown in the following figure:
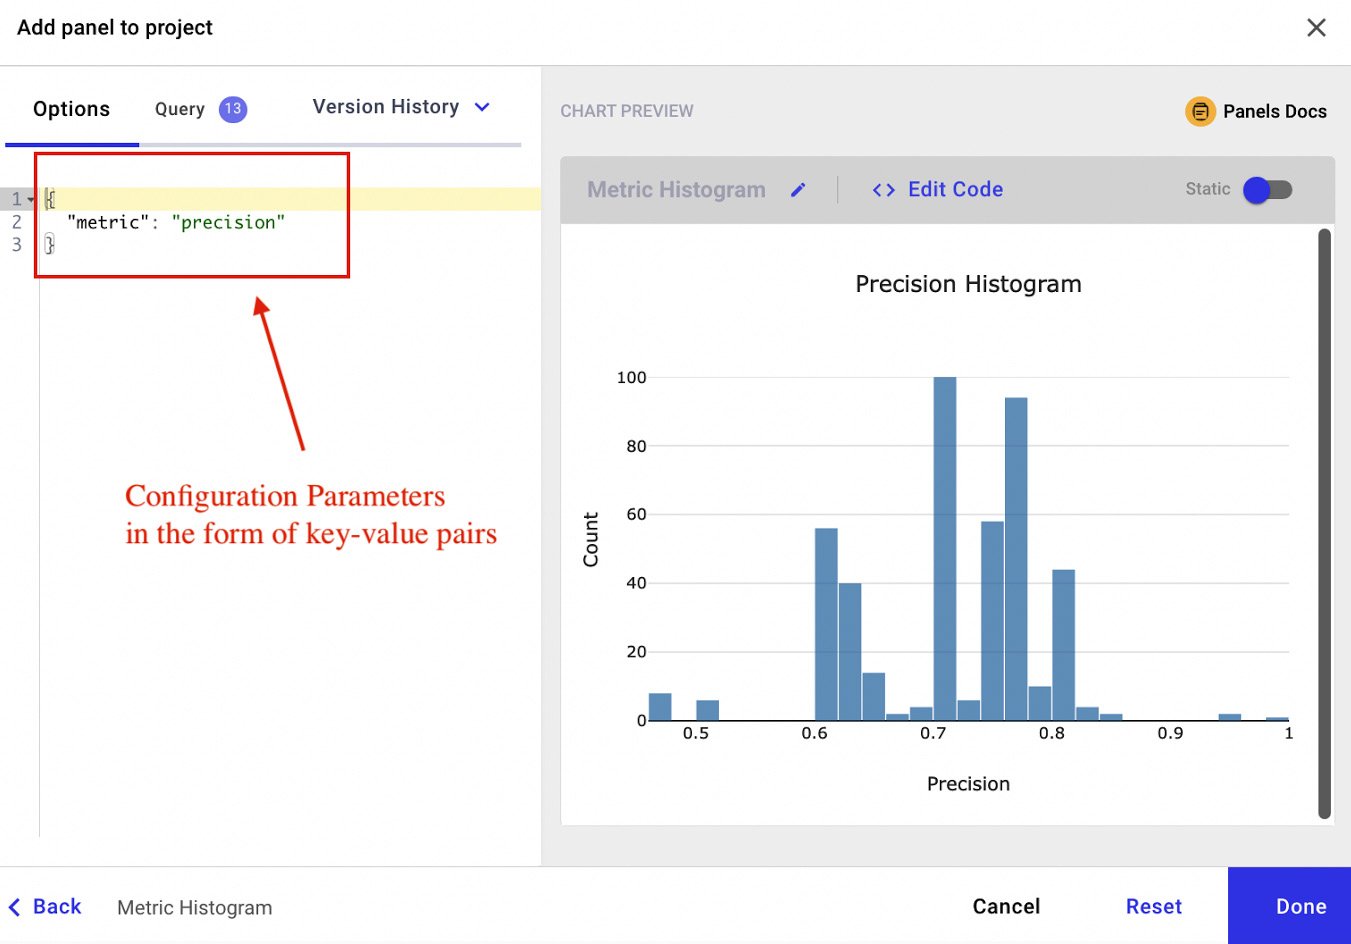
Figure 1.8 – Parameters configuration in a featured, workspace, or public panel
On the left, the figure shows a text box, where we can insert the configuration parameters in the form of a Python dictionary:
{"key1" : "value1",
 "key2" : "value2",
 "keyN" : "valueN"
}
Note the double quotes for the strings. The key-value pairs depend on the specific panel.
The previous figure also shows a preview of the panel on the right, with the possibility to access the code that generates the panel directly, through the Edit Code button.
So far, we have described how to build a panel through an existing template. Comet also provides the possibility to write custom panels in Python or JavaScript. We will describe this advanced feature in the next chapter, on EDA in Comet.
Now that you are familiar with the Comet basic concepts, we can implement two examples that use Comet:
Let's start with the first use case – tracking images in Comet.