The coding style is the standard, tried-and-true method of object-oriented programing and is the variable naming convention for functions and variables.
Fun fact
The majority of Python code you find on blogs and websites is snippets. Therefore, they are not very helpful in studying fundamental topics such as data augmentation. In addition, Python on a Notebook induces lazy practices because programmers think each Notebook’s code cell is a separate snippet from the whole. In reality, the entire Python Notebook is one program. Chief among the benefits of using best programming practices is that it’s easier to learn and retain knowledge. A programming style may include many standard best practices, but it is also unique to your programming style. Use it to your advantage by learning new concepts and techniques faster, such as how to write data augmentation code.
There are quite a few topics in this section. In particular, we will cover the following concepts:
- Source control
- The
PackTDataAug class
- Naming convention
- Extend base class
- Referencing library
- Exporting Python code
- Pluto
Let’s begin with source control.
Source control
The first rule of programming is to manage the source code version. It will help you answer questions such as, What did you code last week?, What was fixed yesterday?, What new feature was added today?, and How do I share my code with my team?
The Git process manages the source code for one person or a team. Among many of Git's virtues is the freedom to make mistakes. In other words, Git allows you to try something new or break the code because you can always roll back to a previous version.
For source control, GitHub is a popular website, and Bitbucket comes in second place. You can use the Git process from a command-line terminal or Git applications, such as GitHub Desktop.
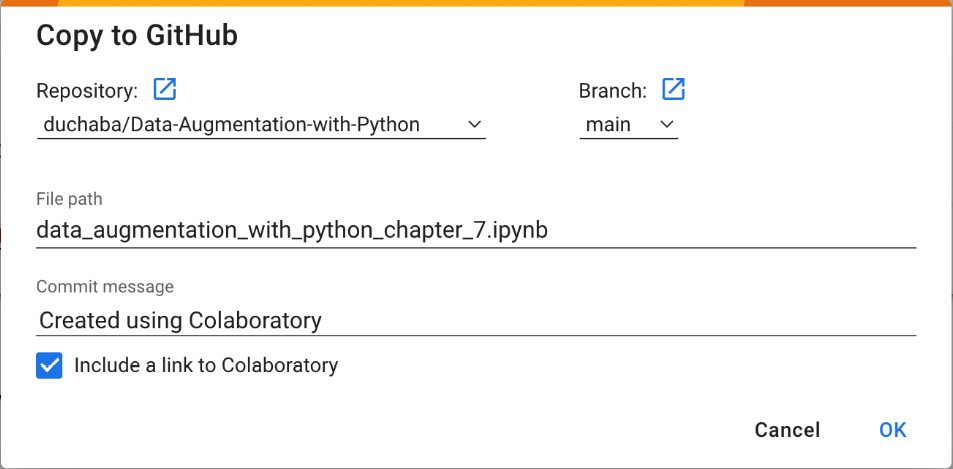
Google Colab has a built-in Git feature. You have seen how easy it is to load a Python Notebook on Google Colab, and saving it is just as easy. In Git, you must commit and push. The steps are as follows:
- From the Colab menu, click on File.
- Select Save a copy in GitHub.
- Enter your GitHub URL in the Repository field and select the code branch.
- Enter the commit message.
- Click OK:
Figure 1.6 – Google Colab – saving to GitHub
Figure 1.6 shows the interface between Google Colab Python Notebook and GitHub. Next, we’ll look at the base class, PacktDataAug.
The PacktDataAug class
The code for the base class is neither original nor unique to this book. It is standard Python code for constructing an object-oriented class. The name of the object is different for every project. For this book, the name of the class is PacktDataAug.
Every chapter begins with this base class, and we will add new methods to the object using a Python decorator as we learn new concepts and techniques for augmenting data.
This exercise's Python code is in the Python Notebooks and on this book’s GitHub repository. Thus, I will not copy or display the complete code in this book. I will show relevant code lines, explain their significance, and rely on you to study the entire code in the Python Notebooks.
The definition of the base class is as follows:
# class definition
class PacktDataAug(object):
  def __init__(self,
    name="Pluto",
    is_verbose=True,
    args, **kwargs):
PacktDataAug is inherent from the based Object class, and the definition has two optional parameters:
- The
name parameter is a string, and it is the name of your object. It has no essential function other than labeling your object.
is_verbose is a Boolean that tells the object to print the object information during instantiation.
The next topic we will cover is the code naming convention.
Naming convention
The code naming convention is as follows:
- The function’s name will begin with an action verb, such as
print_, fetch_, or say_.
- A function that returns a Boolean value begins with
is_ or has_.
- Variable names begin with a noun, not an action verb.
- There is a heated discussion in the Python community on whether to use camelCase – for example,
fetchKaggleData() – or use lowercase with underscores – for example, fetch_kaggle_data(). This book uses lowercase with underscores.
- Functions or variables that begin with underscores are temporary variables or helper functions – for example,
_image_auto_id, _drop_images(), and _append_full_path().
- Variable or function abbreviations are sparingly used because the descriptive name is easier to understand. In addition, Colab has auto-complete functionality. Thus, it makes using long, descriptive names easier to type with fewer typos.
The code for instantiating a base class is standard Python code. I used pluto as the object name, but you can choose any name:
# Instantiate Pluto
pluto = PackTDataAug("Pluto")
The output is as follows:
--------------------------- : ---------------------------
            Hello from class : <class '__main__.PacktDataAug '> Class: PacktDataAug
                   Code name : Pluto
                   Author is : Duc Haba
---------------------------- : ---------------------------
The base class comes with two simple helper methods. They are both for printing pretty – that is, making the printing of status or output messages neatly centered.
The self._ph() method prints the header line with an equal number of dashes on both sides of the colon character, while the self._pp() function takes two parameters, one for the left-hand side and the other for the right-hand side.
You have already seen the result of instantiating pluto with the default parameter of is_verbose=True. As standard practice, I will not print the complete code in this book. I am relying on you to view and run the code in the Python Notebook, but I will make an exception for this chapter and show you the snippet of code for the is_verbose option. This demonstrates how easy it is to read Python code in the Python Notebook. The snippet is as follows:
# code snippet for verbose option
if (is_verbose):
  self._ph()
  self._pp(f"Hello from class {self.__class__} Class: {self.__class__.__name__}")
  self._pp("Code name", self.name)
  self._pp("Author is", self.author)
  self._ph()
Fun fact
This book’s primary goal is to help you write clean and easy-to-understand code and not write compact code that may lead to obfuscation.
Another powerful programming technique is using a Python decorator to extend the base class.
Extend base class
This book has been designed as an interactive journey where you learn and discover new data augmentation concepts and techniques sequentially, from image, text, and audio data to tabular data. The object, pluto, will acquire new methods as the journey progresses. Thus, having a technique to extend the class with new functions is essential. In contrast, providing the fully built class at the beginning of this book would not allow you to embark on the learning journey. Learning by exploration helps you retain knowledge longer compared to learning by memorization.
The @add_method() decorator function extends any class with a new function.
Here is an excellent example of extending the base class. The root cause of Python’s most common and frustrating error is having a different library version from the class homework or code snippet copy from the Python community. Python data scientists seldom write code from scratch and rely heavily on existing libraries. Thus, printing the Python library versions on a local or cloud-based server would save hours of aggravating debugging sessions.
To resolve this issue, we can extend the PacktDataAug class or use the journey metaphor of teaching Pluto a new trick. The new method, say_sys_info(), prints this book’s expected system library version on the left-hand side and the actual library version on your local or remote servers on the right-hand side. The decorator’s definition for extending the Pluto class is as follows:
# using decorator to add new method
@add_method(PackTDataAug)
def say_sys_info(self):
After running the aforementioned code cell, you can ask Pluto to print the library version using the following command:
# check Python and libraries version
pluto.say_sys_info()
The results are as follows:
---------------------------- : ---------------------------
                 System time : 2022/07/23 06:36
                    Platform : linux
     Pluto Version (Chapter) : 1.0
            Python (3.7.10)  : actual: 3.7.12 (default, Apr 24 2022, 17:11:25) [GCC 7.5.0]
            PyTorch (1.11.0) : actual: 1.12.1+cu113
              Pandas (1.3.5) : actual: 1.3.5
                 PIL (9.0.0) : actual: 7.1.2
          Matplotlib (3.2.2) : actual: 3.2.2
                   CPU count : 2
                  CPU speed : NOT available
---------------------------- : ---------------------------
If your result contains libraries that are older versions than this book’s expected value, you might run into bugs while working through the lessons. For example, the Pillow (PIL) library version is 7.1.2, which is lower than the book’s expected version of 9.0.0.
To correct this issue, run the following code line in the Notebook to install the 9.0.0 version:
# upgrade to Pillow library version 9.0.0
!pip install Pillow==9.0.0
Rerunning pluto.say_sys_info() should now show the PIL version as 9.0.0.
Fun challenge
Extend Pluto with a new function to display the system’s GPU total RAM and available free RAM. The function name can be fetch_system_gpu_ram(). A hint is to use the torch library and the torch.to cuda.memory_allocated() and torch.cuda.memory_reserved() functions. You can use this technique to extend any Python library class. For example, to add a new function to the numpy library, you can use the @add_method(numpy) decorator.
There are a few more programming-style topics. Next, you’ll discover how best to reference a library.
Referencing a library
Python is a flexible language when it comes to importing libraries. There are aliases and direct imports. Here are a few examples of importing the same function – that is, plot():
# display many options to import a function
from matplotlib.pyplot import plot
import matplotlib.pyplot
import matplotlib.pyplot as plt # most popular
# more exotics importing examples
from matplotlib.pyplot import plot as paint
import matplotlib.pyplot as canvas
from matplotlib import pyplot as plotter
The salient point is that all these examples are valid, and that is both good and bad. It enables flexibility, but at the same time, sharing code snippets online or maintaining code can lead to frustration when they break. Python often gives an unintelligible error message when the system cannot locate the function. To fix this bug, you need to know which library to upgrade. The problem is compounded when many libraries use the same function name, such as the imread() method, which appears in at least four libraries.
By adhering to this book’s programming style, when the imread() method fails, you know which library needs to be upgraded or, in rare conditions, downgraded. The code is as follows:
# example of use full method name
import matplotlib
matplotlib.pyplot.imread()
matplotlib might need to be upgraded, or equally, you might be using the wrong imread() method. It could be from OpenCV version 4.7.0.72. Thus, the call should be cv2.imread().
The next concept is exporting. It may not strictly belong to the programming style, but it is necessary if you wish to reuse and add extra functions to this chapter’s code.
Exporting Python code
This book ensures that every chapter has its own Python Notebook. The advanced image, text, and audio chapters need the previous chapter's code. Thus, it is necessary to export the selected Python code cells from the Python Notebook.
The Python Notebook has both markup and code cells, and not all code cells must be exported. You only need to export code cells that define new functions. For the code cells that you want to export to a Python file, use the Python Notebook %%writefile file_name.py magic command at the beginning of the code cells and %%writefile -a file_name.py to append additional code to the file. file_name is the name of the Python file – for example, pluto_chapter_1.py.
The last and best part of the programming style is introducing Pluto as your coding companion.
Pluto
Pluto uses a whimsical idea of teaching by including dialogs with an imaginary digital character. We can give Pluto tasks to complete. It has a friendly tone, and sometimes the author addresses you directly. It moves away from the direct lecturing format. There are scholarly papers that explain how lecturing in monologue is not the optimal method for learning new concepts, such as the article Why Students Learn More From Dialogue- Than Monologue-Videos: Analyses of Peer Interactions by Michelene T. H. Chi, Seokmin Kang, and David L. Yaghmourian that was published by the Journal of the Learning Sciences in 2016.
You are most likely reading this book alone rather than engaging in a group, learning how to write augmentation code together. Thus, creating an imaginary companion as the instantiated object might infuse imagination. It makes writing and reading more accessible – for example, the pluto.fetch_kaggle_data() function is self-explanatory, and little additional documentation is needed. It simplifies Python code to a common subject and action-verb-sentence format.
Fun challenge
Change the object name from Pluto to your favorite canine name, such as Biggy, Sunny, or Hanna. It will make the learning process more personal. For example, change pluto = PackTDataAug("Pluto") to hanna = PackTDataAug("Hanna").
Fair warning: Do not choose your beloved cat as the object’s name because felines will not listen to any commands. Imagine asking your cat to play fetch.


 Free Chapter