

Now that we have our project set up, let's get started with creating our player:
Double-click on the
Spritesfolder. Once inside, go to your operating system's browser window, open up theChapter 1/Assetsfolder that we provided, and drag theplayerShip.pngfile into the folder to move it into our project. Once added, confirm that the image is Sprite by clicking on it and confirming from the Inspector tab that Texture Type isSprite(Sprite (2D and UI) in 4.6). If it isn't, simply change it to that, and then click on the Apply button. Have a look at the following screenshot:Note
If you do not want to drag-and-drop the files, you can also right-click within the folder in the Project Browser (bottom-left corner) and select Import New Asset to select a file from a folder to bring it in.

Note
The art assets used for this tutorial were provided by Kenney. To see more of their work, please check out www.kenney.nl.
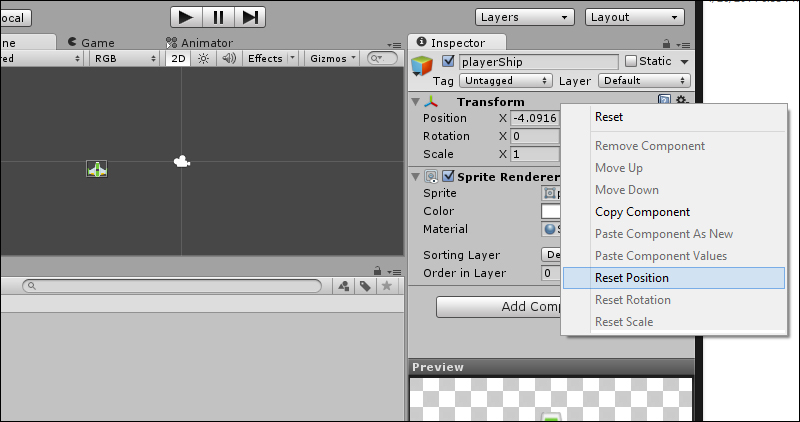
Next, drag-and-drop the ship into the Scene tab (the center part that's currently dark gray). Once completed, set the position of the sprite to the center of the Screen (0, 0) by right-clicking on the Transform component and then selecting Reset Position. Have a look at the following screenshot:
Now, with the player in the world, let's add in a background. Drag-and-drop the
background.pngfile into your Sprites folder. After that, drag-and-drop a copy into the scene.If you put the background on top of the ship, you'll notice that currently the background is in front of the player (Unity puts newly added objects on top of previously created ones if their position on the Z axis is the same; this is commonly referred to as the z-order), so let's fix that.
Note
Objects on the same Z axis without sorting layer are considered to be equal in terms of draw order; so just because a scene looks a certain way this time, when you reload the level it may look different. In order to guarantee that an object is in front of another one in 2D space is by having different Z values or using sorting layers.
Select your background object, and go to the Sprite Renderer component from the Inspector tab. Under Sorting Layer, select Add Sorting Layer. After that, click on the + icon for Sorting Layers, and then give Layer 1 a name,
Background. Now, create a sorting layer forForegroundandGUI. Have a look at the following screenshot:
Now, place the player ship on the foreground and the background by selecting the object once again and then setting the Sorting Layer property via the drop-down menu. Now, if you play the game, you'll see that the ship is in front of the background, as follows:

At this point, we can just duplicate our background a number of times to create our full background by selecting the object in the Hierarchy, but that is tedious and time-consuming. Instead, we can create all the duplicates by either using code or creating a tileable texture. For our purposes, we'll just create a texture.
Delete the background sprite by left-clicking on the background object in the Hierarchy tab on the left-hand side and then pressing the Delete key. Then select the background sprite in the Project tab, change Texture Type in the Inspector tab to Texture, and click on Apply.
Now let's create a 3D cube by selecting Game Object | Create Other | Cube from the top toolbar. Change the object's name from Cube to
Background. In the Transform component, change the Position to (0,0,1) and the Scale to (100,100,1).Note
If you are using Unity 4.6 you will need to go to Game Object | 3D Object | Cube to create the cube.
Since our camera is at 0, 0, -10 and the player is at 0, 0, 0, putting the object at position 0, 0, 1 will put it behind all of our sprites. By creating a 3D object and scaling it, we are making it really large, much larger than the player's monitor. If we scaled a sprite, it would be one really large image with pixelation, which would look really bad. By using a 3D object, the texture that is applied to the faces of the 3D object is repeated, and since the image is tileable, it looks like one big continuous image.
Remove Box Collider by right-clicking on it and selecting Remove Component.
Next, we will need to create a material for our background to use. To do so, under the Project tab, select Create | Material, and name the material as
BackgroundMaterial. Under the Shader property, click on the drop-down menu, and select Unlit | Texture. Click on the Texture box on the right-hand side, and select the background texture. Once completed, set the Tiling property's x and y to25. Have a look at the following screenshot:
Finally, go back to the Background object in Hierarchy. Under the Mesh Renderer component, open up Materials by left-clicking on the arrow, and change Element 0 to our BackgroundMaterial material. Consider the following screenshot:

Now, when we play the game, you'll see that we now have a complete background that tiles properly.
In Unity, the behavior of game objects is controlled by the different components that are attached to them in a form of association called composition. These components are things that we can add and remove at any time to create much more complex objects. If you want to do anything that isn't already provided by Unity, you'll have to write it on your own through a process we call scripting. Scripting is an essential element in all but the simplest of video games.
Unity allows you to code in either C#, Boo, or UnityScript, a language designed specifically for use with Unity and modelled after JavaScript. For this book, we will use C#.
C# is an object-oriented programming language—an industry-standard language similar to Java or C++. The majority of plugins from Asset Store are written in C#, and code written in C# can port to other platforms, such as mobile, with very minimal code changes. C# is also a strongly-typed language, which means that if there is any issue with the code, it will be identified within Unity and will stop you from running the game until it's fixed. This may seem like a hindrance, but when working with code, I very much prefer to write correct code and solve problems before they escalate to something much worse.