
In this section, we will add a parallax or scrolling background. This is a very popular effect in games, in which the objects in the foreground move faster as compared to the objects in the background that move much slower, giving the illusion of depth and motion.
Recall the movies of yesteryear in which the hero or subject remains stationary and acts as if they are galloping on a horse, and the background is looped to give the illusion that the hero is actually moving forward in the scene.
We will implement a very simple parallax effect in which all the objects in the background, such as the trees, bushes, and grass, move at the same speed. So, we will just take the background image and make it move in a loop.
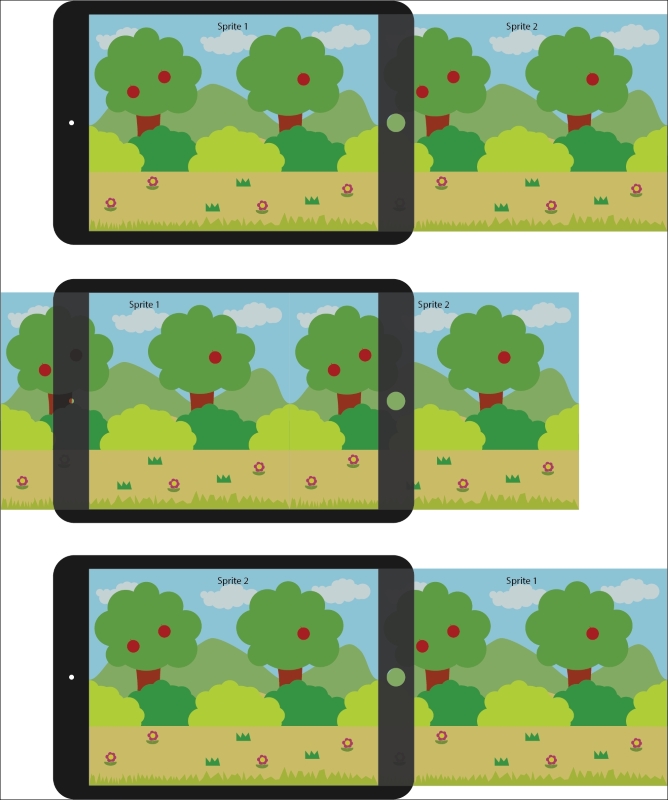
The parallax effect will be achieved thus: instead of a single sprite of the background image, we will use two sprites and place them adjacent to each other horizontally at the start of the game, as seen in the first preceding image. The first sprite will be visible, but the second sprite will be offscreen and won't be visible to the player initially.
When the game starts, both the sprites will be moved with a certain speed in the negative x direction—that is toward the left of the screen. Both the sprites will move at the same speed. So, once the game starts, sprite 1 will slowly go offscreen bit by bit, and the second sprite will start to get visible.
Once the first sprite goes completely offscreen, it is quickly moved to the end of the second sprite, which is at the same position that the second sprite was at the start of the game.
Thus, the process continues in a loop. Both the sprites always move toward the left of the screen. After each sprite goes off screen on the left-hand side, it is placed off screen on the right-hand side of the screen, and it continues to move left.
There are a couple of things that need to be kept in mind while creating assets for parallax scrolling and coding a parallax effect. The first is that when creating assets for a parallax effect, the art needs to be continuous. This means, for example, if you look at the second image in the preceding section, you will see that the mountains look like a continuous mountain range. Even though Sprite1 and Sprite2 are two different images, when put together, they appear as one single image. This can again be seen in the light green bush below the mountain. The left-hand part of the bush is in Sprite1, and the right-hand part is in Sprite2, yet when the two sprites are kept adjacent to each other, they give a seamless illusion of being part of a single bush.
The second aspect to keep in mind is image gap. Even if you make the images seamless and make the sprites move at the same speed, sometimes you might encounter gaps between the sprites. This is not a very common problem, but in some frameworks, this problem might exist. So, to counter this, you can either stretch the images just by a bit so that the sprites overlap each other and it is not very obvious to the player. The other method is to make sure that you manually place the sprites at the end of the onscreen sprite and also make necessary adjustments if required to bridge the gap between the sprites.
This is the main theory behind parallax scrolling. Let's take a look at it in practice in code in the next section.
In a similar way to how we created the Hero class, we will create a file of the CocosTouchClass type and name it ParallaxSprite.
Open the ParallaxSprite.h file and add the following code:
#import "CCSprite.h"

@interface ParallaxSprite :CCSprite{

  CGSize _winSize;
  CGPoint _center;
  CCSprite *_sprite1, *_sprite2;
  float _speed;
}


-(id)initWithFilename:(NSString *)filename Speed:(float)speed;
-(void)update:(CCTime)delta;

@end
We will create a few variables that we will use later, such as _winSize and _center, which will get the size of the screen resolution of the device that the game is running on and calculate the center of the screen.
We will create two sprite variables to hold the two images which will be cycled during the parallax effect.
We will also add a _speed variable. This is the speed with which we will move and loop the images.
In a similar way to the Hero class, we will create an initWithFilename function that will initiate the class with the filename provided. Additionally, we will also take a float, which will be the speed of the sprite.
We will also need an update function that will be called 60 times in a second and will update the position of the two sprites in the class.
This is all for the ParallaxSprite.h file. We will now move on to the ParallaxSprite.m file.
In the file, we will add the following code:
#import "ParallaxSprite.h"

@implementation ParallaxSprite

-(id)initWithFilename:(NSString *)filename Speed:(float)speed;{

  if(self = [super init]){

    NSLog(@"[parallaxSprite] (init) ");

    _winSize = [[CCDirectorsharedDirector]viewSize];

    _center = CGPointMake(_winSize.width/2, _winSize.height/2);

    _speed = speed;

    _sprite1 = [CCSpritespriteWithImageNamed:filename];
    _sprite1.position = _center;
    [selfaddChild:_sprite1];

    _sprite2 = [CCSpritespriteWithImageNamed:filename];
    _sprite2.position = CGPointMake(_sprite1.position.x + _winSize.width , _center.y);
    [selfaddChild:_sprite2];

  }
return self;
}
We will first add the initWithFilename function. In this, we will initialize the super class and get _winSize.
Next, we will calculate the center of the screen by dividing the width and height by two.
The speed value is assigned to the _speed variable classes.
We will then create the _sprite1 and _sprite2 variables. In spriteWithImageNames, we will pass the filename variable that will hold the string of the filename.
Note that _sprite1 is placed at the center of the screen, and _sprite2 is placed off screen by the width of the screen, but at the same height as _sprite1.
Both the sprites are then added to the class.
Next, we will add the update function, as follows:
-(void)update:(CCTime)delta{

  floatxPos1 = _sprite1.position.x - _speed;
  floatxPos2 = _sprite2.position.x - _speed;

  _sprite1.position = CGPointMake(xPos1, _sprite1.position.y);
  _sprite2.position = CGPointMake(xPos2, _sprite1.position.y);

  if(xPos1 + _winSize.width/2 <= 0){

    _sprite1.position = CGPointMake(_sprite2.position.x + _winSize.width, _center.y);

}else if(xPos2 + _winSize.width/2 <= 0){

    _sprite2.position = CGPointMake(_sprite1.position.x + _winSize.width, _center.y);

  }
}


@end
Here, we will calculate the new positions of the individual sprites in the x axis by getting the current x position of the sprites and then subtracting the speed. We will subtract because we want the sprites to move in the negative x direction in each update call.
In the next step, we will assign the x position calculated on both the sprites. We will use the same y position as the value does not change in the y direction.
Next, we will check whether the right-hand edge of the image is visible to the player any more and has gone beyond the left-hand side of the screen. If this is the case, we will place the sprite at the offscreen position, the width of the screen from the center of the other sprite, so that there are no gaps between the sprites.
We will use an "if else" statement here as only one sprite will go beyond the bounds on the left-hand side of the screen.
Let's take a look at how to implement this class now. In the MainScene.h class, we will import the ParallaxSprite.h file and create a new variable called pSprite of the ParallaxSprite type, as follows:
#import "Hero.h"
#import "ParallaxSprite.h"

@interface MainScene :CCNode{

CGSizewinSize;
    Hero* hero;
ParallaxSprite* pSprite;

}
Next, in the MainScene.m file, we will remove the code that was used to add the background sprite at the start of the chapter and replace it with the following code:
//Basic CCSprite - Background Image - REMOVE
//CCSprite* backgroundImage = [CCSpritespriteWithImageNamed:@"Bg.png"];
//backgroundImage.position = CGPointMake(winSize.width/2, winSize.height/2);
//[self addChild:backgroundImage];

//Parallax Background Sprite - ADD
pSprite = [[ParallaxSpritealloc]initWithFilename:@"Bg.png" Speed:5];
[selfaddChild:pSprite];
Here, we will assign the same Bg.png file as we did earlier; however, additionally, we will also provide a speed value of 5.
Note that we will not call the update function of the ParallaxSprite class as it is called automatically every frame. Further, you also don't have to schedule it as you did previously because the function is initialized automatically at the start.
And that is all! You can enjoy the parallax sprite effect now.