

In this recipe, we are going to be looking at the impact that our materials have on performance. So far, this introductory chapter has gone over the basics of the rendering pipeline—we've seen how to create a physically based material, understood what the different shading models were, and saw how light played a key role in the overall look of the final image. However, we can't yet move on without understanding the impact that our games or applications have on the machines that are running them.
The first thing that we need to be aware of is that some materials or effects are more expensive in terms of efficiency than others. Chances are you have already experienced that in the past—think, for example, about frames per second in video games. How many times a second our displays are updated by the hardware that runs them directly influences how the game plays and feels. There are many elements that affect performance, but one determining factor in that equation is how complex our materials are.A different example, if your background is more closely tied to traditional offline renderers such as VRay or Corona, could be how the rendering times vary wildly depending on how complex the materials you are rendering are. Using subsurface scattering, complex translucency, or a combination of multiple advanced effects can take render times from minutes to hours.
The point is that we need to be able to control how performant the scene we are creating is. Unreal offers us several tools that allow us to see how expensive certain effects and materials are, and check where we should be optimizing our assets or where certain things aren't working. With that in mind, let's bring all of the assets we have previously created together and use those tools to check them out.
All we need to do before starting this recipe is to load up the map called 01_ 06_ The Cost Of Materials. As you can see, it's just the usual scene we have been working with up until now, except that it now has a couple more models in it. Feel free to bring your own meshes and materials, as we are going to be checking them out from a technical point of view. All we care about at this point is having multiple elements that we can take a look at, so having materials that use different blend modes is great in that we will be able to see the difference in performance between them.
No matter if you've opened the level provided with this book or one of your own, we are going to be looking at the rendering cost that materials incur when being displayed. To do so, we'll be taking a look at several different indicators that can help us understand our scenes a little bit better. Take the following steps:
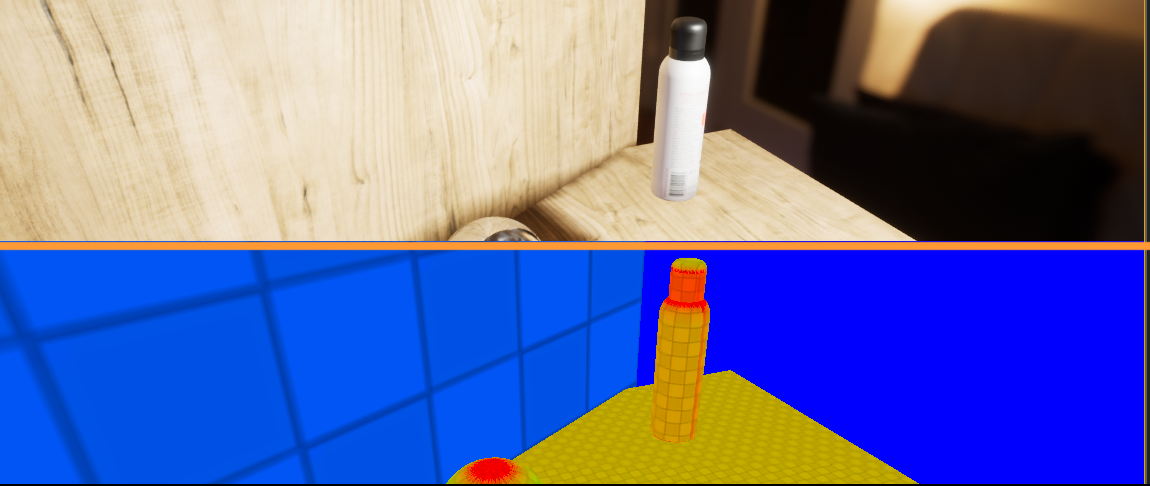
- Let's start by taking a look at the following scene:
I've included four different objects with their respective materials applied, which should help us understand the cost to performance that each one of them has.
- Continue by selecting the chrome ball (named
SM_ReflectiveSphere) and navigate to theDetailspanel, specifically to theMaterialstab. Double-click on the material that is currently applied to the model to open the material editor. - With that editor in front of us, let's take a look at the
Statspanel:
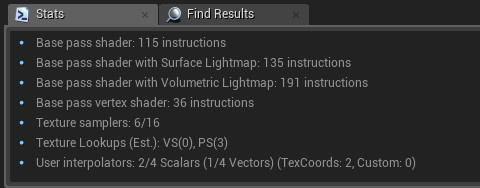
The values we see in there can give us an approximation to how expensive the material is to render. You can see that this M_ReflectiveSphere has 115 instructions for the base pass shader, 135 if we are using static lighting, and 191 if we use movable lights. The numbers themselves will be useful if we compare them to other materials.
- Let's go back to the main scene, and select the object named
SM_Glass. Open up the material that it has applied just like we did for the reflective ball, and look at the stats panel again:
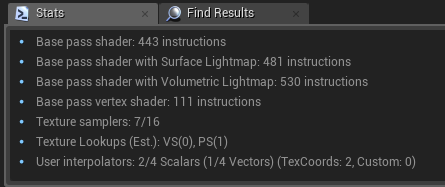
As you can see, the instruction count is much higher than in the last example we saw. This is due to the fact that the complexity of translucent materials is higher than that of opaque ones, and we can see that in here.
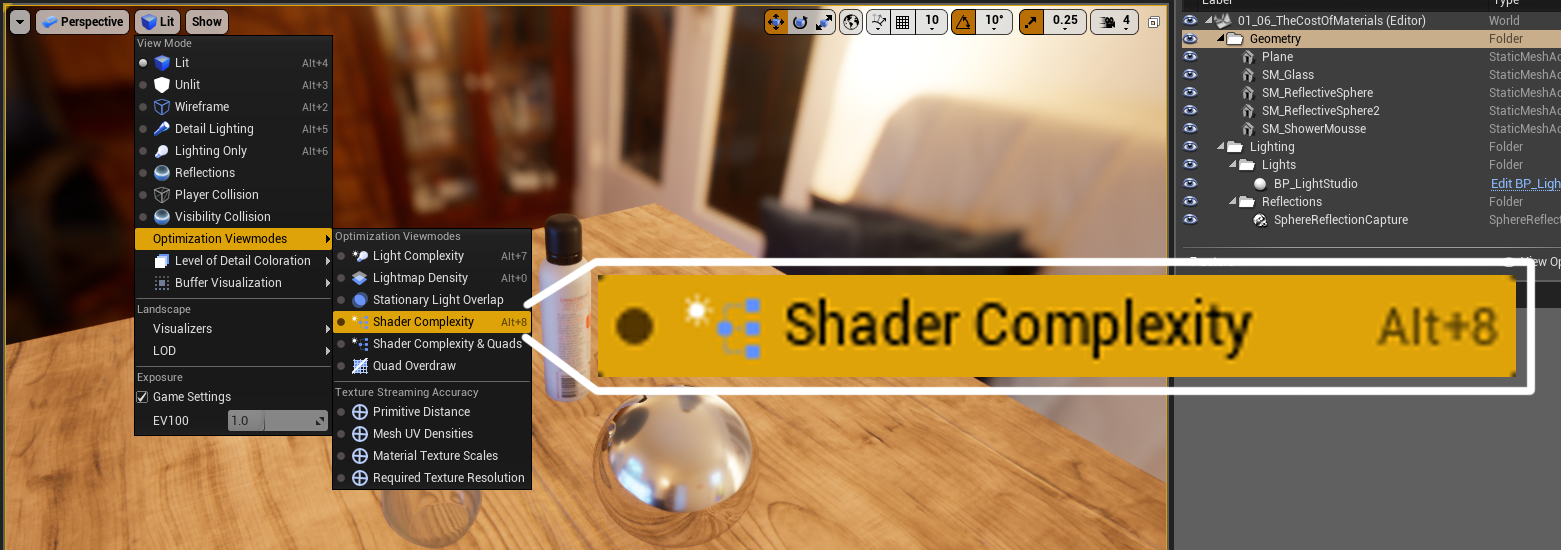
- After clicking that button, you should be looking at something like this:
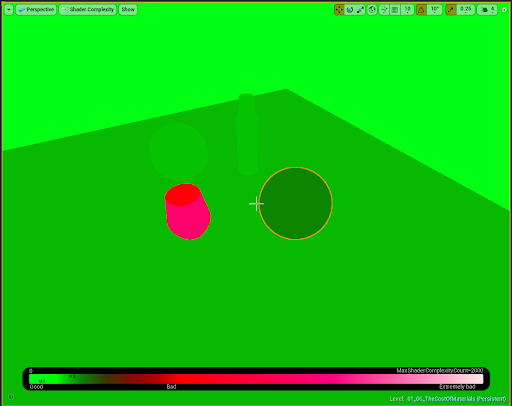
This is a more visually appealing way of looking at the shader complexity. However, it is one that is not 100% accurate, as Unreal only takes the instruction count as a reference to calculate the gradient you are seeing in the preceding image and not the complexity of the material's nodes themselves.
You might see similar values for two different materials that are really not equal in terms of their complexity—for instance, a material that is made out of several textures versus one that uses simple constants might show a similar complexity in this viewmode when in reality using the first is more demanding on the Graphics Processing Unit (GPU).
Now that we've seen one of the optimization viewmodes, why stop with just that one? All of them are useful for understanding how our scene is working from different technical points of view. Let's go over them in a quick way to see how they can help us.
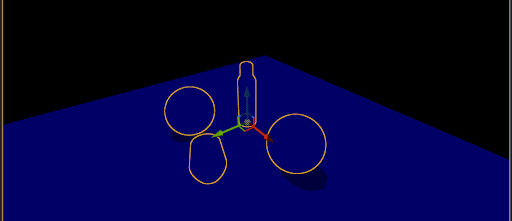
- The first of these modes is called Light Complexity. This can serve us to analyze how expensive the different lights we have in our scene are. Toggle that on and let's see how our scene looks.
- At first you'll see that the whole scene is being rendered in black. This is because we are using a HDRi static type of light—and as the lighting has already been calculated, there's no light complexity at this stage at all. You can only see the object's I've selected being outlined in yellow for reference purposes:

- If we place a new point light, you'll be able to see how the scene turns blue. This is to indicate that there's some complexity to the scene, but this is just as cheap a lighting method as they come:
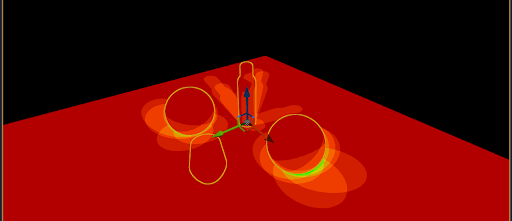
- Placing more lights will change how your scene looks—getting away from its original blue color. That means that lighting is becoming more complex and costly for our hardware to compute, so keep that in mind! The following screenshot is what our scene looks like in that viewmode with seven different lights:
- Another viewmode related to the previous one is Stationary Light Overlap. If we have multiple stationary lights it will tell us how expensive our scene is to render, in a gradient that goes from green to white.
- Finally, the lightmap density viewmode shows you how dense the lightmaps are for the objects that occupy your scene. Using static or stationary lights means that static objects will have their shadows baked, and this is the viewmode that lets us see if the settings we've chosen for our models are evenly distributed. Let's take a look at the two following examples.
- In this first set of images, we've set up the lightmap resolution for both wood planes to a high value of 1,024. That means, as you can see in the first image, that the shadows look correct even across the two surfaces:
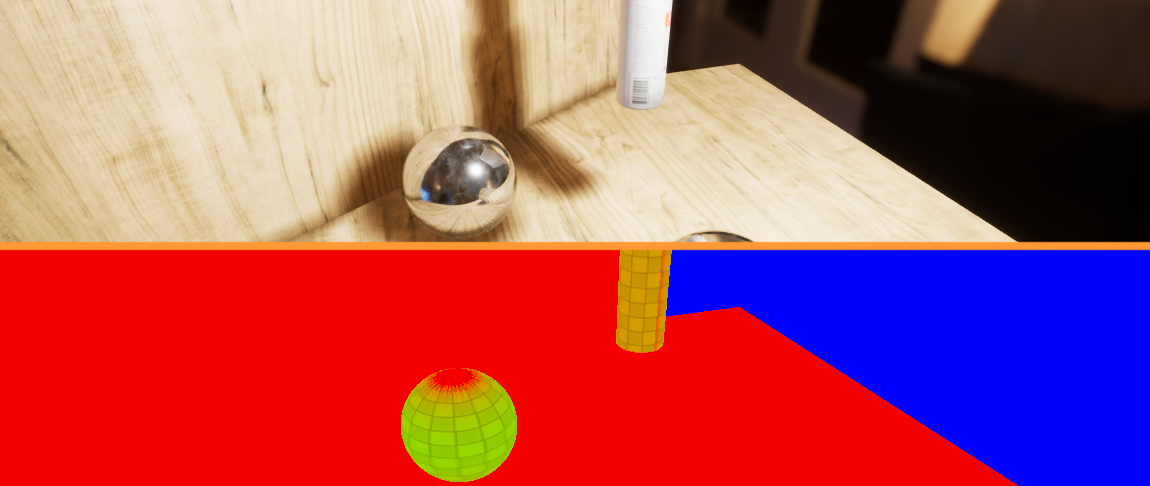
- In the next set of images, we've lowered the resolution, but in a more dramatic way for the vertical wood plane. That means that the vertical plane has much lower quality shadows to the point where they are barely visible, even though they are still there in the horizontal plane:
There are a couple more viewmodes that we haven't talked about, but they deal with the amount of polygons that a model comprises and are not related to the materials we are using. You can take a look at them in the same panel we saw before, and they are called Quad Overdraw and Shader Complexity and Quads. They can be very useful in order to diagnose our scenes, especially when we have many high poly meshes or semi-transparent models—so keep them on your radar in case you ever need them!
As we've seen in previous recipes, materials are not homogeneous entities. And we are not even talking about the ones in real life, but, of course, the ones we have created within Unreal. The mathematics and functions used to describe the different shading and blend modes carry a weight with them that vary from one type to the next. Knowing how heavy each of them is can be a complicated task to burden oneself with, but having an overall idea is key to running a well-oiled application.
In the previous pages, we've taken a look at some examples, which included an opaque material and a translucent one—examples that we've worked on in the past. However, we need to keep in mind that there are more types we can—and will—encounter in the future. Unreal includes the following different shading models, which I will list now in order of how costly they are to render:
- Unlit
- Default lit
- Preintegrated skin
- Subsurface
- Clear coat
- Subsurface profile
(The other shading models—hair and eye—are very specific to characters and we will cover them in the appropriate section.)
Of course, the actual cost of a material depends on how complex we make the graphs for each of them, but that previous order applies to base materials with nothing more applied to them. On top of that, there are options within each type that can make them more or less expensive to render: having a material being two-sided or use a particular type of translucency can increase the cost to the GPU, for example.
On top of this, there are other things to be considered in terms of efficiency that we might want to keep in mind. Epic has created some performance guidelines for artists that highlight where we should be focusing our attention in order to keep our applications running well. You can take a look at them at the following link: https://docs.unrealengine.com/en-us/Engine/Performance/Guidelines.
We've used this recipe to take a look at how fast Unreal can process different types of shaders. We've done so by comparing an opaque material against a translucent one, which gives us a good idea about how instruction counts vary and how efficient some shaders are compared to others. Not only that, we've also had the opportunity to see what optimization tools are available for anyone using the engine. All in all, there is a wide variety of options that give the user control over how well their application runs, and now we are in a position in which we know how to use them.