In this section, we will learn everything about data types in the Luau programming language. Let us start with the absolute basics. Programming is all about data. This data can be anything:
- The player’s in-game money
- The spot the player is in during a race
- The number of criminals that they have arrested, or anything else
All of the mentioned examples are numbers. The in-game money can be 100, the race position can be 1, and the number of criminals arrested can be 3. In programming languages, we have numbers too. Numbers are our first data type.
Internal usage of the number data type
Sometimes, a difference between numbers and integers is made in the documentation. In Luau, integers are a part of the number data type. Internally, Luau changes between doubles, floats, and integers. If the documentation specifies an integer, you can expect the number to be stored as an integer internally. When a number is documented, it is internally stored as float or long. Do not worry if this does not make sense. This knowledge is not required in Luau.
We can have more than just numbers. We can also have sentences. Examples of sentences can be the player’s username, a roleplay name, or a chat message. These sentences are called strings in programming. Strings are our second data type.
You might have heard of our third data type, a Boolean. A Boolean is true or false. People often say programming is about ones and zeros, and true or false. There are no other possibilities for Booleans.
In the following sections, we will learn about all the things that we can do with these three data types. We will start by making a script to test out these data types.
Creating a script
Well, great to know about these three data types, but what can we do with them? Let us start Roblox Studio and follow these steps:
- First, create a new baseplate. Because the book assumes basic knowledge of Roblox and Roblox Studio, this is not explained.
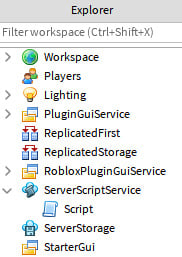
- Once created, open Explorer. It should be visible by default. Search for something named ServerScriptService. You can see this in Figure 1.1.
- Right-click on ServerScriptService, select Insert Object, and add a new script. Make sure you did not accidentally make a
LocalScript instance. The difference is explained later in the book. Once added, the Explorer window should look like this:
Figure 1.1 – Your created script
- Double-click on the script you just created and you should see the following code in the script:
print("Hello world!")
Now we know how to create a new script. In the next section, we will run this script and see its output. Besides that, we dive deeper into what this piece of code means.
Hello, world!
In Roblox, all scripts start when the game begins. We can start the game by pressing the Play button in Roblox Studio. Once pressed, you will see your character appear in a running game. The game still looks empty, as if nothing has happened. There are no scripts in a baseplate game by default, and the one we just added does not do much. However, it definitely does something. It just cannot be seen by a regular player. We have to open the Output frame to see this. To open the Output frame, click on the Output button under the View section, as shown here:
Figure 1.2 – Opening the Output frame
Shortcut
Instead of pressing the Play button, you can press the F5 key on your keyboard.
Once we open the Output frame, we see Hello world!. Looking back at the script we created, we see the Hello world! part. However, one part is missing in Output; this is the print() part. That is because print() is a function in Luau. Functions are explained later in this book. For now, remember that print() prints the text that we passed to it in Output.
We should zoom in on the Hello world! part of the script. We previously learned that programming languages have sentences. They are called strings. “Hello world!” is a sentence; therefore, it is a string. We can see that this is a string because it is surrounded by quotation marks ("). Roblox Studio also recognizes this as a string and gives it a particular color in your script.
Strings can be anything; go ahead, change the Hello world! part to something else, your name, for instance. Your script could look like this:
print("James")
If we run the script that you just edited and open Output, you should see your name appear.
We now know what Hello world! means and what the print() function does. Consider the print() function as your trusted friend that will keep you informed on what your script is doing. This will help us to understand what is going on and come up with solutions for possible errors. In the following section, we will look at printing numbers.
Numbers
There are more data types than just strings. You can print all of these data types. Let us start with numbers. Change your name to any number, for instance, the number eight. Your code might look like this:
print("8")
If we run the game and open the Output frame, we can see that the number you chose was printed instead of your name. Did you notice how the number is the same color as the string in the Roblox Script Editor? As mentioned before, something that defines a string is quotation marks. The quotation marks are still there in the preceding code, but the correct number was printed. This is because the programming language still sees your number as a string. This is possible because numbers can be stored in strings too.
If we want to make sure our number is recognized as an actual number, we have to remove the quotation marks around the number. So, for example, your code could look like this now:
print(8)
Notice how the color of the number changed in the Script Editor?
In this section, we learned how to print numbers and how to differentiate numbers from strings in our code. In the following section, we dive deeper into the unique things we can do with numbers, such as math operations.
Math operations
If we run the code, we see the same line in Output. So, why bother making it a number instead of using strings? We previously mentioned that they are different data types. Different data types also serve different purposes. Numbers can do things that strings cannot do. Let us take a look at it from an easy perspective. In school, you used numbers during math. What did you use numbers for? Most likely to calculate things. You were adding, subtracting, dividing, multiplying, and whatnot. These are all things that you can do with numbers, whereas you probably had to write many sentences in English class. The chance is meager that you used multiplication on sentences.
Now that we have a number in our script, let us do some math. We start by adding the number three to the already present number eight. We do this by using the + operator. Try doing this for yourself. The script should look something like this:
print(8 + 3)
If we run the script, it should say 11 in Output. Congratulations, you have now made your first math operation in a programming language. However, we can do many more math operations. Try subtracting (-), multiplication (*), and dividing (/).
Tip
You can add multiple print statements below each other to create a larger script that performs multiple math operations at once.
Your code should look something along these lines:
print(8 + 3)
print(8 - 3)
print(8 * 3)
print(8 / 3)
We have two more math operations that you can do on numbers: exponentiation (^) and the modulus (%). For exponentiation, you can do something like this:
print(8 ^ 3)
The result of this operation would be 512. What happens when using this operator is that the number before the caret (^) gets taken. The number gets multiplied against itself as many times as stated behind the exponentiation operator. To make this easier, the operation 8 ^ 3 translates to 8 * 8 * 8. If we switched the numbers and made the operation 3 ^ 8, the operation would be translated to 3 * 3 * 3 * 3 * 3 * 3 * 3 * 3.
The last operator is the modulus. This operator is commonly forgotten, especially in Roblox programming. The modulus operator (%) looks like a percentage; however, it is absolutely not a percentage. Do not let it fool you. The modulus operator takes the number behind the % and multiplies itself as many times as it fits into the number before the operator. Once it reaches its limit, it subtracts its total multiplication from the first number and gives back the difference. This operator is not easy to understand.
To visualize it, we take the operation 8 % 3. The number three fits twice into the number eight, because three times two is six, and six is lower than eight. If we multiplied it once more, we would do it three times, resulting in nine. Nine does not fit in eight. Then, we subtract six from eight. What is left is two. The operation 8 % 3 would return two. This is probably the most confusing operator so far. It is confusing because it is never taught during math in school.
Tip
You can try to make a few operations in your script to test this operator yourself.
We learned how to program math operations. In the next section, we will learn how to combine these math operations in one statement.
Combining math operations
Something that the modulus operator can do is combine different operators in one statement. We can do this too. Execute the following code:
print(8 + 3 * 2)
Notice how the result of this execution is 14? During math, you probably learned about the order of operations. The order of operation tells you in which order you have to execute each operation. In programming languages, we do the same. Luckily, it is the same order of execution taught in school. You probably heard of PEMDAS to help you remember this order. PEMDAS stands for Parentheses (( and )), Exponents (^), Multiplication (*), Division (/), Addition (+), and Subtraction (-).
In the previous code example, the three times two is executed first. If we wish to execute 8 + 3 first, we can surround it with parentheses. Your code would look like this:
print((8 + 3) * 2)
The outcome of this math operation changed from 14 to 22. Do you see that there are two opening parentheses directly behind print? Having multiple parentheses is allowed because the programming language understands that the first closing parenthesis, which is the one behind the three, is the closing one for the last opening parenthesis.
We learned that we could do math operations with the number data type in the previous two sections. Previously, we learned about multiple data types. The following section explores the unique things that we can do with strings.
String concatenation
Now that we know how to use numbers, we can look at some of the cool things that you can do with strings. We cannot do math with strings, but we can combine them. When combining strings, we use an operator called concat, short for concatenate. This operator is two dots directly after each other (..). Let us try to concatenate two strings in a print function.
First, we need two strings. As shown in the following code snippet, this is done by enclosing the message with quotation marks ("). Then, you can choose the sentence that you wish to insert into your string yourself. For this example, two strings that say “Hello” and “Laura” are combined:
print("Hello " .. "Laura ")
Hello Laura appears as one string in Output when you start your game. This operator is the only thing that you must use to concatenate two strings into one. Now, try to concatenate three strings into one by using what we just learned. As you might have guessed, it looks like this:
print("Hello " .. "Laura " .. "! ")
Now we know how to concatenate different strings into one. The following section teaches you about another unique thing with strings: escape characters.
Escape characters
If you want to display a string on the next line, we can add another print. Most of the time, this is not the ideal solution. There is a simple alternative for this. It is called a new line escape character. The name sounds more complicated than it is. This new line escape character looks like this: \n. In the same script, suppose that we want to greet someone and tell them it is Monday on a new line. Your code should look something like this:
print("Hello Peter!\nToday is Monday! ")
If you run this script, Hello Peter! appears on the first line, and Today is Monday! appears on the second one.
Another practical escape character is for a horizontal tab. This escape character mimics the same thing that happens when you press the Tab button on your keyboard in your preferred text editor. This horizontal tab escape character looks like this: \t. This escape character comes in handy when creating lists. For example, printing a shopping list can look something like this:
print("Shopping List:\n\t- Bread,\n\t- Butter,\n\t- Milk.")
Tip
Try to play around and create a few strings yourself. Practicing with strings is the best way to ensure you know how to use them.
We now know how to use the new line escape character and the horizontal tab escape character. Previously, we also learned how to concatenate two strings into one, and before that, we learned about the unique things that we can do with numbers. But what if we wanted to combine both data types into one print statement? The following section teaches you how to do this.
Casting data types
What if we tried to combine a string and a number in the same print statement? For example, we have a string that contains the number four and the number five. If we want to concatenate them, our script looks like this:
print("4" .. 5)
For some reason, this statement prints 45 in Output. Behind the screen, the system sees a string trying to concatenate with a number. We know that strings can contain numbers. The system knows it too. So, Luau helps you out and turns the number 5 from your statement into a string that contains the number 5. Then, the two strings merge into one. As a result, we get an output of 45.
Instead of letting the programming language figure out how to solve this issue, we can specify that we want to do it this way. We can use more functions besides the print() function. One of them is tostring(). This function turns any data given between the parentheses into a string:
print("4" .. tostring(5))
If we change the operator from a concatenation (..) into an addition (+), do we get an error?
print("4" + 5)
This code gives an error. This error occurs because you used an operator used for numbers on a string. But did we not use an operator used for strings on a number too? Yes, however, we know that strings can contain any character, including non-numbers. Therefore, Luau cannot change a string into a number unless we specifically tell it to do so.
We can tell Luau to change a string into a number using the tonumber() function. For example, if we put the string that contains the number four into this function, our operation should work:
print(tonumber("4") + 5)
As expected, the result of this operation is 9 and not 45. However, what if we wanted to use the same string and number and get the result 45, while having both pieces of data as numbers and not strings? We can combine the tonumber() and tostring() functions to achieve this:
print(tonumber("4" .. tostring(5)))
One disclaimer when using the tonumber() function: this function does not always work. For example, if your string contains anything other than numbers, this function returns something called nil. Nil means nothing. If you are not careful and your function returns nil, and your script does not expect this, an error occurs. Try it for yourself:
print(tonumber("a5")) -- This will return nil.
print(tonumber("a5") + 6) -- This will give an error.
Now we know how to cast strings into numbers and the other way around. We also learned how to combine numbers and strings in one statement. In the next section, we look at Booleans, our final data type.
Booleans
Last but not least, we can also print Booleans. Printing Booleans is not very difficult on its own. However, there are some operations for Booleans as well. For now, let us start with printing true and false. Your script should look something like this:
print(true)
print(false)
When printing Booleans, there are no quotation marks (") required. The reason for this is because Booleans are not strings. Instead, they are a unique data type. In the next section, we look at logical operators.
Logical operators
Similar to the other data types, there are some operators that we can use to create operations with Booleans. These are the and (and) and the or (or) operators. There are no special characters for these operators; they are just text. However, these operators do have a particular name. They are called logical operators.
Let us start with the and operator. To keep it simple, let us use a real-life example of asking your parents for permission to purchase a new game. The answers your parents give are Booleans, yes (true) or no (false). Because we are talking about the and operator, you need both your parents to agree on purchasing a new video game.
If both of your parents allow you to purchase the video game, you have two true Booleans. Our expected result is true if we put this into our print script:
print(true and true)
Roblox Studio might warn you when you enter this script because it already knows that the result is always true. Therefore, the statement is redundant. However, to help you understand these operations, you can ignore the warning and execute the script.
Now, one of your parents says no. Make a script where one of the Booleans is false, and execute it. Your script can look like this:
print(true and false)
print(false and true)
Both of these statements return false. As mentioned before, we are using the and operator. Using this means both parents in our scenario have to agree. If either does not agree, the deal is off.
As you might have guessed, when both your parents do not agree, and both Booleans are false, the statement always returns false. However, for the sake of understanding, you should try the script regardless. Your script can look something like this:
print(false and false)
Besides the and operator, Booleans also have the or (or) operator. For the or operator, we use a different example. Imagine you are selling something online. You only need one buyer that wants to pay the price you have set. In the best-case scenario, both customers are interested in purchasing your item. Your script looks something like this:
print(true or true)
The result of this is true. The only problem is picking which person you sell your product to. This problem, however, is not something you have to solve through coding.
Now, only one person agrees. So, the code looks like this:
print(true or false)
print(false or true)
Unlike with the and operator, these both return true. When selling an item, you do not need multiple sellers. One is enough to sell your item to. However, both would be false when there are no sellers at all. The sale cannot go through. Your code looks like this:
print(false or false)
We have now seen the logical operators that we can use on Booleans. It might seem pointless, but we will see why this is important in the Using conditionals section.
In this section, we learned all about data types. We learned about three different data types: numbers, strings, and Booleans. We learned how to print them to Output and about the special operations that we can do on them. We learned how to do math operations on numbers, how to combine strings, and how to use logical operators on Booleans. In the next section, we take these data types to the next level by using variables.
Introducing and using variables
Now that we know about the essentials of programming and data, we can start using this data to start doing things. In this section, we will learn about variables. We will learn what they are, what they are helpful for, how to update them, and how to improve the quality and readability of our code by using variables. Variables are all about temporarily storing your data somewhere. In Luau, the variables for all data types look the same.
To create a variable, follow these steps:
- First, you define a variable by putting
local into your script.
- Then, you put the name of your variable. The name of the variable can be anything. Try to make your variable names as logical as possible, as it helps when the size of your script starts to increase.
- Once your name is defined, you put an equal sign (
=).
- Finally, you can specify the data that you wish to store in this variable. You can see an example of a variable structure in the following code:
local your_name_here = your data
You can consider variables as temporary boxes that store any data that you specify behind the equal sign (=) under a specific name. Now, if we want to store a name, for instance, Emma, in a variable, it looks like this:
local name = "Emma"
We learned that the quotation marks (") around a sentence define a string. You can see this is the case for the preceding example, which means we just stored a string in a variable that is named name.
Now that we know how to make a variable, let us continue to learn about some of the best practices when creating a variable in the following sections.
Lower and upper camel case
Variables can be named anything. However, it is custom to start your variable name with a lowercase letter. If your variable name consists of multiple words, the first letter of the first word is a lowercase character, and the first letter of each word after that should be a capital letter. There is no practical reason for this, and it is just for the readability of your code. Here are some examples of correct variable names:
local firstName = "Emma"
local randomNumbers = 125
local isThePlayerAFK = false
This way of naming variables has a name. It is called lowerCamelCase. This method of naming variables is not unique to Roblox or Luau. Many tech companies around the world use it. It is a good habit to teach yourself to do this from the start.
Besides the lower camel case, another “camel case” is good to know. This other camel case is UpperCamelCase. The first character is capitalized with this naming method instead of using a lowercase character. You primarily use the upper camel case method when naming scripts.
We now know how to name our variables correctly. In the next section, we will learn how to update the value of our variables.
Updating variables
Besides storing data, what can we do with it? Everything that you can do with the data you learned about. The only difference is that you can now use the variable’s name instead of direct data, as shown here:
local firstName = "Alexander"
print(firstName)
Order of execution
Notice how we defined the variable before the print? The reason for this order is that the system reads the script line by line when the script gets executed. When it arrives at the line of the variable, it puts the variable into your computer’s memory. If it gets to the print first, it tries to find the firstName variable in your memory. If the variable does not exist, it cannot be printed and gives an error. It is custom to put all of your variables at the top of the script to prevent this from happening.
The same output appears when you insert the string directly into the print function. However, when you have 10 different print statements that would all print Alexander and you wish to change Alexander to William, you only have to change it in one spot. The variable’s value is the only thing that has to be changed for all prints to be automatically updated.
Let us take a better example. We have a number that starts at zero. We updated it five times. Each time we update the number, the number gets printed. We only use one variable for the number that we have. Your code can look something like this:
Disclaimer
The code you are about to see is imperfect, and we will improve it later. Methods for removing duplicate code are taught in Chapter 2, Writing Better Code.
local currentNumber = 0
print(currentNumber)
currentNumber = currentNumber + 1
print(currentNumber)
currentNumber = currentNumber + 1
print(currentNumber)
currentNumber = currentNumber + 1
print(currentNumber)
currentNumber = currentNumber + 1
print(currentNumber)
currentNumber = currentNumber + 1
print(currentNumber)
Let us take a look at the preceding code. First, we see a currentNumber variable that starts at 0. The first print() puts the variable, with the value 0, in the Output frame. Then, it does something that we have not seen before. It takes the variable’s name, puts an equal sign (=) behind it, states its name again, and does a math operation that adds one.
We start with what we know. We know how math operations work, and we know how variables work. currentNumber + 1 is a math operation with a variable. We can assume that this works the same way as any other math operation. It takes a look at the variable’s value, which is 0 for our current scenario, and then adds 1 to it. The result of this math operation would be 1. What Luau does behind the screen is change the line that we are executing to this:
currentNumber = 1
Hopefully, the statement that we have right now looks a bit familiar. It is not an exact match. However, you might recognize it from how we create variables. The only thing missing from creating a variable and our current code is the local part. We know that the local part is used when creating a variable. What if the statement that we have right now updates an existing variable to a new value? It would make sense. Just translate our current statement to something you can say out loud: “Current Number Equals One.” The currentNumber variable now has the value of one.
Hopefully, analyzing the code helps you realize what to do when you do not understand the code that you just read. First, try to look for the parts that you understand and figure out the rest from there.
Now we know how to update the value of a variable. In the next section, we learn about a best practice when updating variables.
Removing magic numbers
Now that we understand the script from the previous section, we know how to make variables and update them. But, as we said previously, the code is not ideal. Previously, we had an example where we incremented the number by 1. However, what if for our current example we do not want to increment a variable by 1 but by 2? We have to change our code in so many places. We could have prevented this by making a second variable that would determine the amount by which we would increment our variable. An improved version of the code would look something like this:
local currentNumber = 0
local incrementValue = 2
print(currentNumber)
currentNumber = currentNumber + incrementValue
print(currentNumber)
currentNumber = currentNumber + incrementValue
print(currentNumber)
currentNumber = currentNumber + incrementValue
print(currentNumber)
currentNumber = currentNumber + incrementValue
print(currentNumber)
currentNumber = currentNumber + incrementValue
print(currentNumber)
This code does what we initially wanted to do. Now, if we want to change our increment value from 2 to 3, there is only one spot we have to change it in. Using a variable makes it much easier to maintain for the future. Besides that, the code is a lot more readable as well. Before, there was just a number in your code; we had no idea what the purpose of this number was.
The number we just removed from our script has a name in programming. It is called a magic number. Magic numbers are pieces of data used multiple times in your script and do not explain what they do or what their purpose is, just like the example we just had. To prevent the usage of magic numbers, we can introduce a variable. Using magic numbers when programming is considered a code smell and should be avoided.
There is an even shorter way of writing this code. Notice how you were writing the current number variable multiple times per line? We do this because we have to define the variable that we are updating and also to get the current value of this variable. We can change the equals sign (=) to an operator that assigns and adds (+=) as follows:
local currentNumber = 0
local incrementValue = 2
print(currentNumber)
currentNumber += incrementValue
print(currentNumber)
currentNumber += incrementValue
print(currentNumber)
currentNumber += incrementValue
print(currentNumber)
currentNumber += incrementValue
print(currentNumber)
currentNumber += incrementValue
print(currentNumber)
Our code works the same, and the only difference is that we no longer have to write the variable’s name twice; we used it twice per line. Currently, we are using an operator that assigns and adds (+=); however, there are other operators like this for different math operations. For example, we also have one for assigning and subtracting (-=), assigning and multiplying (*=), and assigning and dividing (/=). Try using these new operators in a script similar to the one previously.
We just learned about a best practice to make our code more efficient while removing our magic number code smell. However, there is another best practice we can use to improve the readability of our code. The following section explains how to use constants in Luau.
Introducing constants
So far, we have made an immaculate script. However, we can do one more thing to improve the readability of this script. Most programming languages have something called constants. Constants are a special type of variable. The value of these variables is set once and can never be changed while running the script.
Previously, we said that the final thing was to optimize the script’s readability. This is only for readability purposes because Luau does not have constants. However, constants have a unique method of naming. You learned to name variables by using the lower camel case method. For constants, you have to write the full name of the variable in capitals. When the name of your constant consists of multiple words, an underscore (_) is added to separate the different words; this is something we can do in Luau. This way, other programmers know that this variable never changes, even though it is technically possible.
In the example we used, we can find a candidate for a constant. The currentNumber variable gets constantly updated with a new value. This variable is not a candidate to become a constant. On the other hand, our other variable is an excellent candidate to become a constant. The variable only defines the amount that the currentNumber variable is incremented by. If we turn this variable into a constant, our script looks like this:
local INCREMENT_VALUE = 2
local currentNumber = 0
print(currentNumber)
currentNumber += INCREMENT_VALUE
print(currentNumber)
currentNumber += INCREMENT_VALUE
print(currentNumber)
currentNumber += INCREMENT_VALUE
print(currentNumber)
currentNumber += INCREMENT_VALUE
print(currentNumber)
currentNumber += INCREMENT_VALUE
print(currentNumber)
If our script had been a bit different, our constant might have changed back to a standard variable. If, halfway through the script, we wished to change our increment value from two to three, it would have to be a variable again. As you can see, introducing a constant depends on what you wish to achieve with your script, and you have to look into the future as well. Do you wish to allow your script to be modified so this might be possible in the future? If so, it might be a good idea to keep it as a variable.
As you can see, when and when not to introduce a constant is a vague area. It is perfectly fine if you wish to never use constants in Luau. After all, Luau does not even have the implementation of a constant, and it is just about readability.
Tip
When in doubt about introducing a constant, do not do so. In Luau, it is better to keep a standard variable than to have an incorrectly implemented constant. This book, however, uses constants when required from now on.
Now that we know how to use variables and constants, we are ready to take our coding skills to an even higher level. The next section teaches us how to make our code perform different actions depending on our data.


 Free Chapter