

It is important to understand the order of operations when it comes to the initialization of our games. The basic needs for a game include creating the engine, loading the game's resources, and setting up the initial screen and settings. This is all it takes in order to create the foundation for an AndEngine game. However, if we plan on more diversity within our games, it is wise to get to know the full life cycle included in AndEngine.
The AndEngine life cycle includes a few methods that we are responsible for defining directly. These methods include creating the EngineOptions object, creating the Scene object, and populating the scene with child entities. These methods are called in the following order:
Define the
onCreateEngineOptions()method:@Override public EngineOptions onCreateEngineOptions() { // Define our mCamera object mCamera = new Camera(0, 0, WIDTH, HEIGHT); // Declare & Define our engine options to be applied to our Engine object EngineOptions engineOptions = new EngineOptions(true, ScreenOrientation.LANDSCAPE_FIXED, new FillResolutionPolicy(), mCamera); // It is necessary in a lot of applications to define the following // wake lock options in order to disable the device's display // from turning off during gameplay due to inactivity engineOptions.setWakeLockOptions(WakeLockOptions.SCREEN_ON); // Return the engineOptions object, passing it to the engine return engineOptions; }Define the
onCreateResources()method:@Override public void onCreateResources( OnCreateResourcesCallback pOnCreateResourcesCallback) { /* We should notify the pOnCreateResourcesCallback that we've finished * loading all of the necessary resources in our game AFTER they are loaded. * onCreateResourcesFinished() should be the last method called. */ pOnCreateResourcesCallback.onCreateResourcesFinished(); }Define the
onCreateScene()method:@Override public void onCreateScene(OnCreateSceneCallback pOnCreateSceneCallback) { // Create the Scene object mScene = new Scene(); // Notify the callback that we're finished creating the scene, returning // mScene to the mEngine object (handled automatically) pOnCreateSceneCallback.onCreateSceneFinished(mScene); }Define the
onPopulateScene()method:@Override public void onPopulateScene(Scene pScene, OnPopulateSceneCallback pOnPopulateSceneCallback) { // onPopulateSceneFinished(), similar to the resource and scene callback // methods, should be called once we are finished populating the scene. pOnPopulateSceneCallback.onPopulateSceneFinished(); }
The code found in this recipe's class is the foundation for any AndEngine game. We've set up a main activity class which serves as the entry point into our application. The activity contains the four main methods included in AndEngine's activity life cycle that we are responsible for, beginning with creating the EngineOptions options, creating the resources, creating the scene, and populating the scene.
In the first step, we are overriding the Engine's onCreateEngineOptions() method. Inside this method, our main focus is to instantiate our Camera object as well as our EngineOptions object. These two object's constructors allow us to define the display properties of our application. Additionally, we've disabled the screen from automatically turning off during application inactivity via the engineOptions.setWakeLockOptions(WakeLockOptions.SCREEN_ON) method call.
In step two, we continue to override the onCreateResources() method, which gives us a specified method for creating and setting up any resources needed within our game. These resources may include textures, sounds and music, and fonts. In this step and the following two, we are required to make a call to the respective method callbacks in order to proceed through the application's life cycle. For the onCreateResources() method, we must call pOnCreateResourcesCallback.onCreateResourcesFinished(), which should be included at the end of the method.
Step three involves instantiating and setting up the Scene object. Setting up the Scene can be as simple as displayed in this recipe, or for more complex projects, it may include setting up touch event listeners, update handlers, and more. Once we've finished setting up the Scene, we must make a call to the pOnCreateSceneCallback.onCreateSceneFinished(mScene) method, passing our newly created mScene object to the Engine to be displayed on the device.
The final step to take care of includes defining the onPopulateScene() method. This method is in place specifically for attaching child entities to the Scene. As with the previous two steps, we must make a call to pOnPopulateSceneCallback.onPopulateSceneFinished() in order to proceed with the remaining AndEngine life cycle calls.
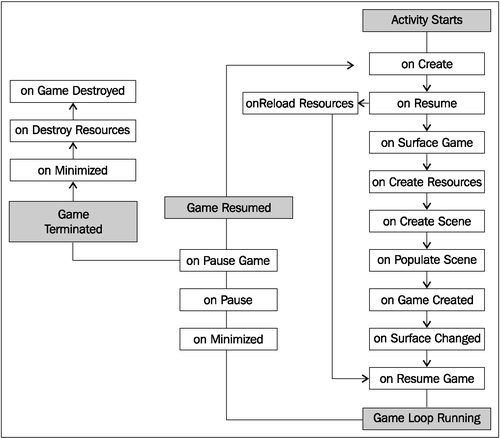
In the following list, we will cover the life cycle methods in the order they are called from the start up of an activity to the time it is terminated.
The life cycle calls during launch are as follows:
onCreate: This method is the Android SDK's native application entry point. In AndEngine development, this method simply calls theonCreateEngineOptions()method in ourBaseGameActivityclass then applies the returned options to the game engine.onResume: This is another Android SDK native method. Here, we simply acquire the wake lock settings from ourEngineOptionsobject and proceed to call theonResume()method for the engine'sRenderSurfaceViewobject.onSurfaceCreated: This method will either callonCreateGame()during the initial startup process of our activity or register a Boolean variable astruefor resource reloading if the activity had previously been deployed.onReloadResources: This method reloads our game resources if our application is brought back into focus from minimization. This method is not called on the initial execution of an application.onCreateGame: This is in place to handle the order of execution of the next three callbacks in the AndEngine life cycle.onCreateResources: This method allows us to declare and define our application's initial resources needed during the launch of our activity. These resources include, but are not limited to, textures, sounds and music, and fonts.onCreateScene: Here, we handle the initialization of our activity's Scene object. It is possible to attach entities to the Scene within this method, but for the sake of keeping things organized, it's usually best to attach entities withinonPopulateScene().onPopulateScene: In theonPopuplateScene()method of the life cycle we are just about finished setting up the scene, though there are still a few life cycle calls which will be handled automatically by the Engine. This method should be used to define the visual result of the Scene when our application first starts up. Note that the Scene is already created and applied to the Engine at this point. It is possible in some cases to see the entities being attached to the Scene if there is no loading screen or splash screen in place and if there are a large number of entities to attach.onGameCreated: It signals that theonCreateGame()sequence has finished, reloadinresources if necessary, otherwise doing nothing. Reloading resources depends on the Boolean variable briefly mentioned in theonSurfaceCreatedmethod five life cycle calls back.onSurfaceChanged: This method is called every time our application's orientation changes from landscape to portrait mode or vice versa.onResumeGame: Here we have the final method call which takes place during an activity's startup cycle. If our activity reaches this point without any problems, the engine'sstart()method is called, bringing the game's update thread to life.
The life cycle calls during minimzation/termination are as follows:
onPause: The first method call when an activity is minimized or terminated. This is the native android pause method which calls the pause method for theRenderSurfaceViewobjects and reverts the wake lock settings appled by the game engine.onPauseGame: Next, AndEngine's implementation ofonPause()which simply calls thestop()method on the Engine, causing all of the Engine's update handlers to halt along with the update thread.onDestroy: In theonDestroy()method, AndEngine clears all graphical resources contained withinArrayListobjects held by the Engine's manager classes. These managers include theVertexBufferObjectManagerclass, theFontManagerclass, theShaderProgramManagerclass, and finally theTextureManagerclass.onDestroyResources: This method name may be a little misleading since we've already unloaded the majority of resources inonDestroy(). What this method really does is release all of the sound and music objects stored within the respective managers by calling theirreleaseAll()methods.onGameDestroyed: Finally, we reach the last method call required during a full AndEngine life cycle. Not a whole lot of action takes place in this method. AndEngine simply sets anmGameCreatedBoolean variable used in the Engine tofalse, which stats that the activity is no longer running.
In the following image, we can see what the life cycle looks like in action when the game is created, minimized, or destroyed:
In the previous section of this recipe, we covered the main BaseGameActivity class. The following classes can be used as alternatives to the BaseGameActivity class, each providing their own slight differences.
The LayoutGameActivity class is a useful activity class that allows us to incorporate the AndEngine scene-graph view into an ordinary Android application. On the other hand, with this class we are also able to include native Android SDK views, such as buttons, seek bars, spinners, additional layouts, or any other view into our game. However, the most popular reason for using this sort of activity is to allow easy implementation of advertisments into games for a means to gain revenue.
There are a few additional steps for setting up a LayoutGameActivity class.
Add the following line to the project's default layout XML file. This file is usually called
main.xml. The following code snippet adds the AndEngineRenderSurfaceViewclass to our layout file. This is theview that will display our game on the device:<org.andengine.opengl.view.RenderSurfaceView android:id="@+id/gameSurfaceView" android:layout_width="fill_parent" android:layout_height="fill_parent"/>
The second and final additional step for this activity type is to reference the layout XML file and
RenderSurfaceViewin step one, in theLayoutGameActivityoverridden methods. The following code is assuming the layout file is calledmain.xmlin theres/layout/folder; in which case they can be copied/pasted into ourLayoutGameActivityclass after step one has been completed:@Override protected int getLayoutID() { return R.layout.main; } @Override protected int getRenderSurfaceViewID() { return R.id.gameSurfaceView; }
The SimpleBaseGameActivity and the SimpleLayoutGameActivity classes, as suggested, make the overridden life cycle methods somewhat easier to deal with. They do not require us to override the
onPopulateScene() method and on top of that, we are not required to make calls to the method callbacks when we are finished defining the overridden methods. With these activity types, we can simply add the unimplemented life cycle methods and AndEngine will handle the callbacks for us.
The final game activity class we will talk about is the SimpleAsyncGameActivity class. This class includes three alternative life cycle methods called onCreateResourcesAsync(), onCreateSceneAsync(), and onPopulateSceneAsync() along with the usual onCreateEngineOptions() method. The main difference between this activity and others is that it provides us with loading bars for each of the "Async" methods. The following snippet shows how we can increment the loading bar in the event of a texture being loaded:
@Override
public void onCreateResourcesAsync(IProgressListener pProgressListener)
    throws Exception {

  // Load texture number one
  pProgressListener.onProgressChanged(10);

  // Load texture number two
  pProgressListener.onProgressChanged(20);

  // Load texture number three
  pProgressListener.onProgressChanged(30);

  // We can continue to set progress to whichever value we'd like
  // for each additional step through onCreateResourcesAsync...
}
Tip
Downloading the example code
You can download the example code files for all Packt books you have purchased from your account at http://www.PacktPub.com. If you purchased this book elsewhere, you can visit http://www.PacktPub.com/support and register to have the files e-mailed directly to you.