
In order to create a game in GameMaker: Studio, you need a minimum of three types of resource assets: a Sprite (what you see), an Object (what it does), and a Room (where it happens). On top of these, you can also have Scripts, Backgrounds, Sounds, Fonts, Paths, and Time Lines.
Each resource that you can bring into GameMaker: Studio has its own properties editor. In order to get acquainted with each of them, we are going to build a very simple game of cat and mouse. We will create a player character (a mouse) that can move around the room, collect items (cheese), and avoid an enemy (a cat). Let's dive right in by creating some sprites.
Sprites are bitmap images that are intended to be used for the graphical representation of an object. These can be a single image or an animated sequence of images. GameMaker has its own image editor to create these, but also allows JPG, GIF, PNG, and BMP files to be imported.
For our example, we are going to start by creating two sprites; one for a wall and one for a player character. If you have downloaded the support files, we have supplied image files for this in the Chapter_01 folder.
We will start with a simple Sprite that will represent the walls of our game.
Create a new Sprite by navigating to Resources | Create Sprite. This creates a Sprite in the Resource tree, and opens up the Sprite Properties editor.
Name the sprite
spr_Wall.Click on Load Sprite to open a Sprite image. On the side of this window there is an Image Information section, where we can see a preview of the selected image and choose to activate several options. Make Opaque will remove all transparency from the selected sprite. Remove Background will remove all pixels with the color found in the pixel in the lower-left corner of the image. Smooth Edges will smooth the transparent edges of an image and is very useful when importing animated GIF files to get rid of the hard edges.
With none of the options checked, open
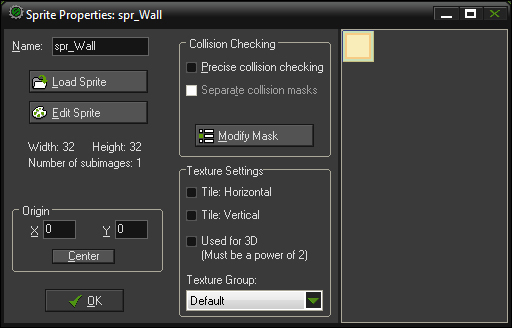
Chapter 1/Sprites/Wall.pngand click on OK.As you can see in the following screenshot, it has a width and height of 32 pixels and has one subimage. Nothing else needs to be changed, so click on OK:

The player in this game is going to be a mouse and the Sprite consists of two frames of animation.
Create a new Sprite.
Name the sprite
spr_Player.Click on Load Sprite and select
Chapter 1/Sprites/Player.gif. Check the box for Remove Background and Smooth Edges. Click on OK.Once again, it has a width and height of 32 pixels, but this has two subimages as shown in the next screenshot. This means it has animation! Let's see what each frame looks like by clicking on the arrow beside Show. It is useful to do this when loading animated images to ensure that all the frames are in the appropriate order and are aligned properly.

Set X in Origin to
16and Y to16, or you can just click on the Center button.Click on the OK button.
Congratulations! You have created your first sprites. We will be going deeper into the creation of art assets in the following chapter, so let's move onto Objects.
This is where the real power of GameMaker: Studio truly shows itself. Objects can be thought of as containers that hold the properties, events, and functions that we want each item in the game to do. When we place an object into the game world, it is called an instance and it will operate independently from all other instances of that object.
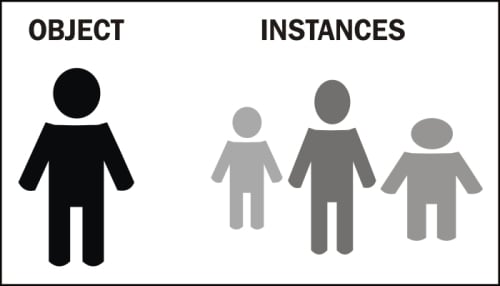
Before we move on, it is important to understand the difference between an object and an instance of that object. An object is a set of rules that describe something, while an instance is a unique representation of that something. A real-world example would be you are an instance of a human object. A human is something that has arms, legs, speaks, sleeps, and so on. A you is the unique interpretation of these elements. An example of this concept can be seen in the preceding diagram.
The reason this is important is because depending on the functions being used, the effect will be applied either to all of the items of that type or to the individual item. Generally you wouldn't want to shoot an enemy and then have all the enemies in the world die, would you?
Continuing with our example, we are going to create a Wall object and a Player object. The Wall is going to be a stationary obstacle, while the Player is going to have controls allowing it to move around the world and collide with the Wall.
We will start with the solid Wall object that we can use to create a maze for the player.
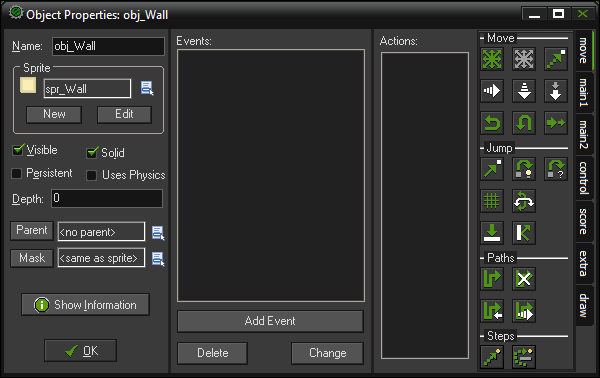
Create a new Object by navigating to Resources | Create Object. This will create a new Object in the Resource tree and open up the Object Properties editor.
Name this object
obj_Wall.Click on the input box in Sprite and select
spr_Wall.GameMaker treats collision with solid objects differently than non-solid objects. If a solid object and a non-solid object collide, GameMaker will try and prevent them from overlapping by moving the non-solid object back to its previous position. Of course, in order to do this properly, the solid object has to be stationary. Therefore, we should add the solid property to the Wall.
Click on the Solid checkbox and then click on OK.
The Player object will introduce us to using Events and Actions for things, such as movement and collision.
Create a new Object and name it
obj_Player.Select
spr_Playeras the Sprite.GameMaker's power comes from its event-driven system. Events are moments and actions that occur during the running of a game. When you add an Event to an Object, you are asking the item to respond to that action when it occurs, and then apply the assigned instructions.

Sounds fairly straightforward, doesn't it? Well it can be a bit confusing when it comes to the order of events. GameMaker breaks down the game into steps (finite moments of time), which run the events many times every second. Some events happen in a preset order, such as Begin Step, which always starts at the very beginning of the step. Other events happen whenever they are called, such as Create, which is run immediately when an instance of an object is created, to check whether that code occurs at the start or end of the step.
Note
Go to http://wiki.yoyogames.com/index.php/Order_of_events to learn more about GameMaker: Studio's order of events.
In the Events: area, click on Add Event and navigate to Keyboard | Left. This event will run code each step that the left arrow key is held down.
Events need Actions to be applied for them to do anything. GameMaker: Studio uses a drag-and-drop (DnD) system where icons representing common behaviors can be easily implemented. These have been separated into seven different tabs based on functionality. For the vast majority of this book we are going to use only the Execute Script icon found in the Common tab, as we will be writing code placed into Scripts. In this chapter, however, we will use the DnD Actions, so that you get an understanding of what they do.
From the Move tab, select and drag the Move Fixed icon into the Actions area of the Left Key event.

The Move Fixed icon
In the Move Fixed options box, there is an option for what object this action is to be applied to. We want this to be set to Self, so that it is applied to the instance of the player.

Click on the left arrow to indicate the direction we want the movement to go.
Set the Speed field to a value of
8. This will apply a velocity of eight pixels per step.Ensure that Relative is not checked. Relative will add the value to whatever the current value is.
Click on OK.
Repeat steps 4 to 9 for the other keyboard arrows (right, up, and down) with the same Speed and the appropriate direction.
Now we have an object that will move around the world when the arrow keys are pressed. However, if we were to run this, once we started moving, we would be unable to stop. This is because we are applying a velocity to the object. In order for us to stop the object, we need to give it a velocity of zero.
In the Events: area, click on Add Event and navigate to Keyboard | No Key. This is a special keyboard event that will only happen when no keys are being pressed.
Set the direction to be in the center and set the Speed field to
0.The last thing we need to do is to add our collision detection. Collision in GameMaker: Studio is a single event comprising two instances. Each instance is capable of executing an event call on this single collision, though it is generally more efficient to put the code on only one of them. In our case, it makes sense to put a Collision Event on the Player for when it collides with a Wall, as the Player will be the instance that does something. The Wall will remain where it is, doing nothing.
Click on Add Event and navigate to Collision | obj_Wall.
Drag the Move Fixed icon into the Actions: area.

Set the direction to be in the center and the Speed field to
0. Click on OK.
The actors are ready; we have some objects that can be seen and do something. Now all we need to do is put these into a room.
Rooms represent the world in which the instances of our objects live. Most rooms you create will likely be used as various levels, but rooms can also used for:
Frontend menu screens
Non-interactive scenes
Any self-contained environment you need

We want to lay out a world that will contain the player as well as presenting some obstacles. To do this, we are going to place down wall objects around the outer edges of the room and place a few lines in the center.
Create a new room by navigating to Resources | Create Room. This will create a new room in the Resource tree and open up the Room Properties editor.
To make placement a bit easier, set the Snap X and Snap Y fields to
32. This will create a placement grid with snapping points every 32 pixels.Select the settings tab. Here we can change the basic room properties, the size, steps per second, and the name of the room.
Name the room as
rm_GameArea.We will leave the room Width, Height, and Speed fields at their defaults as seen in the following screenshot:

Select the objects tab, and under Object to add with left mouse, select
obj_Wall.In the upper-left corner of the room, click with the left mouse button to place an instance of the wall.
Now you might be thinking that this is going to take a painfully long time to build the room, click by click. Don't worry, there is an easier way. If you hold down Shift + Ctrl, you will be able to paint the world with the instances. If you make a mistake and want to remove an instance, just right mouse click to delete one instance, or hold the Shift key to de-paint the instances. If you just want to move the instance a tiny bit, as in not a whole grid unit, hold the Alt key down.
Holding down the Shift + Ctrl keys and the left mouse button, draw the perimeter walls. Also lay down two extruded sections as shown in the following example screenshot:

Don't forget to add the Player in!
In the objects tab, select
obj_Player.Place a single instance of
obj_Playerinto the room in the lower-right corner of the room.Close the room by clicking on the check mark in the upper-left corner of the Room Properties editor.
At this point, we have all the required elements necessary to run a game in GameMaker: Studio. Before we test the game out, we should save our work by navigating to File | Save.
While creating a game, there are three different types of compilations that can be done. If the game is 100 percent complete, you can select Create Application for the target platform. If the game is still in development, there is Run Normally, which will compile and run the game as if it were an application, and Run in Debug Mode, which runs the debugging tools.
Let's not wait any longer. Run the game by navigating to Run | Run the Game, or by pressing F5.
If everything is working correctly, the player object should be able to move around the world using the arrow keys, but not be able to pass through any of the wall objects. However, there is something not quite right. The player object appears to be flickering due to it being animated. Let's fix this while taking a look at the Script Properties editor.
GameMaker: Studio utilizes its own proprietary scripting language called GameMaker Language
, otherwise known as GML. This language was developed to be very forgiving to the novice user, and utilizes some functionality you likely won't find in other scripting languages. For example, GML will accept the standard expression && to combine two comparisons, or alternatively the word and. GameMaker: Studio does a lot of hard work when it comes to creating games by giving the user a great set of functions, variables, and constants.
As previously stated, we want to stop the player object from animating. This is very easy to do using scripts.
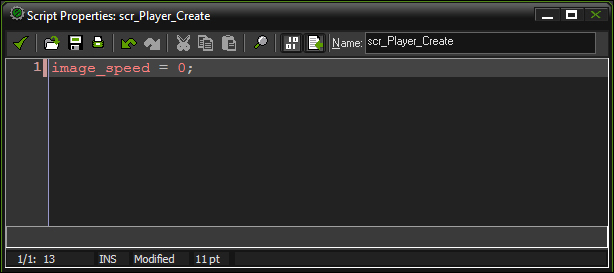
Create a new Script by navigating to Resources | Create Script. This will create a new Script in the Resource tree and open up the Script Properties editor.
Name this as
scr_Player_Create. Throughout this book we will be naming most of our scripts with the name of the event at the end of the name. In this case we will be placing this code into aCreateevent.To stop a Sprite from animating, all we need to do is set the playback speed of the Sprite to zero. On line 1, type the following:
image_speed = 0;
Close the Script by clicking on the check mark in the upper-left corner of the editor.
In order for the script to run we need to attach it to an object.
Reopen the Object Properties editor for
obj_Player.Add a Create Event.
Navigate to Actions | Control, and select and drag the Execute Script icon into the Actions: area.

The Execute Script icon
Select
scr_Player_Createas the script to execute, and then click on OK.
We can now run the game, and we see that the player object is no longer animating.
Backgrounds are a special kind of art asset that come in two different types: background images and tilesets. Unlike Sprites, backgrounds never have any animation as a part of the art asset. Background images are mainly used as large backdrops of a room and are useful if you want the background to move. Tilesets are small slices of art that can be used to paint the background, are useful for creating large, unique worlds, and to keep the graphics cost computationally low.
Note
Use Tilesets if you want:
Only a few art assets to create large worlds
To add unique details to the background
For this simple example we will just create a static background. We will look more into tilesets in the next chapter:
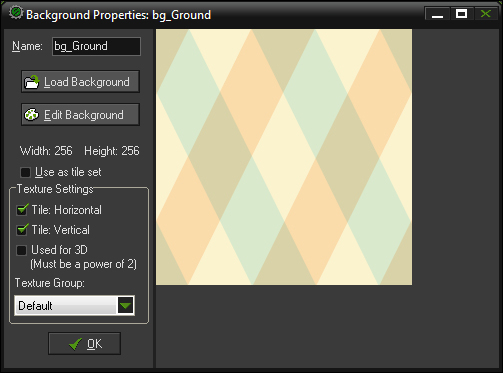
Create a new Background by navigating to Resources | Create Background. This will create a new background in the Resource tree and open up the Background Properties editor.
Name this as
bg_Ground.Click on Load Background and open
Chapter 1/Backgrounds/Ground.png.Then click on OK.
We now have the art asset ready to go, we just need to place it into the room.
Reopen
rm_GameArea.Click on the
backgroundstab.
Each room allows up to eight backgrounds to be displayed simultaneously. These backgrounds can also be used as foreground elements. If no background is active, it will display a solid color.
Select Background 0, and then check the box for Visible when room starts. This has to be active in order to see the background during gameplay.
Select
bg_Groundas the background to be displayed.Everything else can remain at their defaults. Tile Hor. and Tile Vert. should be checked and all other values should be set to
0.Close the room by clicking the check mark in the upper-left corner of the editor.
Let's run the game again and we can now see that we have a background. Things are definitely looking better, but something is missing. Let's get some sound into the game.
The Sound Properties editor is where you can bring in sounds to be used in your games. GameMaker allows you to bring in MP3 and WAV files only. There are two types of sounds that you can use:
Normal sounds
Background music
Normal sounds are all the small sound effects that you hear, such as gunfire and footsteps. These should generally be WAV files. Background music is for the longer sounds such as the game music, but also things such as spoken dialog. This should be in MP3 format.
When GameMaker: Studio exports the game audio for HTML5, all sounds will be converted to both MP3 and OGG format. This is due to the fact that different browsers use different audio file formats in their implementation of the HTML5 audio tag. Luckily for us, GameMaker: Studio automatically adds browser identification code into the game, so the game knows what files are being used.
We are going to create two sounds for the game, some background music and a sound effect for a collectible object.
Let's bring in some music to our game to help build some atmosphere.
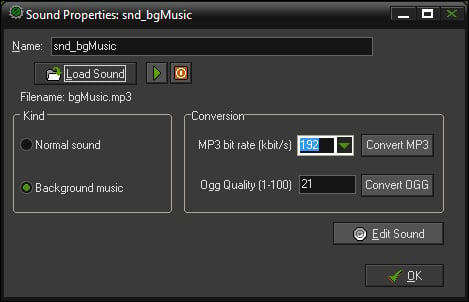
Create a new Sound by navigating to Resources | Create Sound. This will create a new Sound in the Resource tree and open up the Sound Properties editor.
Name this as
snd_bgMusic.Load the
Chapter 1/Sounds/bgMusic.mp3file. If you want to hear the music, just hit the play button. When you are done listening, hit the stop button.Under Kind select Background Music as the type, and then click on OK.
We will want to have the music start right at the start of the game. To do this we are going to create a data object that we will call the Overlord . Data objects are generally not meant to be seen in the game, so we do not need to assign it a Sprite.
We will be using an Overlord object to watch over the game and control things, such as the music and win/lose condition.
Create a new object and name it
obj_Overlord.Add an Event, and then navigate to Other | Game Start. This is a special function that will only be run when the game first starts.
Navigate to Actions | Main1, and select and drag the Play Sound icon into the Actions: area.

The Play Sound icon
Set the sound: field to
snd_bgMusic, set loop: totrue, and then click on OK.
Before we test this out, we need to make sure the Overlord is in the world. When you place it into a room, it will be represented by a little blue circle icon, as shown in the following screenshot:

Reopen
rm_GameArea.Select
obj_Overlordfrom the objects tab and place a single instance in the room.
Let's run the game and listen. Music should start playing right away and loop infinitely. Let's move on to creating a collectible.
We are going to create an object that the player can collect during the game. When the player collides with it, the sound will be played once.
Create a new Sound and name it
snd_Collect.Load the
Chapter 1/Sounds/Collect.wavfile and set it to Normal Sound, and then click on OK.We haven't created an Object for this, nor have we brought in a Sprite. Now is a chance for you to test your memory. We will only quickly go over what we need.
Create a new Sprite and name it
spr_Collect.With Remove Background and Smooth Edges selected, load the file
Chapter 1/Sprites/Collect.pngand center its origin.Create a new Object and name it
obj_Collect.Assign
spr_Collectas its Sprite.Add a Collision Event with
obj_Player.Navigate to Actions | Main1, and drag the Play Sound icon into the Actions: area.
Set the
sound:field tosnd_Collectand set loop: tofalse.Now when the player collides with the object it will play the sound once. That's a good start, but why don't we give the player a bit more of a reward?
Navigate to Actions | Score, and drag the Set Score icon into the Actions: area.

The Set Score icon
As can be seen in the next screenshot, set the new score: field to
50, check the box for Relative, and then click on OK. This will add 50 points to our score each time the object is collected. Relative makes the score add to the previous score.
Now we have something worth collecting. Only one issue remains and that is we get the points and sound just for touching the object. We can't let that go on forever!
Navigate to Actions | Main1, and drag the Destroy Instance icon into the Actions: area. This action will remove the instance from the world. Leave the values as they are, and click on OK.

The Destroy Instance icon
We are done with this object, and if built correctly, it should look like the following screenshot. Click on OK.

Let's place a couple of these collectibles into the room and run the game. We should be able to move the player around the world and collide with the collectibles. We should hear a sound play and the object disappears. But where is our score? Well, in order to display it, we need to bring in some text.
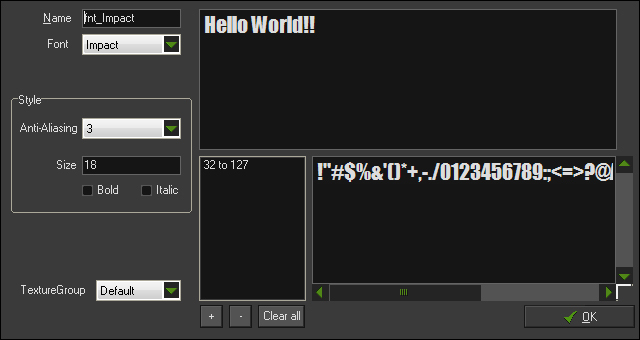
You can import fonts to use them as text in your games. These fonts need to be installed on your machine in order to use them during development. Each font resource is set to a specific font type, size, and whether it is bold/italicized or not. If you want a slight variation, such as a font that is two points larger, than a separate font resource must be created. This is due to the fact that on export, GameMaker will convert the font into an image that will allow it to be used without the font being pre-installed on the user's machine.
We are going to create a font that will be used to display the score of the game.
Create a new Font by navigating to Resources | Create Font. This will create a new Font in the Resource tree and open up the Font Properties editor.
Name this
fnt_Impact.From the Font drop-down menu, select Impact. This is a default Windows font.
Set the Size to
16. Then click on OK.We now have a font that we can use in our game. For this, we are going to have the Overlord object draw the game score at the top of the screen. We will also make the text white and align it to the center.
Reopen
obj_Overlord.Add a Draw GUI event by navigating to Draw | Draw GUI.
Navigate to Actions | Draw, and drag the Set Color icon into the Actions: area. This will open a dialog box where you can set a color.

The Set Color icon
We want to set the color to teal. In the color palette that pops up, select the teal color found on the bottom row, fifth column from the left. Click on OK.

Navigate to Actions | Draw, and drag the Set Font icon into the Actions: area. This will open up a dialog box with two parameters: the font to use and how it should be aligned.

The Set Font icon
Set the Font: field to
fnt_Impactand align it tocenter. Click on OK.
Finally, navigate to Actions | Score, and drag the Draw Score icon into the Actions: area. This will open up a dialog box with three parameters: the x and y coordinates, and an optional caption that can be placed in front of the actual score.
Set the x: field to
320, the y: field can remain at0, and removeScore:from the caption: field, leaving it blank as can be seen in the following screenshot. Click on OK.
We can now run the game and the score will now be displayed at the top of the screen in the center. When you collide with the collectibles now, you should see the score increase.
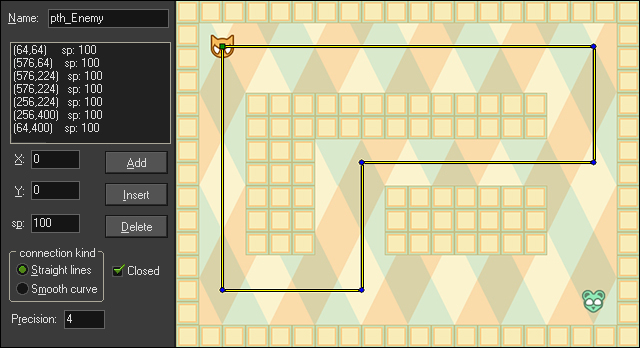
Paths are the best way to create complex movement patterns for objects. A path is made up of a series of points in which an object can move along. The transition between points can be straight, meaning the object will hit each point precisely, or curved, an interpolation between three points. The path can either be an open line or a closed loop. The following screenshot will be used as the reference image throughout this section.
We are going to create a simple enemy that will follow a path around the room. If the player collides with the enemy, the player will be destroyed. Let's start by creating the path.
Create a new Path by navigating to Resources | Create Path. This will create a new Path in the Resource tree and open up the Path Properties editor.
Name this as
pth_Enemy.At the end of the editor toolbar we can set what room is displayed. This is very useful for creating accurate paths on a per room basis. Set this to
rm_GameArea.
To add a point for the path you can just left-click anywhere on the map. The very first point will be represented by a green square and all the points following will be circles.
Place the first point at
64,64of the map. If you make a mistake you can always drag the point to the proper position, or you can manually set the X and Y values.To this path we are going to add five more points as seen in the reference image.
We will leave all the other settings at their defaults, so click on OK.
The path is ready for use, now we just need to create an enemy to attach the path to. This enemy is going to simply move along the path and if it collides with the player, it will restart the game.
Create a new Sprite and name it
spr_Enemy.With Remove Background and Smooth Edges selected, load
Chapter 1/Sprites/Enemy.pngand center the origin.Create a new Object and name it
obj_Enemy.Add a Create Event, navigate to Actions | Move, and drag the Set Path icon into the Actions: area. This will open the Set Path options dialog box.

The Set Path icon

Set path: to
pth_Enemy.Set the speed: field to
4.The next option determines what should happen when the instance reaches the end of the path. There are options to stop, continue on from the start (for open paths), continue from here (for closed paths), and reverse directions. Set at end: to continue from here.
The relative: option here determines whether the path starts where the instance is (relative), or whether the instance starts at the path's first point (absolute). As we built it to fit the room, set relative: to absolute. Then click on OK.
We now have an enemy ready to follow a path, but it isn't really a threat to the player. Let's put a collision event on the enemy and make it restart the game on contact.
Add a Collision Event with
obj_Player, navigate to Actions | Main2, and drag the Restart Game icon into the Actions: area.
The Restart Game icon
The enemy is now complete, so click on OK to close it.
Place a single instance of the enemy anywhere in the room. It doesn't matter exactly where, as it will relocate itself to the proper location when the game runs.
Save the game and run it. We should see the enemy moving along the path around the room. If the player object collides with it, the game will restart.
We've now got some risk in the game, but not enough reward. Let's fix that, shall we?
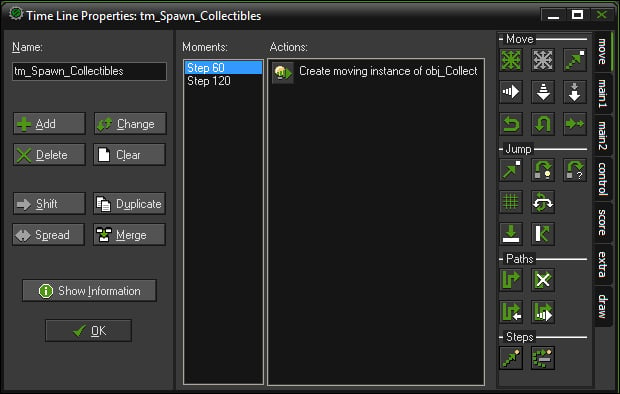
Time Line is an advanced time tracking system that allows finite control of things that happen during gameplay. A Time Line is comprised of a list of moments. Each moment represents a number of steps from when the Time Line started.
While a Time Line can be used for almost anything, one of the most common uses for one is to spawn instances. In this game, we are going to use it to spawn our Collectible objects, so that the player has something to chase after.
Create a new Time Line by navigating to Resources | Create Time Line. This will create a new Time Line in the Resource tree and open up the Time Line Properties editor.
Name this as
tm_Spawn_Collectibles.Click on the Add button and set Steps to
60.We are going to make these collectibles move by applying a velocity to them. Navigate to Actions | Main1, and drag the Create Moving icon into the Actions: area.

The Create Moving icon
Set the object to
obj_Collect.We want the spawning to occur offscreen, so that the player doesn't see it blink into existence. We will make this Collectible move horizontally, so we will start from the left of the game area. Set the x: field to
-64.We don't want the collectibles always spawning in the exact same location, so we are going to add a random element to it. We will create the instance at a random vertical position between 48 pixels from the top and 48 pixels from the bottom of the screen. Set the y: field to
random(394) + 48.Give it a speed of
4, and set the direction: field to0. It should look like the following screenshot. Click on OK.
Add another Moment at
120and repeat the previous steps except this time make it vertical. To do this, the x: field should be set torandom(546) + 48, the y: field should be-64, the speed: field should be4, and the direction: field should be270.We now have a Time Line that will spawn a new moving Collectible every two seconds. However, we need to attach this to an object so let's apply this to the
obj_Overlord.Reopen
obj_Overlord.In the Game Start Event that already exists, drag the Set Time Line icon into the Actions: area by navigating to Actions | Main2.

The Set Time Line icon
Set the time line: field to
tm_Spawn_Collectibles.Leave position: at
0; this will start it from the beginning.Set start: to Start Immediately.
We want it to repeat itself infinitely, so set loop: to
Loop.
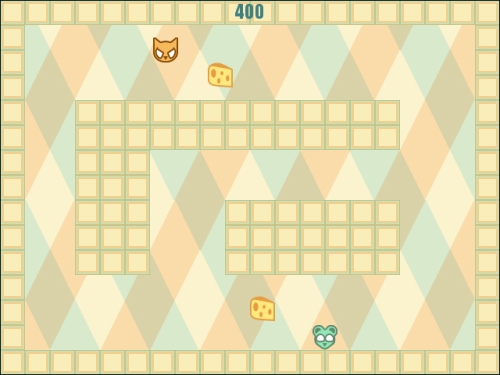
There you have it! Run the game and you should see the collectibles start to spawn after two seconds and continue to be created forever. As you can see from the following screenshot, our game is complete, but there is still one component we need to take a look at.