After you have downloaded and installed Gideros, you can try to create your first Gideros project. Although Gideros is IDE independent, and lot of other IDE's such as
LuaGlider,
ZeroBrane, IntelliJ IDEA, and even Sublime can support Gideros, I would recommend that first-time users choose the provided Gideros Studio. That is what we will be using in this book.
Trying out Gideros Studio
You should note that I will be using the Windows version for screenshots and explanations, but Gideros Studio on other operating systems is quite similar, if not exactly the same. Therefore, it should not cause any confusion if you are using other versions of Gideros.
When you open Gideros Studio, you will see a lot of different sections or what we will call
panes. The largest pane will be the Start Page, which will provide you with the following options:
Create New Project
Access offline the Getting Started guide
Access offline the Reference Manual
Browse and try out Gideros Example Projects
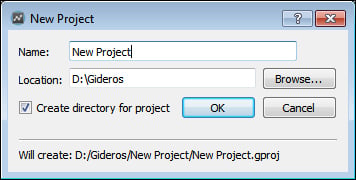
Go ahead and click on Create New Project, a New Project dialog will open.
Now enter the name of your project, for example, New Project. Change the location of the project if you want to or leave it set to the default value, and click on OK when you are ready.
Note that the Start Page is automatically closed and the space occupied by the Start Page is now free. This will be your coding pane, where all the code will be displayed.
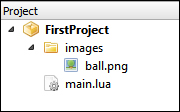
But first let's draw our attention to the Project pane, where you can see your chosen project name inside. In this pane, you will manage all the files used by your app.
One important thing to note is that file/folder structure in Gideros Project pane is completely independent from your filesystem. This means that you will have to add files manually to the Gideros Studio Project pane. They won't show up automatically when you copy them into the project folder.
And in your filesystem, files and folders may be organized completely different than those in Gideros Studio.
This feature gives you the flexibility of managing multiple projects with the same code or asset base. When you, for example, want to include specific things in the iOS version of the game, which Android won't have, you can create two different projects in the same project directory, which could reuse the same files and simultaneously have their own independent, platform-specific files.
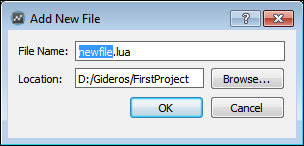
So let's see how it actually works. Right-click on your project name inside the Project pane and select Add New File.... It will pop up the Add New File dialog.
Like in many Lua development environments, an application should start with a main.lua file; so name your file main.lua and click on OK. You will now see that main.lua was added to your Project pane. And if you check the directory of your project in your filesystem, you will see that it also contains the main.lua file.
Now double-click on main.lua inside the
Project pane and it will open this file inside the code pane, where you can write a code for it.
So let's try it out. Write a simple line of code:
What this line will do is simply print out the provided string (Hello world!) inside the output console.
Now save the project by either using the File menu or a diskette icon on the toolbar and let's run this project on a local desktop player.
Using the Gideros desktop player
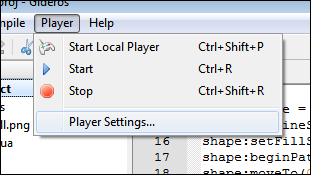
To run our app, we first need to launch Gideros Player by clicking on a small joystick icon on the toolbar.
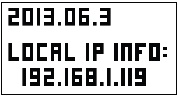
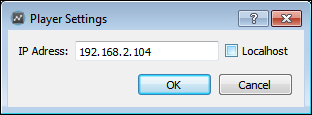
This will open up the Gideros desktop player. The default screen of Gideros Player shows the current version of Gideros used and the IP address the player is bound to.
Additionally, the desktop player provides different customizations:
You can make it appear on the top of every window by navigating to View | Always on Top.
You can change the zoom by navigating to View | Zoom. It is helpful when running the player in high resolutions, which might not fit the screen.
You can select the orientation (portrait or landscape) of the player by navigating to Hardware | Orientation, to suit the needs of your app.
You can provide the resolution you want to test your app in by navigating to Hardware | Resolution. It provides the most popular resolution templates to choose from.
You can also set the frame rate of your app by navigating to Hardware | Frame Rate.
Note
Resolution selected in Gideros Player settings corresponds to the physical device you want to test your application on.
All these options give you the flexibility to test your app across different device configurations from within one single desktop player.
Now when the player is launched, you should see that the start and stop buttons of Gideros Studio are now enabled. And to run your project, all you need to do is click on the start button.
Note
You might need to launch Gideros Player and Gideros Studio with proper permissions and even add them to your Antivirus or Firewall's exceptions list to allow them to connect.
The IP address and Gideros version of the player should disappear and you should only see a white screen there. That is because we did not actually display any graphical object as image. But what we did was printing some information to the console. So let's check the Output pane in the Gideros Studio.
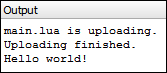
As you see the Output pane, there are some information messages, like the fact that main.lua was uploaded and the uploading process to the Gideros Player was finished successfully; but it also displays any text we pass to Lua print command, as in our case it was Hello world!.
The Output pane is very handy for a simple debugging process by printing out the information using the print command. It also provides the error information if something is wrong with the project and it cannot be built.
Now when we know what an Output pane is, let's actually display something on the player's screen.
Displaying graphical objects in Gideros Player
Before we start displaying graphical objects as images on the screen, there are some things to note.
Gideros uses an hierarchical structure to hold the objects and render them on the screen with the root element called the stage.
Note
The variable stage is the root of the hierarchy of the objects we want to display on the screen. So anything you want to display on the screen, you need to add it to the stage variable or to any of the child elements that have been added to stage.
This hierarchy also determines the Z-ordering of the objects. For example, children always appear above their parents and, when the objects are at the same level, the later added ones appear on top.
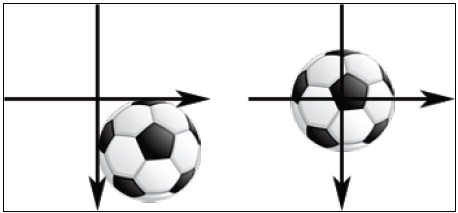
Another thing to note is the coordinate system used by Gideros. It is the Cartesian coordinate system with (0, 0) coordinate in the top-left corner. And objects with higher y-axis value will be placed lower.
Note
Gideros uses the Cartesian coordinate system, where the values of the y axis increase downward, thus making (0, 0) coordinate appear in the top-left corner, and (0, 100) coordinate appears below it.
Since this chapter will include more coding examples, every time you get lost and don't know how to use any specific class (what method the class has, which parameters it takes, and what is the purpose of the class), you can get more information in the reference manual provided with the copy of Gideros. You can easily locate it under the Help menu by selecting API Documentation. It should open a webpage with the list of all Gideros classes, and also their methods, properties, and events for each class, to show you what it does and how to use it.
The first thing we will display is simple text. To do that, we need to create an instance of the TextField class, which would represent our text on the screen. Usually, we need to provide a font and text to the TextField class, but in this situation, we will simply provide nil instead of font. This is because we don't have any fonts yet and nil will tell Gideros that there is nothing we want to provide as font, and TextField would use the internal Gideros system font.
After that we store the instance of TextField in the local variable named text.
We then set the position of the text we want to display. By default, the position coordinate is (0, 0), which is in the upper-left corner. But we provide a small (10, 20) coordinate offset because text is positioned by the baseline and it won't appear whole at (0, 0) coordinates, but rather be a little outside the screen.
Once the position is set, we scale the text twice as large as it is in the original, because the default font in Gideros is quite small.
In the end, we add the text to the stage variable, which will render this text on the screen.
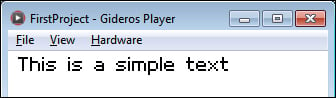
Now let's try and run this modified project again by clicking on the start button inside Gideros Studio. If everything is right, you will see in the
Output pane that main.lua is being uploaded again and the provided text should appear on the screen of Gideros Player.
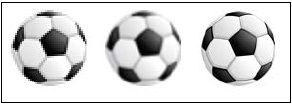
The next thing we will try to display on the screen is a simple image. For that purpose, you can use any image you have (or use the one provided in code examples); I will be using ball.png, which is an image of a simple football.
The first thing to do is to copy the image in your Gideros project folder. After you have copied the image, go back to Gideros Studio. You should see that your image did not automatically appear in the Project pane and you need to add it manually. So just to emphasize this difference between Gideros Project files and your filesystem, let's create a folder inside the Project pane, where we will store our images.
To do that, right-click the mouse button on your project name in the Project pane and select New Folder. This should create a folder in the Project pane file hierarchy. Now name it images.
After it is done, let's add our image to this folder by right-clicking on the images folder, selecting Add Existing Files, and selecting our copied image in the opened file dialog. Our image should now have been added to the Project pane.
You can also click on your image in the Project pane and see a preview of it in the Preview pane.
Just to sum it up and emphasize the difference between Gideros project's file management and what actually happens on your filesystem, you can see that in Gideros Studio, your image is in the images folder. But if you open the directory of your project in your filesystem, you will see that there is no images directory and your image is where you copied it to.
This is an important difference that you need to understand and take advantage of when managing multiple projects that share the same codebase and assets.
So, our image is already in the project; now let's modify our project and display this image on the Gideros Player's screen.
First, we need to create a texture representation of the image using the Texture class. After that, we can create the image object by providing our texture to the Bitmap class.
Then, we set it's position to (40, 40) coordinate and add it to the stage variable to render. If you run the project, you should see that the image is positioned at (40, 40) coordinate at its top-left corner. But Bitmap objects also have an option to position themselves using different internal points as positioning anchors, called anchor points.
For example, what if we want an image's center to be at (40, 40) coordinate. Of course we could calculate that! If we take a 80 x 80 image and want to position its center at (40,40), we need to position its left corner at (0, 0) coordinate.
But we also could simply change its anchor point to the relative center using (0.5, 0.5) as the anchor point like this: image:setAnchorPoint(0.5, 0.5).
Anchor points provide an easy way to position an image relative to the provided origin point from 0 (image's top or left-side) to 1 (image's bottom or right-hand side). By default, the anchor point is (0, 0), which means that image will be positioned by its top-left corner. But when we set the anchor point to (0.5, 0.5), we say that we want to position the image by its center.
Thus in our case, the image's center will be on (40, 40) coordinate and not at the top-left corner.
And in the end, as usual, we must add the image to the stage variable for it to be rendered.
The separation between simple image object as the Bitmap class and texture representation as the Texture class in Gideros provides great flexibility:
Efficiently reusing textures
Easily changing the textures of an existing Bitmap without changing the Bitmap object itself
Allowing us to use textures for other purposes such as, for example, filling the shapes
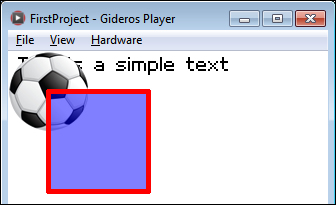
And again we can try and run this modified project by clicking on the start button in Gideros Studio. If everything is ok it should display the image on top of the previously added text.
I made the image to overlay the text deliberately, just to show you how Z-ordering works in Gideros. Text was added to the stage as a first element, and the image was added after it. Thus, if we position text and an image in the way they would overlay, the image would be on top of the text (only because it was added to the stage after the text).
Another thing we will try to display on the screen would be our drawn shape. For that purpose, there is a
Shape class in Gideros, which could draw any shape from the provided coordinates that can have line style and fill style of a solid color image.
First we create the Shape instance and store it in the shape variable. After that, we set the style of the lines used in the shape. In the example, by calling shape:setLineStyle(5, 0xff0000, 1), we use red lines that are 5 px wide and with full opacity. An opacity or alpha channel can be provided as values between 0 (fully transparent) and 1 (not transparent).
After we set our line styles, we also provide a fill style using the shape:setFillStyle(Shape.SOLID, 0x0000ff, 0.5) method call. Here, Shape.SOLID specifies that we will be using a solid color to fill the shape (we could also use texture to fill the shape by providing Shape.TEXTURE). Then, similar to what we did before, we provide a fill color and an alpha value. In our case, blue and semi-transparent alpha value.
After we have set the style of our shape, we can draw something with that. To let the shape object know we want to start drawing, we need to call the shape:beginPath() method. After that, we can imagine that we have a pencil and we need to move it using shape:moveTo to some relative coordinate; in our case, (0, 0) coordinate. Then we can draw a line to another coordinate using the shape:lineTo method. In our case, we are drawing a square with 100 px wide sides.
When we've finished drawing, we can call the
shape:closePath() method, which would automatically draw the line from a last and first point in the shape. Then, we tell the shape object that we've finished drawing by calling the
shape:endPath() method.
And the last thing we should do is to position the shape and add it to the stage variable, so it would be rendered.
Let's again run the project by clicking on the start button in Gideros Studio.
Now, on the Gideros Player screen you should see some text and an image positioned over the text, because it was added to the stage variable after it. And you should see a square with red line and a blue semi-transparent filling over the image (because it was added to the stage variable after the image). As the filling of the square is semi-transparent, you should also see the image underneath it.
Note
There is also an alternative to Shape, which is called the Mesh class, and it allows you to draw in triangles and provide much wider functionality, such as setting separate colors for vertices and creating gradients.
Additionally, meshes are more efficient than shapes, but they are also much more complex to use (you would have to represent all shapes in triangles to use meshes) and have their own limitations, for example, mesh triangles can't be transformed (rotated, scaled) as Shapes.
Using the Sprite class for groups and layers
By now, we should have three objects positioned in the way they overlay each other. But what if we want to position them somewhere else on the screen while maintaining their relative positions (they would still overlay in exactly the same way)?
The first thought would be to move them separately by the same amount of coordinates. It might be ok to do so while there are three objects, but imagine if we had hundreds of objects to move; it might not be so easy or efficient to move them separately.
For that purpose we can use the Sprite class, which is actually just a dummy holder (without anything to render) and is meant to group other objects. So instead of adding our text, image, and shape straight to the stage variable, we first create a Sprite object to group them and store it in the variable named group. Then we add our objects to group and in the end, add this group to the stage variable.
After this modification, we can move the whole group; so for example, if we call the group:setPosition(100, 100) method, the whole group would be moved to (100, 100) coordinates, maintaining their relative positions to each other.
This is one of the most common usages of the Sprite class, but there is another one, which is meant for dividing groups of objects into layers.
Now, for example, we have a need to add and remove objects in our game, but we want to add each new object underneath our current three objects, so that our text, image, and shape objects would always be on top overlaying any newly added object.
Of course, it may seem hard to achieve because Gideros uses a Z index based on an object's position in the rendering hierarchy, so all new elements will always be on top. But actually, it can be done very easily by using the Sprite object as a layer.
First, we will create a new group using the Sprite class and store it in the bottomLayer variable. Then we will add this layer below our group by using the stage:addChildAt method and providing index 1, which means first. It will add bottomLayer before group, thus making it appear overlapped.
After that, there is no need to use stage:addChildAt anymore, because every object you add to bottomLayer will automatically be underneath the group (because this layer by itself is underneath the group).
This example perfectly demonstrates how the rendering hierarchy works in Gideros, and you can experiment more with it to understand it better and use it to your advantage.
Managing project settings
Now when we have something to see in our Gideros Player, let's experiment more with a player's customizations and change its resolution to something higher, such as an iPad's resolution (768 x 1024). When you have done this, hit the start button in our Gideros Studio to refresh the project.
Previously, our group, when set to (100, 100) coordinates, was almost at the center of the app, but now it's in the top-left corner. Why is that?
Well, previously we ran our app in the default (320 x 480) resolution, but now there is a higher resolution (768 x 1024), and relatively, our positioned group is still at the (100, 100) coordinate.
But does this mean you will have to create a different app layout for each resolution? Of course not, Gideros can handle the automatic scaling for you. Let's try it out.
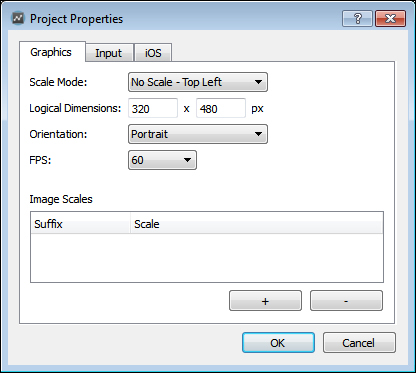
Right-click on your project name inside the Project pane in Gideros Studio and select Properties. The
Project Properties dialog should pop up.
In the Project Properties dialog you can perform the following tasks:
While Orientation and FPS are self-explanatory, Logical Dimensions and Scale Mode may seem confusing at first.
Let's try selecting Letterbox as Scale Mode and clicking on OK. Then click on the start button to reload the project in Gideros Player. If you did not have the iPad resolution selected in Gideros Player, then select it and reload the project again.
You should now see the same effect that was at the default resolution—our group is now at similar position.
So what happened? Gideros took our logical dimensions and automatically scaled it up to the iPad resolution, maximally without cropping it and maintaining the aspect ratio. That's awesome, isn't it?
I try to use the Letterbox scale mode in all my projects as it provides the most resistance to all resolutions, but let's see what the other options are:
No Scale – Top Left: This mode does not scale the project
No Scale – Center: This mode does not scale the project, but centers it
Pixel Perfect: This mode centers the app and scales it with scale increments such as 1/3, 1/2, 1, 2, or 3
Letterbox: This mode scales the project maximally preserving the aspect ratio and without cropping the screen
Crop: This mode fills the screen completely by cropping all the content if needed and preserving the aspect ratio
Stretch: This mode stretches the app on both dimensions without preserving the aspect ratio
Fit Width/Height: This mode fits only one dimension preserving the aspect ratio
To learn more about scale modes, check out the Gideros documentation here: http://docs.giderosmobile.com/automatic_screen_scaling.html.
So the Letterbox scaling does what we need; but if you look at the image closely, you will note that it is quite pixelated and appears in poor quality.
There are two ways to handle this problem. The first one would be by applying anti-aliasing to the image. You can do that by providing the second parameter true when creating texture like this: local texture = Texture.new("images/ball.png", true). Try it out and reload the project in the player by clicking on the start button inside Gideros Studio. You will see it looks better.
While this works great for small scaling, it is better to use larger images, for example, twice as large images for iPad retina resolution than used in iPhone. And again, Gideros comes to aid on this problem.
Automatic image resolution
Another killer feature of Gideros is the automatic image resolution selection. Basically, it allows you to provide the same image in different (higher and lower) resolutions. Gideros will automatically select the image that suits the current screen resolution best, based on your logical dimensions and the scaling mode.
To do that, you need to specify the scaling ratios you will be using in your images. This can be done by navigating to the Project Properties and clicking the + button in the Graphics tab under Image Scales.
You can specify any suffix you want together with the ratio, for example, let's specify three ratios such as:
suffix: @small, ratio: 0.5
suffix: @medium, ratio: 1
suffix: @big, ratio: 2
Then create images with resolutions in these ratios and name them accordingly:
If you add all those images to Gideros Studio, then while running the app in different resolutions, Gideros will automatically choose the image that suits the device best. Thus for example, in Letterbox scaling, the image won't be so upscaled anymore, because the larger version of it will be used automatically.
Note
All the example setting provided here could be interpreted as default or recommended. But you will need to experiment with your own combination of image sizes, logical dimensions, and scaling modes to achieve results most suitable for your game needs and device-resolution coverage.
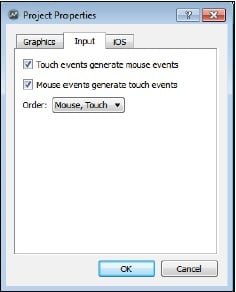
That's all about the Graphics tab. Now let's move on to the next one, the
Input tab.
Apart from the key inputs, there are two types of input events in Gideros:
The settings on the Input tab allow you to generate mouse events on mobile devices and touch events (with single touch) on a desktop player. So both of the events would be compatible with any platform. Also for example, you could use mouse events to handle single touches more easier and touch events for multiple touches. Thus, it is recommended to enable generation of both events.
On the last tab, there are some iOS-specific settings allowing you to enable or disable the retina support and autorotation for a specific set of iOS devices. Due to the Apple policy, when reviewing apps, it is recommended to enable retina and autorotation either for both iPad and iPhone (if you are creating a universal project) or for the specific device you will be supporting in your app.
Exporting Gideros project
Last thing you may want to do with your project is to export it, so you could build an Android or iOS app and submit it to the market.
This can be easily done by accessing the File menu and selecting Export Project. If this is the first time you are exporting an app, you may see a message: You do not have a license installed. Please run Gideros License Manager.
It means you need to license your copy of Gideros (even free accounts have to license it). To do that, you must have an account with Gideros (you can register one here: http://giderosmobile.com/members/register, if you haven't done so already).
Once registered, go to your Gideros installation folder and run GiderosLicenseManager.exe.
Enter the username and the password you used when registering with the Gideros website and click on Login.
If everything goes well, you should see a message with your license information.
Note
If, for some reason, Gideros License Manager can't install a license, you can do it manually by logging into your Gideros account and accessing this page, http://giderosmobile.com/members/license, which allows you to get the license file and also provides detailed information on how to install it.
Now you can try accessing the
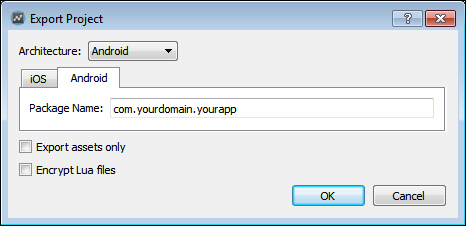
Export Project option again in Gideros Studio. This time the Export Project dialog should pop up.
In the
Export Project dialog, you can chose the platform to which you want to export with an option to provide some platform-specific settings. Additionally, you can select exporting a full project or checking Export assets only.
Note
A full export should be done the first time you are exporting your Gideros project. It will create a platform-specific (Android or Xcode) project with all your files inside.
After that, you may select to Export assets only, especially if you did some modifications to the exported Android or Xcode project (for example, installed some platform specific plugins).
When exporting assets only, Gideros will only export your files (images, code, and so on) that come from the Gideros Studio Project pane and will not override previously exported Xcode or Android project and its settings.
After that, you may import the exported project in the platform-specific IDE and build or run it as you would when developing the app natively for this specific platform.


 Free Chapter