

Now that the lighting is ready, we need to add some material to the objects of our scene. Let's start with the key.
Select the key from the scene, add a new material and name it Key. Even if the key material alone will be quite simple, this time we are going to use the node editor in order to set it up.
By default when we add a new material, Cycles will add a Diffuse shader node and of course, the material output. For the key metal we will also need this node, so let's leave it where it is. Moreover, we are going to need a glossy shader in order to add reflections to the key surface.
These are the steps to create the materials of this recipe:
To add a new node, we need to keep the cursor on the node editor and press Shift + A to make the Add menu appear. Now let's go to Shader | Glossy BSDF. A new Shader node will appear where your cursor stands.
Now we need to mix the Diffuse BSDF and the Glossy BSDF nodes. To do this, we can use the Mix Shader node. You will find it again in the Add menu, Shader section. Now let's take the output from the Diffuse BSDF node and plug it into the first Shader input of the Mix Shader node, and the output of the Glossy BSDF node into the second Shader input of the Mix Shader node. As a last thing, take the output of the Mix Shader node and plug it into the Surface input of the Material Output node.
In the real-time viewport you should already see that the key is looking much better than with the plain white material it had before. Anyway, we need to make a couple of tweaks to make it look as it really should.
First of all we need to change the mix factor in the Mix Shader node. Let's change the face value to
0.800. In this way 80 percent of the output will come from the lower shader input, where we connected the Glossy BSDF node. Now the key should have stronger reflections on the surface.Anyway if we observe a real key, we will notice that reflections are quite sharp when objects are close to the surface, while they get a bit blurred as the distance increases. Our key right now has definitely too blurred reflections, and to make them sharper, we need to change the Roughness value of the Glossy BSDF node. Set it to
0.060and now we can see that the reflection of the close objects are much sharper.The last thing to do is to change the diffuse color to a gray one (set RGB values as
0.200,0.200,0.200).
The final node setup should look like the following screenshot:
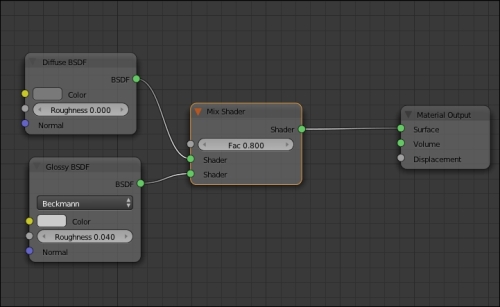
In this first material we are mixing two different BSDFs to obtain the desired result. While the Glossy BSDF is important to get reflections on the surface of the key, it is also true that the metal of which the key is made of does not behave as a mirror. This means that even if it is strongly influenced by the colors and lights around it, in most cases it will maintain its grayish color. This is why we mixed the Glossy BSDF with a bit of Diffuse BSDF. The Diffuse BSDF is useful to give a plain color to a surface. It will still be influenced by surrounding objects and lights, but it will help the surface to maintain its gray color in most environment situations.