

Let's dig deeper into our spinning-shape world and explain how it all works. You can follow along with this section in the online editor or type the code into a new HTML file.
First, there's the HTML template:
<!DOCTYPE html>
<html>
  <head>
    <meta charset="utf-8">
    <style>
      body {
        background-color: #ffffff;
        margin: 0;
        overflow: hidden;
      }
    </style>
  </head>
  <body>
    <script src="http://mrdoob.github.com/three.js/build/three.min.js"></script>
    <script> /* …your code here… */ </script>
  </body>
</html>
Nothing surprising here. We're basically just including Three.js and removing the browser's default page margins. The <canvas> element, onto which we'll render our scene, will be added into the DOM by our JavaScript.
Note
Instead of using the Three.js file from the GitHub CDN, you should download the latest Three.js build and include the local copy in your projects. The full Three.js script can be found in the build folder of the project or can be downloaded from https://raw.github.com/mrdoob/three.js/master/build/three.js. In production, you will want to use the minified version (three.min.js).
Now comes the fun part: telling Three.js to display something. First, let's declare the objects we'll need:
var camera, scene, renderer;
var geometry, material, mesh;
Then, let's give them values and explain what they do:
scene = new THREE.Scene();
A Scene class represents a list of objects that affect what is displayed on the screen, such as 3D models and lights. (Each class provided by Three.js is invoked as a property of the global THREE variable.) A scene isn't very useful by itself, so let's put something in it.
Tip
Downloading the example code
You can download the example code files for all Packt books you have purchased from your account at http://www.packtpub.com. If you purchased this book elsewhere, you can visit http://www.packtpub.com/support and register to have the files e-mailed directly to you.
A mesh object can be displayed in a scene, instantiated using the THREE.Mesh constructor. It consists of geometry, which is the object's shape, and a material, which is a color, image, or other texture that defines how the faces of the shape appear. In this case, the geometry we'll use is IcosahedronGeometry, which is based on a 20-sided shape approximating a sphere. The constructor takes a radius and detail, where detail is the number of times to split each edge of the icosahedron to add more faces and make the shape closer to a sphere:
  geometry = new THREE.IcosahedronGeometry(200, 1);
  material = new THREE.MeshBasicMaterial({ color: 0x000000, wireframe: true, wireframeLinewidth: 2 });
  mesh = new THREE.Mesh(geometry, material);
MeshBasicMaterial is a type of material that is not affected by the surrounding lighting. The options we're passing include the color in hex format (like you'd use in CSS), whether to display the shape as a solid color or highlight the edges, and how thick to draw the wireframe, respectively.
Tip
There are many other types of geometry and materials. Chapter 2, Building a World describes them in detail.
Now we can add our mesh to the scene:
scene.add(mesh);
We've put together what we want to display, so the next step is to actually display it. Three.js accomplishes this with renderers, which take the objects in a scene, perform some calculations, and then ask the browser to display the result in a specific format like WebGL. The renderer creates a new <canvas> element by default that should be added to the DOM:
  renderer = new THREE.CanvasRenderer();
  renderer.setSize(window.innerWidth, window.innerHeight);
  document.body.appendChild(renderer.domElement);
Here, we're using the CanvasRenderer as our method of displaying the scene. (We'll cover other renderers such as WebGLRenderer in Chapter 2, Building a World.) We're also telling the renderer to display the scene at the full size of the browser window with our
setSize() call. Then we will add the renderer's canvas to the DOM with appendChild(renderer.domElement).
Tip
Avoid changing the canvas' size with CSS; use the renderer's setSize method instead, which sets the width and
height HTML attributes on the canvas element. This is because CSS describes the display size but not the render size. That is, if the canvas is rendered at 800 x 600, but the CSS shows it at 1024 x 768, the rendering will be stretched to fill the space just like if you specified the CSS size of an image to be larger than its true size. This can result in distortion and difficulty converting between "screen space" and "canvas space."
The one last thing we need is a camera object as shown in the following code snippet, which is something Three.js uses to tell the renderer from what perspective the scene should be displayed. If the player was standing in your virtual world and their screen represented what they could see, camera would be their eyes, renderer would be their brain, and scene would be their universe.
  camera = new THREE.PerspectiveCamera(75, window.innerWidth / window.innerHeight, 1, 1000);
  camera.position.z = 500;
A PerspectiveCamera instance displays the world from a single point in space, just like your eyes. This creates a little bit of distortion due to distance (objects that are farther away appear smaller). There is also an OrthographicCamera class which is like looking out from a plane. Orthographic cameras are sometimes used for isometric (also known as 2.5D) games and level editors to get accurate views of objects' relative sizes. You can see the difference in the following figure:
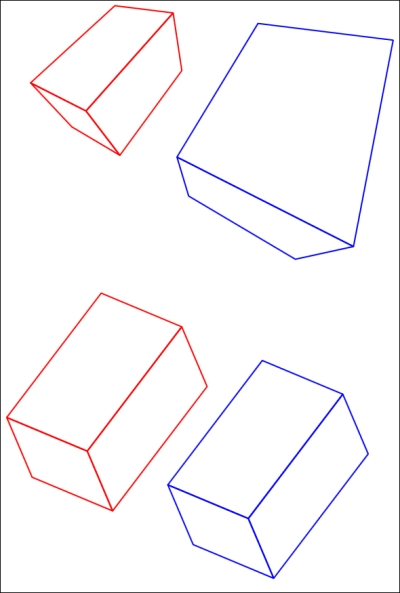
Camera projections. Top is perspective and bottom is orthographic.
The PerspectiveCamera object's parameters are field of view (in degrees), which controls how wide the camera lens is; aspect ratio, the ratio of the canvas' width to its height; near-plane frustum,the closest an object can be to the camera and still be seen; and far-plane frustum, the farthest an object can be from the camera and still be rendered. You'll rarely need to change these values
Also notice that we change the camera's location by assigning to camera.position.z. Three.js uses a spatial coordinate system in which, by default, the x-axis increases from left to right, the z-axis increases from back to front, and the y-axis increases upward. Most objects have a position and scale, both of which are represented by a three-dimensional vector (specifically THREE.Vector3). They also have a rotation represented by a THREE.Euler instance, which is an abstraction that allows treating rotation much like a vector. All objects are initialized at the position (0, 0, 0), also called the origin. Rotation also starts at (0, 0, 0), and scale starts at (1, 1, 1). Vectors are very versatile, but usually all you'll need to do with them is assign to the x, y, and
z properties. For example, if we wanted to move the camera upward, we could increase camera.position.y.
Finally, we can display the scene by asking the renderer to display it from the camera's perspective:
renderer.render(scene, camera);
Hooray, a static 3D display! If you have been following along by rebuilding our scene from scratch, now is the point at which you can actually see the results of your work. Just open the HTML file in a browser. (If you're loading the three.js file from GitHub instead of locally, you'll need to be connected to the Internet.)
A static scene isn't very fun though, so let's add animation by constructing a render loop:
animate();

function animate() {

  requestAnimationFrame(animate);

  mesh.rotation.x = Date.now() * 0.00005;
  mesh.rotation.y = Date.now() * 0.0001;

  renderer.render(scene, camera);

}
The key here is requestAnimationFrame(), which executes the function passed to it when the browser is ready to paint a new frame. In that function, we perform any necessary updates to the scene (in this case, changing the mesh's rotation vector just like we changed the camera's position vector earlier) and then ask the renderer to repaint the canvas as before.
Putting it all together (and also wrapping our setup code in a function for clarity), we get:
var camera, scene, renderer;
var geometry, material, mesh;

init();
animate();

function init() {

  camera = new THREE.PerspectiveCamera( 75, window.innerWidth / window.innerHeight, 1, 1000 );
  camera.position.z = 500;

  scene = new THREE.Scene();

  geometry = new THREE.IcosahedronGeometry( 200, 1 );
  material = new THREE.MeshBasicMaterial( { color: 0x000000, wireframe: true, wireframeLinewidth: 2 } );

  mesh = new THREE.Mesh( geometry, material );
  scene.add( mesh );

  renderer = new THREE.CanvasRenderer();
  renderer.setSize( window.innerWidth, window.innerHeight );

  document.body.appendChild( renderer.domElement );

}

function animate() {

  requestAnimationFrame( animate );

  mesh.rotation.x = Date.now() * 0.00005;
  mesh.rotation.y = Date.now() * 0.0001;

  renderer.render( scene, camera );

}
It's animating! You've now built your first 3D world in the browser. Because it's in JavaScript, you can also easily send it to your friends. (In the online editor, click on the stacked bars icon  at the upper-right, click on the Download button, and then rename the downloaded file with a
 .html extension.)
Tip
Both within the Three.js repository and online, most of the Three.js examples you'll find will have all their code in a single HTML file. This is convenient for small projects but unhealthy for larger ones. Even though most of the code in this book is small enough to be manageable in a single file, we will try to use patterns that make the code maintainable. Chapter 5, Design and Development specifically addresses designs that work well at scale.