

Different Methods' React, a $45 AI, introduces a behavior tree and the use of a navigation mesh, or NavMesh. A NavMesh is a series of interconnected polygons forming a complex area used for travel. It creates a simplified graph of the level that is inputted into the pathfinding system. This simplified graph that it creates is smoother and tends to have characters that travel better than a grid-based graph. A behavior tree is a parent-child structure used for making decisions in many AIs. We will look at behavior trees and navigation meshes in more detail in the later chapters. NavMesh is a basic feature available in Unity, but the behavior tree is not. Unlike the other two AIs shown, this AI requires a bit more coding to get started, but not much.
To begin with, you'll need a new scene, as well as to import React AI from the Asset Store. Perform the following steps:
Add a plane or another ground type. Then add several obstacle objects, such as cubes. Make sure that each of the objects we just created are marked static at the top of the Inspector, or the NavMesh won't identify them later on. The scene should look like this:

Next, find the Window menu and select Navigation. At the bottom of the Navigation tab, click on the Bake command. You have now generated a simple navigation mesh for your characters to navigate. It will highlight the areas that NavMesh AIs can walk, as seen here:

Let's add a player who can move around the world now. Add a capsule and name it
Player. Fortunately, the demo contains a simple script for controlling a player who you can find (and add) by navigating to Add Component | Scripts | Simple Player Control. Now, this doesn't move the object around on its own; instead it drives a Character Controller object.When adding the component, just start typing
Character Controllerin the search box, and it will show you all the similar component names. Add Character Controller. Now, the player should be controllable. You will probably need to increase the speed to 1 to detect the player movement.Next, we'll add an enemy in the same way, with Capsule. The enemy needs a component called Nav Mesh Agent, which is a component capable of using a NavMesh to move around, so add it. Now, the game object has the ability to walk around, but it has nowhere to go. To get it moving, we need to add the enemy AI agent.
Next, we get to the AI for the enemy agent. In React, a behavior tree is called a Reactable. To add a reactor, we start the Project explorer, in a folder of our choice, by navigating to Create | Reactable.
Once created, rename it to
EnemyMovement. In the Inspector, it has a list of behaviors for it. We'll need to add a script, which can be found in the book's contents:\Scripts\React AI\FollowThePlayer.cs. Without going in-depth in the code, let me explain the following key points:The C# file was copied from a sample script provided with React AI that made a character move away from a target.
It was rebuilt to make the player the target destination, and also to turn seeking on and off by using a button. It is not hard to adapt these scripts.
Unlike normal mono behaviors, you use a special
Gomethod. The go method is called by React AI only if it is selected to be used.In the
Startmethod, we see it obtain the NavMeshAgent that we attached to the enemy in the Inspector panel.In the
Gomethod, we see it feeding the destination to the NavMeshAgent, and then checking to see whether it has already found a path. Once it does, it just goes.All uses of that agent are still following standard Unity calls to use NavMesh, and can be applied without using the AI, by placing this code in a traditional behavior
Updatemethod.
This script needs to be added to the Inspector for the EnemyMovement asset, and also to the
Enemygame object.Once the script is attached to the enemy, the Inspector will reveal that it has a target. Drag the player from the Hierarchy panel into the player attribute on the Inspector panel.
Finally, we have the behavior tree to set up. In the Project panel, right-click on the EnemyMovement asset, and click on Edit Reactable. A behavior tree pops up an editor, which is how we train our AI.
For this chapter, we'll just give it a one track mind to follow the player. With Root selected, click on the Action button under Leaf, as shown in the following screenshot:
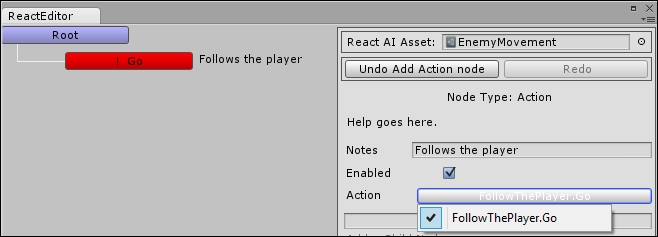
Since we only have one action in the behavior list, it selects it by default. What makes the behavior tree nice is that we can make decisions, or check whether the target is within X distance then try to follow, otherwise do something else–all from the designer. The next section on RAIN also uses a behavior tree, and most of the same basic types are used in both RAIN and React.
This took more steps than the previous AI, but there is also more going on. It is playable now.
Tip
Downloading the example code
You can download the example code files from your account at http://www.packtpub.com for all the Packt Publishing books you have purchased. If you purchased this book elsewhere, you can visit http://www.packtpub.com/support and register to have the files e-mailed directly to you.