
To put it simply, everything in Construct 2 is a game object. This can range from the things that are visible on screen, for example, sprites, text, particles, and the sprite font, to the things that are not visible but are still used in the game, such as an array, dictionary, keyboard, mouse, gamepad, and many more.
To create a new game object, you can either double-click anywhere on a layout (not on another object already present), or you can right-click on your mouse and select Insert new object. Doing either one of these will open an Insert New Object dialog, where you can select the object to be inserted.
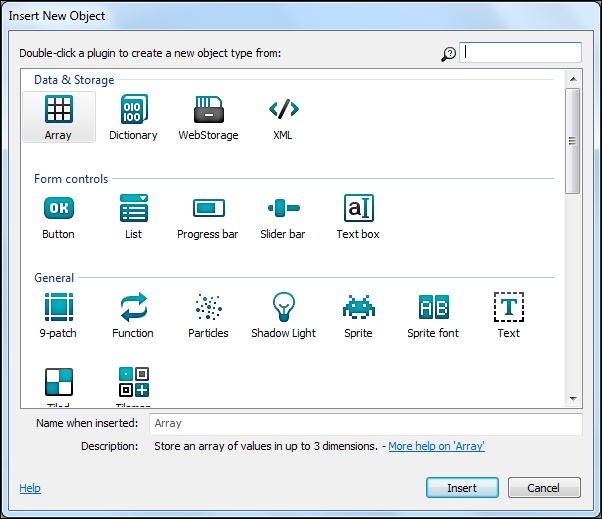
You can click on the Insert button or double-click on the object icon to insert it. There are two kinds of objects here: the objects that are inserted into the active layout and the objects that are inserted into the entire project. Objects that are visible on the screen are inserted into the active layout, and objects that are not visible on the screen are inserted into the entire project.
If you look closely, each object is separated into a few categories such as Data & Storage, Form controls, General, and so on. I just want to say that you should pay special attention to the objects in the Form controls category. As the technology behind it is HTML5 and a Construct 2 game is basically a game made in JavaScript, objects such as the ones you see on web pages can be inserted into a Construct 2 game. These objects are the objects in the Form controls category.
Tip
A special rule applies to the objects: we can't alter their layer order. This means that these objects are always on top of any other objects in the game. We also can't export them to platforms other than web platforms. So, if you want to make a cross-platform game, you are advised not to use the Form controls objects.
For now, insert a sprite object by following these steps:
After clicking on the Insert button, you will notice that your mouse cursor becomes a crosshair, and there's a floating label with the Layer 0 text. This is just a way for Construct 2 to tell you which layer you're adding to your object.
Click your mouse to finally insert the object. Even if you add your object to a wrong layer, you can always move it later.
When adding any object with a visual representation on screen, such as a sprite or a tiled background, Construct 2 automatically opens up its image-editing window. You can draw an image here or simply load it from a file created using a software. Click on X in the top-right corner of the window to close the window when you have finished drawing. You shouldn't worry here; this won't delete your object or image.
Layers are a great way to manage your objects' visual hierarchy. You can also add some visual effects to your game using layers. By default, your Layers bar is located at the same place as the Projects bar. You'll see two tabs here: Projects and Layers. Click on the Layers tab to open the Layers bar.
From here, you can add new layers and rename, delete, and even reorganize them to your liking. You can do this by clicking on the + icon a few times to add new layers, and after this, you can reorganize them by dragging a layer up or down. Just like with Adobe products, you can also toggle the visibility of all objects in the same layer to make it easier while you're developing games. If you don't want to change or edit all objects in the same layer, which might be on a background layer for instance, you can lock this layer:
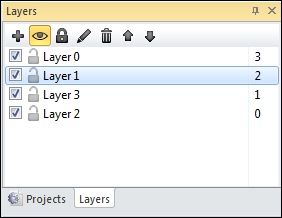
There are two ways of referring to a layer: using its name (Layer 0, Layer 1, Layer 2, Layer 3) or its index (0, 1, 2, 3). As you can see from the previous screenshot, the index of a layer changes as you move a layer up or down its layer hierarchy (the layer first created isn't always the one with the index number 0). The layer with index 0 will always be at the bottom, and the one with the highest index will always be at the top, so remember this because it will come in handy when you make your games.
The eye icon determines the visibility of the layer. Alternatively, you can also check the checkbox beside each layer's name. Objects from the invisible layer won't be visible in Construct 2 but will still visible when you play the game. The lock icon, beside the layer's name at the top, toggles between whether a layer is locked or not, so objects from locked layers can't be edited, moved, or selected.
All objects in each layer are placed based on their z-order. A z-order is the order of positioning objects in a layer. Construct 2 draws objects from the bottom to the top of the z-order; as a result, the objects in the bottom layer will always be behind the objects in the top layer. You can send an object either to the bottom or to the top of the z-order by right-clicking on them and selecting where to send them.
Just like layouts or objects, layers have their own properties. These properties do two things: they change how the layers behave, and they give a good-looking special effect to the objects in a layer. You can see it in the Properties bar after clicking on each layer. The members of these properties also have an explanation at the bottom of the Properties bar to make it easier to understand. I will explain the ones that are not really easy to understand:
Force own texture: This forces the layer to render to an immediate texture rather than to the screen; this is useful for special effects. The downside is that it slows down rendering, and for most games, it isn't used anyway. If you're unsure which value to set it to, always set it to no.
Scale rate: This is the rate at which the layer zooms when the layer is scaled. Set this to 0 if you want your objects' size to stay the same regardless of scaling; set it to 100 to make your objects scale perfectly.
Parallax: This is the rate at which the layer scrolls. The X value is the horizontal scrolling speed, and the Y value is the vertical scrolling speed. Keep it at 100 to make the layer's scroll speed the same as the game's scroll speed. Change it to 0 to stop the layer from scrolling; this can be used for HUDs (short for Heads Up Displays). With this in mind, a value between 0 and 100 (ideally, 50) will make it perfect for a parallax-scrolling effect.
Blend mode: This property is like simple effects, as it provides ways to blend the object with the background.
Effects: This applies special effects to a layer; Construct 2 comes with more than 70 stock effects. Effects uses a technology called WebGL, or an OpenGL for web platforms, and because of this, it might not available on all platforms. It is already supported on modern browsers.