
Construct 2 doesn't use a traditional programming language. Instead, it uses a unique style of programming called an event system. However, much like traditional programming languages, it works as follows:
It executes commands from top to bottom
It executes commands at every tick
It has variables (a global and a local variable)
It has a feature called function, which works in the same way as other functions in a traditional programming language, without having to go into the code
An event system is used to control the objects in a layout. It can also be used to control the layout itself. An event system can be found inside the event sheet; you can access it by clicking on the event sheet tab at the top of the layout.
I hope I haven't scared you all with the explanations of an event system. Please don't worry because it's really easy! There are two components to an event system: an event and an action. Events are things that occur in the game, and actions are the things that happen when there is an event. For a clearer understanding, take a look at the following screenshot where the event is taken from one of my game projects:
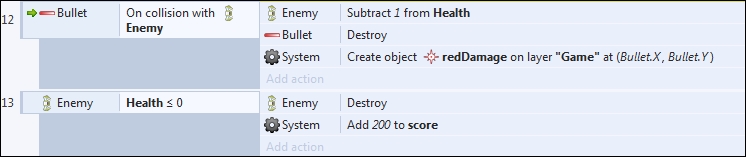
The first event, the one with number 12, is a bullet on collision with an enemy, which means when any bullet collides with any enemy, the actions on its right-hand side will be executed. In this case, it will subtract the enemy's health, destroy the bullet object, and create a new object for a damage effect. The next event, number 13, is what happens when an enemy's health drops below zero; the actions will destroy the enemy and add points to the score variable. This is easy, right?
Take a look at how we created the redDamage object; it says on layer "Game". Every time we create a new object through an action, we also need to specify on which layer it is created. As mentioned earlier, we can refer to a layer with its name or with its index number, so either way is fine. However, I usually use a layer's name, just in case I need to rearrange the layer's hierarchy later. If we use the layer's index (for example, index 1) we can rearrange the layer so that index 1 is different; this means that we will end up creating objects in the wrong layer.
Earlier, I said that an event system executes commands from top to bottom. This is true except for one kind of event: a trigger. A trigger is an event that, instead of executing at every tick, waits for something to happen before it is executed. Triggers are events with a green arrow beside them (like the bullet on collision with enemy event shown earlier). As a result of this, unlike the usual events, it doesn't matter where the triggers are placed in the event system.
Events are written on event sheets. When you create a new layout, you can choose to add a new event sheet to this new layout. If you choose to add an event sheet, you can rename it to the same name or one that is different from the layout. However, it is advised that you name the event sheets exactly same as the layout to make it clear which event sheet is associated with a layout. We can only link one event sheet to a layout from its properties, so if we want to add more event sheets to a layout, we must include them in that event sheet. We will cover this in Chapter 5, Making a Platformer Game.
To write an event, just perform the following steps:
Click on the event sheet tab above the layout.
You'll see an empty event sheet; to add events, simply click on the Add event link or right-click and select Add event.
You'll see a new window with objects to create an event from; every time you add an event (or action), Construct 2 always gives you objects you can add an event (or action) from. This prevents you from doing something impossible, for example, trying to modify the value of a local variable outside of its scope. I will explain local variables shortly.
Whether or not you have added an object, there will always be a system object to create an event from. This contains a list of events that you create directly from the game instead of from an object. Double-click on it and you'll see a list of events you can create with a system object. There are a lot of events, and explaining them can take a long time; I will explain them as we go along and create our games in the upcoming chapters. For now, if you're curious, there is an explanation of each event in the upper part of the window.
Next, scroll down and look for an Every x seconds event. Double-click on it, enter 1.0 second, and click on Done. You should have the following event:

To add an action to an event, just perform the following steps:
Click on the Add action link beside an event.
Click on an object you want to create an action from; for now, double-click on the systems object.
Double-click on the Set layer background color action under the Layers & Layout category.
Change the three numbers inside the bracket to
100,200, and50.Click on the Done button.
You should have the following event:

This action will change the background color of layer 0 to the one we set in the parameter, which is green.
I said that I'm going to explain variables, and you might have noticed a global and local variables category when you added an action. A variable is like a glass or cup, but instead of water, it holds values. These values can be one of three types: Text, Number, or Boolean.
Text: This type holds a value of letters, words, or a sentence. This can include numbers as well, but the numbers will be treated like a part of the word.Number: This type holds numerical values and can't store any alphabetical value. The numbers are treated like numbers, which means that mathematical operations can be performed on them.Boolean: This type only holds one of the two values:TrueorFalse. This is used to check whether a certain state of an object is true or false.
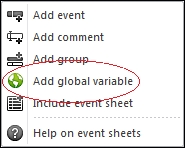
To create a global variable, just right-click in an event sheet and select Add global variable.
After that, you'll see a new window to add a global variable.
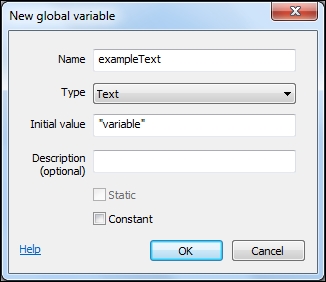
Here's how to fill out each field:
Name: This is the name of the variable; no two variables can have the same name, and this name is case sensitive, which means
exampleTextis different fromExampleText.Type: This defines whether the variable is
Text,Number, orBoolean. Only instance variables can have aBooleantype; I will explain instance variables in Chapter 3, Creating Diverse Player Experiences with a Flappy Bird Clone.Initial value: This is the variable's value when first created. A text type's value must be surrounded with a quote (
" ").Description: This is an optional field; just in case the name isn't descriptive enough, additional explanation can be written here.
After clicking on the OK button, you have created your new variable! This variable has a global scope; this means that it can be accessed from anywhere within the project, while a local variable only has a limited scope and can be accessed from a certain place in the event sheet. I will cover local variables in depth later in the book.
You might have noticed that in the previous screenshot, the Static checkbox cannot be checked. This is because only local variables can be marked as static. One difference between global and local variables is that the local variable's value reverts to its initial value the next time the code is executed, while the global variable's value doesn't change until there's a code that changes it. A static local variable retains its value just like a global variable.
All variables' values can be changed from events, both global and local, except the ones that are constant. Constant variables will always retain their initial value; they can never be changed. A constant variable can be used for a variable that has a value you don't want to accidentally rewrite later.