

Now you have learned enough about SpriteKit. To explore this in more depth, let's create a mini game that will help you to understand the concepts in much more detail. We are going to create an AntKilling game. In this game, we will place an ant on the screen; the ant will animate when you click on it.
We will use the project we created in the previous section. To create a mini game, we will have to update the source files we have got with the starter project. Now it's time to update AKMyScene to hold our ant sprites.
Before getting into the steps to update the code, download all the resources for this chapter and check for the assets folder, which has all the images used in this project.
Execute the following steps sequentially to create a mini game:
Open the
Resourcesfolder and add them to your Xcode project.While adding the resources to the Xcode, make sure that the selected target is AntKilling and Copy items into destination group's folder (if needed) is checked.

Now delete all the existing code from
AKMyScene.mand make it look similar to the following screenshot:
Now, firstly, we have created a private interface to declare private variables:
@interface AKMyScene ()
@property (nonatomic) SKSpriteNode *ant;
@end
Then, in the
initmethod, we have printed a log to print the size of the screen:NSLog(@"Size: %@", NSStringFromCGSize(size));
Now we will change the screen background color to white using the following line of code:
self.backgroundColor = [SKColor colorWithRed:1.0 green:1.0 blue:1.0 alpha:1.0];
Then we will change the screen background color to white using the
backgroundColorproperty in the following line of code.self.backgroundColor = [SKColor colorWithRed:1.0 green:1.0 blue:1.0 alpha:1.0];
In the following line of code, we are creating a sprite object using the
spriteNodeWithImageNamedmethod and passing the image name to the same. Then we have positioned it to100, 100of the screen, which is in the bottom-left corner of the screen. Then finally we have added it as a child.self.ant = [SKSpriteNode spriteNodeWithImageNamed:@"ant.jpg"]; self.ant.position = CGPointMake(100, 100); [self addChild:self.ant];
Tip
Downloading the example code
You can download the example code files from your account at http://www.packtpub.com for all the Packt Publishing books you have purchased. If you purchased this book elsewhere, you can visit http://www.packtpub.com/support and register to have the files e-mailed directly to you.
In games, we have to keep two sets of images, one for the normal display and the second for the retina display. In the preceding block of code, we have provided the name of the sprite as ant.jpg, which is going to autoreference to [email protected] for the retina devices.
Now build and run your application; you should see something similar to the following screenshot:
Now as you can see, the screen color has changed to white but there is no ant on the screen. This means something has gone wrong in the code. So, now let's check our logs, which should be printing the following:
2014-07-22 19:13:27.019 AntKilling[1437:60b] Size: {320, 568}So the scene size is wrong. The scene should print 568 as the width and 320 as the height but it's printing the opposite. To debug this, navigate to your AKViewController.m viewDidLoad method. You can find the complete code for this function at AntKilling/AntKilling/AKViewController.m.
So, from this method, we can see that our scene is absorbing the size from the bounds of the view and this viewDidLoad method is invoked even before the view has been added to the view hierarchy. So it has not responded to the layout changes. Thus, because of the inconsistent view bounds our scene is getting started with wrong bounds.
To solve this issue, we have to move the scene startup code in the viewWillLayoutSubviews method. After removing the code from the viewDidLoad method and pasting it to viewWillLayoutSubviews, you can find the complete code for this function at AntKilling/AntKilling/AKViewController.m.
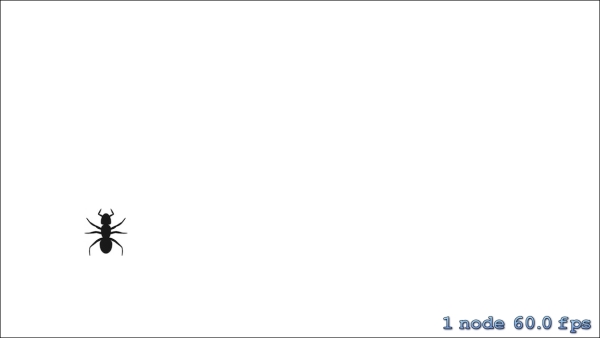
Now, once again build and run the app; you should see the following output:

So, congrats! You have fixed the issue. Your ant has now appeared on the screen at the given location. If you observe closely, you can see that the status bar is at the top of the game, which does not look great. To remove the status bar from the screen, open your AntKilling-Info.plist file and add an UIViewControllerBasedStatusBarAppearance attribute with value NO. Your .plist file should look like the following screenshot:

Build and run your project again; you should be able to see the game without the status bar now:
This looks perfect now; our ant has been residing on the screen as expected. So now our next objective is to animate the ant when we tap on it. To accomplish this, we need to add the following code in the AKMyScene.m file, just below your initWithSize method:
- (void)touchesBegan:(NSSet *)touches withEvent:(UIEvent *)event
{
  UITouch *touch = [touches anyObject];
  CGPoint positionInScene = [touch locationInNode:self];
  SKSpriteNode *touchedNode = (SKSpriteNode *)[self nodeAtPoint:positionInScene];
  if (touchedNode == self.ant) {
    SKAction *sequence = [SKAction sequence:@[[SKAction rotateByAngle:degreeToRadian(-3.0f) duration:0.2],
    [SKAction rotateByAngle:0.0 duration:0.1],
    [SKAction rotateByAngle:degreeToRadian(3.0f) duration:0.2]]];
    [touchedNode runAction:[SKAction repeatActionForever:sequence]];
  }
}

float degreeToRadian(float degree) {
  return degree / 180.0f * M_PI;
}
You can find the complete code for this function at AntKilling/AntKilling/AKMyScene.m.
So, now let's go line-by-line to understand what we have done so far. To begin with, we have added the - (void)touchesBegan:(NSSet *)touches withEvent:(UIEvent *)event method to the grab all the touches on the scene.
Now in the function the first line allowed you to grab touch using CGPoint positionInScene = [touch locationInNode:self];.
In the next line, we grabbed the touch and converting it to the CGPoint positionInScene = [touch locationInNode:self]; location.
In the following line, we fetched the sprite, which has been touched:
SKSpriteNode *touchedNode = (SKSpriteNode *)[self nodeAtPoint:positionInScene];
Now, once you have the sprite object, compare and check whether the select object is the ant bug. If it's the ant bug, then animate the object by adding the following line of code:
SKAction *sequence = [SKAction sequence:@[[SKAction rotateByAngle:degreeToRadian(-3.0f) duration:0.2],[SKAction rotateByAngle:0.0 duration:0.1],[SKAction rotateByAngle:degreeToRadian(3.0f) duration:0.2]]];
[touchedNode runAction:[SKAction repeatActionForever:sequence]];
Using the SKAction class, you can execute various sequence of animations such as rotation, moveBy, moveTo, and so on. Also all the rotate methods accept the angle in radians. So to achieve the rotation, we must convert the degree to radians before passing to any rotate function.
Now, this code will animate the selected sprite. Build and run the project and you will see the ant animating on tap.
You will soon notice that on tapping the ant, it starts animating, but there is no way to stop this. So now let's add a way to stop this animation once you click anywhere on the scene. Navigate to the - (void)touchesBegan:(NSSet *)touches withEvent:(UIEvent *) event method, and update it to the following code:
- (void)touchesBegan:(NSSet *)touches withEvent:(UIEvent *)event
{
  UITouch *touch = [touches anyObject];
  CGPoint positionInScene = [touch locationInNode:self];
  SKSpriteNode *touchedNode = (SKSpriteNode *)[self nodeAtPoint:positionInScene];
  if (touchedNode == self.ant) {
    SKAction *sequence = [SKAction sequence:@[[SKAction rotateByAngle:degreeToRadian(-3.0f)duration:0.2],
    [SKAction rotateByAngle:0.0 duration:0.1],
    [SKAction rotateByAngle:degreeToRadian(3.0f) duration:0.2]]];
    [touchedNode runAction:[SKAction repeatActionForever:sequence]];
  } else {
  [self.ant removeAllActions];
  }
}
Now if you observe closely, you can see that we have added an if-else condition to check whether the touch is made on the ant, which allows it to animate; when the touch is made anywhere outside the screen, stop all the actions. To stop all the actions on the sprite, we can use the removeAllActions method on the sprite.