
After you are done with the achievements, go back to the game app main page. This page is used to show all the public information for the game; the information users will see when the game appears on the store:
App video Preview and Screenshots: This is the area where you can place screenshots and a video preview of the game. Apple requires different image sizes for all their devices. If you want your app to show images, you will need to create, scale, and upload all the images here. The video preview also has to be in a Mac-friendly codec, such as M4V. The screenshots for the app are required, and your game will not be able to go live until you have them included in these slots; the video is up to you and not required by Apple to submit your game.
Tip
If you want to convert a AVI file to a M4V file, you can use a program called HandBrake (https://handbrake.fr/).
Description: This specifies the description of your app. This area is open for you to describe the game and why the user may be interested in it.
Keywords: This denotes the list of keywords that describe your app. When the user searches, these keywords are used to match your app to that search.
Support URL: This specifies the URL that a user can go to get help with the app. This is generally the studio website or the creator's personal e-mail.
Marketing URL: This is the URL that would be used as marketing for your app. This is optional.
Privacy Policy URL: This would link the user to the privacy policy of your game. This is required for apps that are made for kids, if you offer autorenew in-app purchases, or if you have free subscriptions. If you include account registration, an app that would access the users existing account, or if (by chance) your app is required by law, this is also required.
App Icon: This is the icon of your app. It is what the user will see when it appears on the store.
Version: This is the current version of the app.
Category: This specifies the category that the app falls into. For us, it is "Games".
Rating: This denotes the rating of this app.
License Agreement: This specifies the standard license agreement between you and Apple.
Copyright: This denotes the name of the person or entity that owns the rights to this app. In the example of this book, you would probably just use your name.
Trade Representative Contract Information: This allows you to display additional information that would be displayed on the Korean App Store.
Name, Address, and Country: This specifies your personal information about who owns the app.
Routing App Coverage File: This allows you to specify the geographic regions supported by your app.
Build: This is the current build and is uploaded with Xcode 5.1.1 version or later or the Application Loader 3.0 version.
Game Center: This denotes the achievements and leaderboards used for this game. You set these earlier.
Multiplayer Capability: This specifies the games that are multiplayer-capable. Keep this as it is.
Newsstand: Keep this unused.
App Review Information: This specifies the information that the Apple review team will use to contact you if they need any information during the review process. You'd generally use the name of the person in charge of quality assurance. In my case, I will use my name and e-mail.
Demo Account: This is used if the game needs an extra account to play, such as if you had a multiplayer service that required a log in, you would give the reviewers a demo account so that they could test the game with the extra service. For us, we can leave this blank.
Notes: This specifies the additional information that the review team may need to test the app. As our game will be on the simple side, you can leave this blank as well.
Version Release: This is the setting you can use to either automatically release the game as soon as it clears review or to set it up, so Apple lets you know when the game has cleared review. This is a personal choice. I generally use Manually release this version to make sure that everything is correct before it goes to the store.
At the very top of the page, click on Save.
At the top of the page, click on My Apps, and in the window that pops up, click on Agreements, Tax, and Banking.
On this page, you will have to fill out and accept the contracts for iOS Free Application, iOS Paid Applications, and iAd App Network. The process includes the personal banking information and the identity verification. When you have completed these, the game will be set up to sell and display iAds.
As Unity does not support the native functionality of iOS, we need a plugin to call the native iOS functions from Unity. For example, if we want to provide the user with the in-app purchase, we need this plugin to handle the code that takes care of this.
For our plugin to know about the specifics of our game, we must first include the Apple ID and the Bundle ID.
In Unity, click on Window at the top of the editor screen, navigate to iOS Native, and select Edit Settings.
The Inspector window should update to show iOS Native Settings.
In iTunes Connect, navigate to My Apps and click on your game. This will open the main settings page. About halfway down, you will find the text for Apple ID. This is a big integer value. Copy this and go back to Unity; you can select the text and click on Ctrl + C, or you can write it down.
In iOS Native Settings in Unity, under Apple ID, paste or enter the Apple ID from iTunes Connect:

While still in Unity, click on File in the top-left corner of the editor window. Then, navigate to Build Settings.
If your project is set to PC, Mac & Linux Standalone, click on IOS. In the bottom-left corner of the window, click on Switch Platform.
Next, in the same window, click on Player Settings. This will update the Inspector window. Under Other Settings, find the section under Identification and then the textbox labeled PlayerSettings.bundleIdentifier. In this field, enter the Bundle ID that you set up earlier. I used the reverse-domain name style, such as com.mycompanyname.appname.
If you do not remember your Bundle ID, navigate to iTunes Connect, select My Apps and then select your game. On the right-hand side of the window, click on More and then About this app. In this window, you will see the game information, including the Bundle ID of the game.
You can leave PlayerSettings.bundleVersion set to 1.0.
Apple has come a long way when it comes to making the provisions and certificates for games. This used to be a headache, but now, we can use Xcode to generate these for us.
The first step is that you will need to make a build and open it in Xcode. This can be done from your Windows or Macintosh machine, but it has to be opened on your Mac.
To create the build, open Unity and navigate to File in the top-left corner of the editor window. Then, go to Build Settings.
Make sure that the build is iOS and Development Build is checked.
As there is no reason to run this build on a device, you do not have to have a scene selected in the Scenes in build window.
Open Player Settings and make sure that PlayerSettings.bundleVersion is 1.0, and PlayerSettings.bundleIdentifier is set to the Bundle ID of your app.
Under Optimization, there are a few settings that you can keep as default so that you know what the important ones do:
API Compatibility Level: This allows you to set the .NET API profile. The .NET 2.0 API is the full .NET compatibility, whereas the .NET 2.0 subset is the subset of the full .NET compatibility and has smaller file sizes.
Target iOS Version: This selects the iOS version you want to target your game to. The lower the version number you use, the more devices can run your game. Using a higher version means that you have the option to utilize the features of this higher version, but users who have not upgraded their device to run this version will not be able to run your game.
Stripping Level: This option allows you to have the engine remove the unused aspects of the code to optimize the file size of your game.
Strip assemblies level: This will look at the scripts by the code and remove any classes and methods that are not being used.
Strip ByteCode level: This takes any of the .NET DLL files and strips them down to metadata only.
Use micro mscorlib level: This is a special option to use a small version of mscorlib. This does remove some features, including security, Reflection.Emit, remoting, and nonGregorian calendars.
When everything is set, click on Build. This will prompt you to save the build at a location on your computer. It doesn't matter where.
When the build is done, navigate to where you saved it. If you are not on a Mac, you need to copy this whole folder onto your Macintosh machine. You can do this with version control, a local network, or you can zip it up and send it to yourself and then download it on your Mac.
In order to open the project in Xcode, open the folder and double-click on the file that ends with Xcodeproj. This will open Xcode and your project.

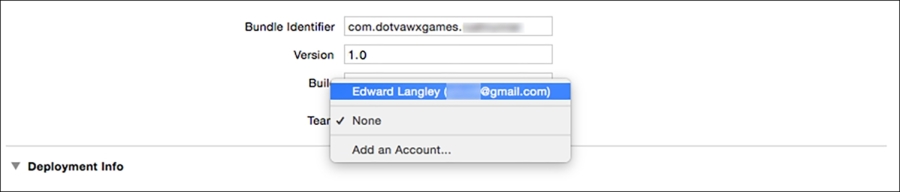
In the General tab in Xcode, you will see the project general settings. This includes things, such as Bundle Identifier, Version, Deployment Target, and the type of devices the game will run on.

Under the Identity portion of the General settings tab, there is a drop-down menu for Team. Click on it and then select Add an account. This will open the Accounts window. In the bottom-left corner of this window, click on the small + sign and select Add Apple ID…. This will prompt you to log in with your developer credentials. Use these credentials to log in.

After logging in, you can close the Accounts window. Now, from the Team drop-down list, you should be able to change it from None to your team name, which is probably the name and e-mail you used to create your account:
To make sure the certificate went through, visit https://developer.apple.com.
At the bottom of the page, click on iOS Apps.
On the following page, if not logged in to your developer account, log in. After this, in the top-right corner, click on the link called Certificates, Identifiers & Profiles.
Under iOS Apps, click on Certificates.
When the page loads, you should have All selected in the Certificates section. On the right-hand side of your screen, you should see your name, the type of certificate, and the expiry date (1 year after the creation of it):

Through the course of this book, we will use two different types of certificates: iOS Development and iOS Distribution.
iOS Development refers to a certificate you can use during development, and iOS Distribution is the certificate that can be used when you are ready to submit your game for distribution.
The process of setting up iTunes Connect and Developer Account is important because these are the settings we will use in Unity in order to unlock achievements, leaderboards, in-app purchases, and display iAds.
If we didn't go through the process of creating an app in iTunes Connect, it would be impossible to release a game on the App Store, and if we didn't set up the Game Center features, we wouldn't be able to have achievements or leaderboards. The same is true for in-app purchases and iAds.