
Manga Studio can automatically add page numbers to your pages. Let's see how this works and explore some different options for page numbering.
Before you start, have the New dialog window opened by going to File | New or clicking on the New icon in the top toolbar.
Follow these simple steps to add a page number to your project:
Go to the Story Information section of the New dialog box.
Make sure that the checkbox next to Page number is checked.
Use the drop-down menu to the right of the Page number checkbox to choose the display position.
Choose a number in Start number.
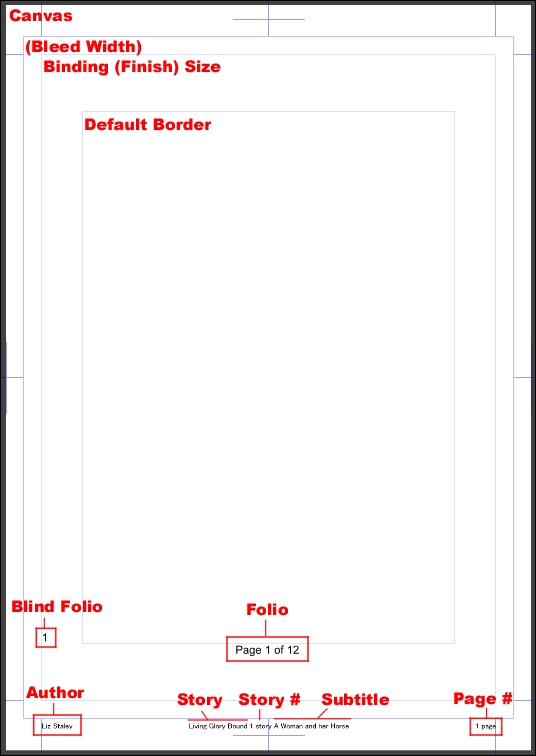
Using the Page number option will display a number in Manga Studio's margin (outside of the trim area). This number will not be visible after the page has been trimmed down to the finish size.
Manga Studio EX 5 has multiple options for page numbers. The following subsection shows you how to add folio page numbers.
Folio numbers are inside of the finish size, and so they are visible on the page after the printing is done and the bleeds have been trimmed:
In the New dialog box, go to the Folio section.
Check the box next to Folio(P) to turn this option on.
Use the drop-down menu to the right of the checkbox to choose the display position for the number.
Add any leading or trailing formatting for the page number in the Format textboxes.
Choose the number to begin with using the Start number option, either by typing the number manually in the textbox or by using the slider to the right.
Using the Font drop-down menu, select the font to use from those installed on your computer.
Adjust the display size of the folio page number information using the Size option. Again, either type the desired value in the text box or use the slider to the right by clicking on the black arrow icon.
Using the Color drop-down menu, select whether to display the text in black or white.
To add a contrasting outline around the page number, check the box next to Put edges. Black folio information will have a white border around it, and vice versa.
Choose the thickness of the outline using the textbox to the right of the Put edges option. The larger the number, the thicker the outline.
Click on OK to create the new page.
Using the Format boxes, we can make our page number read Page 1 of 12. Simply enter Page in the first textbox (before the number) and of 12 in the textbox after the number. See the following screenshot.
Tip
Note the extra spaces in Page and of 12 in the preceding example. These need to be added to make the folio information read correctly. If the spaces are not added, they will not be included when the new page is generated.

Blind folio(H) is a page number in the margin of the book. When the book is printed and bound, it will not be seen.
Check out this screenshot to learn how the story name, author information, and page numbers are displayed using information from the preceding recipes: