

As mentioned previously, Animator Controllers are state machines containing animations (states). Any given character can be in one such state (play one animation) at a time. To switch between states (animations), you need to create state transitions.
Before we start, you should have an animated model placed on a scene with an Animator Controller assigned. You can find such a model in the provided example Unity project. Go to the Chapter 01 Working with animations\Recipe 04 Creating animation transitions in Animator Controller directory. Open the Example.unity file. You will find a Sheep object in the Hierarchy. It has an Animator Controller assigned. You can open it by double-clicking on the Controller field in the Animator component of the Sheep game object.
To create a state transition in an Animator Controller, follow these steps:
- Open the
Animator Controllerasset. - Add at least two states by dragging and dropping two animations into the
Animatorwindow. You can also point the cursor at an empty space in theAnimatorwindow, press the right mouse button and selectCreate State|Empty, then select the state, and add an animation to theMotionfield in theInspector. - Click on the right mouse button on the state you want to transition from and choose
Make Transition. - Drag the transition onto the state you want to transition to and click the left mouse button.
- A default transition will be created. The state will switch after its animation has finished playing. To be able to observe it in gameplay, make sure you transition from the default (orange) state, as only the default state will play when the game starts.

State transitions define how we can travel through the graph of animations. They are combined with transition conditions based on Animator Controller parameters; we will discuss the parameters in detail in the next recipe: Using parameters to control the animation flow. Each transition has a set of properties we can adjust. Click on the transition (white arrow) to select it. You can find the transition properties in the Inspector tab (make sure to unfold the Settings foldout):
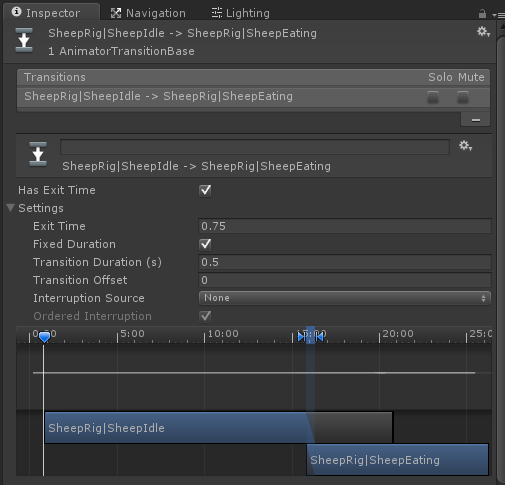
Has Exit Time: If set to true, this enables the transition only after a given percentage of the animation has been already played. If disabled, the transition will take place instantly after its conditions are met. If you want to create a sequence of animations, set it to true.Exit Time: This is the percentage (0-1 range) of the animation length after which theHas Exit Timecondition is met. If you set it to0.5, for instance, the state will transition after 50 percent of the animation was played.Fixed Duration: This property is combined with the next one,Transition Duration (s). If it's on, theTransition Duration (s)is in seconds, and if it's off, theTransition Duration (s)is in percentage of the animation time.Transition Duration (s): the time of the state transition. This is how long the animations will transition one into another. Animations are being blended together during the transition. Longer transitions are smoother, shorter, are more sharp. A good default value is around0.25.
Transition Offset: This offsets the target animation in time. The value is in percentage of the animation. Setting it to0.3means that the target animation will start from 30 percent of its length instead of the beginning.Interruption Source: This setting tells Unity whether the transition can be interrupted by other transitions. You can set it to:None:the transition cannot be interrupted by any other transition.Current State:The transition can be interrupted by transitions from the state we are trying to transition from.Next State:The transition can be interrupted by transition from the state we are trying to transition to.Current State then Next State:The transition can be interrupted by the transitions of the state we are trying to transition from or by the transitions of the state we are trying to transition to. The transitions from the state we are trying to transition from take the priority.Next State then Current State:The transition can be interrupted by the transitions of the state we are trying to transition from or by the transitions of the state we are trying to transition to. The transitions from the state we are trying to transition to take the priority.Ordered Interruption:If set to false, this lets the transition be interrupted by other transitions independently of their order. If set to true,the order of the transitions matters.
When you create an Animator Controller, you can see three more nodes apart from your animation states:
Entry and Exit: This node is used when you transition between state machines (Animator Controllers or substate machines). We will discuss it in detail in the Using Sub-State Machines in Animator Controller recipe in Chapter 6, Handling Combat.Any state: This node can be used as a helper to make a transition from any state to a given state. It is used when you have an animation that can be played anytime, for instance, a hit animation. We will discuss it in detail in the Using transitions from any state to play hit reactions recipe in Chapter 6, Handling Combat.