

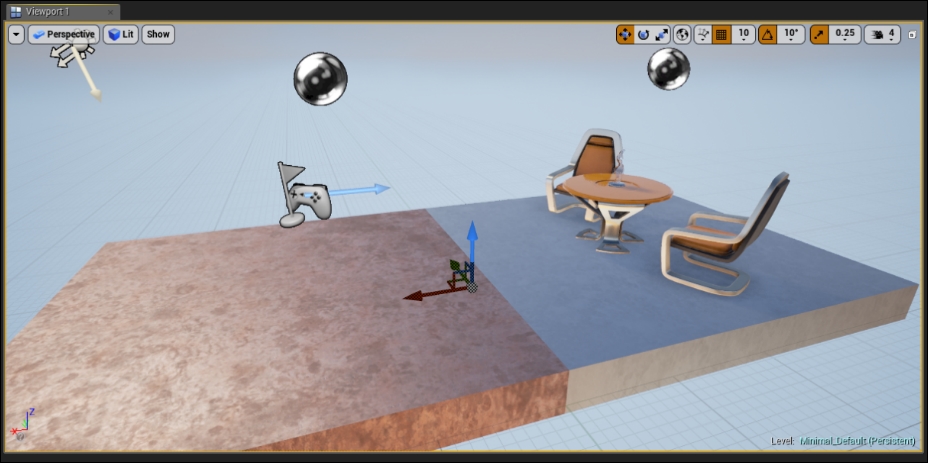
At this point you should have a world that looks similar to this:
What we are going to do now is remove the table, statue, and chairs from our level and replace them with our own actor. The purpose of this is to show you how we can create new actors and add components from within the editor without having to navigate to other areas of the engine. You can remove actors by clicking on them and hitting the Delete key, right-clicking on them and selecting Edit | Delete from the dropdown menu, or by finding the actor in the World Outliner and performing the same steps.
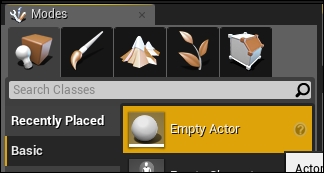
Once the table and chairs have been removed, we need to add an actor to the world that we wish to build upon. To do this we need to place an element from the Modes Panel in the top left-hand side of the window. As stated in the introductory tutorial, the Modes Panel is where you can find all of the tools that you will need to perform construction actions within the editor. The five tabs you can interact with are Place, Paint, Landscape, Foliage, and Geometry Editing.
These options will be explored during the course of this book but, for now, we are concerned with the Place tab. The Place tab is where you can find all of the editor objects that can be dragged and dropped into the level. Here you can find things such as basic geometry primitives, BSPs, visual effects, and numerous processing volumes.
Tip
If you wish to see detailed documentation for each of the editor objects, click the small question mark on the right-hand side of the object name.
From the list on the left-hand side of the panel, select Basic; this will show you a selection of simple objects that can be dragged into the world. We want to drag an Empty Actor into the world.
Unreal Engine utilizes a specific naming convention for the objects that can be created and built upon within the editor. There are Objects, Actors, Pawns, and Characters. Each name represents an expanded level of functionality. In general, you can think of Actors as whole items or entities such as a power up or boost pad, where an object is usually a small part or Component with specialized functionality. For example, a whole car could be an Actor but the engine within the car would be considered an Object. Pawns and Characters I will detail in later chapters. The term object(s) will be used to refer to things in our levels but when required I will use the capitalized Actor or Object when specification is required.
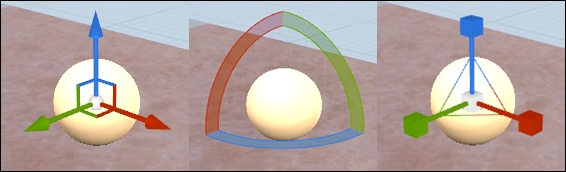
Select our new actor now by clicking on it within the viewport. With the Empty Actor selected in our world we are presented with a few new visual elements. The first is the transform widget; the transform widget provides us with the ability to translate, rotate, and scale objects within our world. You can swap the functionality of your transform widget by pressing the W key for translation, the E key for rotation, and the R key for scale. Alternatively, in the top right-hand side of the Viewport panel you can click and select the appropriate transform icon. We can also select the globe icon in the same corner to swap between world and local space transformation. Simply put, world space transformation will present a transform axis in line with the world. Local space will present a transform axis in line with the object (based on the objects arbitrary forward).
You will notice that, if you try to scale or rotate the empty actor, nothing happens. That is because, at this point, the empty actor only contains a DefaultSceneRoot component. A component is an Object that is owned by other Unreal Engine 4 objects (usually Actors, Pawns, or Characters) that provide different functionalities/features to the object. In this case our actor owns a DefaultSceneRoot component allowing us to translate, rotate, and scale the object.
Why then does scaling and rotating do nothing? Well, right now we have no 'visual' components included in our actor and by that I mean any components that contain geometry that will visually represent the object in the game world. Without a visual reference, the orientation or size of the empty actor has no context, only the location of the object in 3D space could be of any use, thus we have the ability to translate.
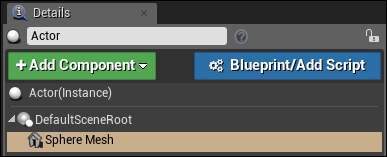
This brings me to the second visual element; on the right-hand side of the window is the Details panel. This panel is used to show all information about any selected object within our world. From the Details panel we can manipulate exposed member data, add and remove components, and edit component properties. There are a few other tricks the Details panel offers us but I will expand upon those later on in the book.
You can also change the name of objects in the details panel. Right now our object is called Actor, we should change this to a more specific name, let's use Hello Sphere. Now we need to add a visual reference to our Hello Sphere. Under the Details panel you can see a green Add Component button; clicking this button will bring up a list of pre-built components we can add to our actor. We would like to add a Sphere to our actor, it can be found under the Basic Shapes section of the dropdown. You can either use the search bar provided to find specific components or scroll down the list until you find what you require.
Once you have added the sphere mesh to our Hello Sphere actor you will see a new element in the Details Panel, component hierarchy. We still have our DefaultSceneRoot component but now, directly under it, we have our sphere mesh. This brings up a very important point: Component parenting.
Within the Details panel you will notice that the sphere mesh component is indented slightly and directly beneath our DefaultSceneRoot component.
This is called parenting; our sphere mesh is now a child component of our DefaultSceneRoot component. This means that any scaling, rotation, or translation we apply to our DefaultSceneRoot will be applied to our sphere as well. However, any transformations we enact on our sphere mesh will not be applied to our DefaultSceneRoot. You can change the hierarchy of an object's components by clicking and dragging them up and down the list. The top-most component will be the Root Component and will dictate the transform of all subsequent components.
Ignoring this can lead to disjointing of child components and can be fairly troublesome. I encourage you to now translate the Hello Sphere with the Sphere component selected in the details panel, then again with the DefaultSceneRoot component selected instead. You will notice that, upon the second translation, the Sphere Mesh maintains its relative distance from the location of the DefaultSceneRoot component. It is because of this that I would strongly advise to only apply transformations to child objects when you wish those transformations to remain constant, relative to the parent.
Now translate the Hello Sphere to the same location that the table and chairs originally occupied. We are going to add some Flash to our Hello Sphere. We are going to add two more components to the actor; a Text Render component and a
Particle System component. We will then use the Details panel to modify the properties of these components to achieve our desired visual result.
First, let's modify the text. After adding a Text Render component, select it in the component hierarchy. You will see that the bottom section of the Details panel will change. This section is where you can modify the component's properties. You will notice that you can also get access to the component's transform properties here, this is so you can perform exact transformation changes to an object without having to use the transform widget.
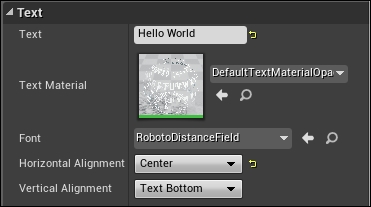
Underneath the Transform and Materials sections we will see a section titled Text. It is here that the main properties for our Text Render component exist. The first thing we need to do is change the text so it says something meaningful. Let's change the Text field to Hello World then change the Horizontal Alignment field to Center.
Your Text section of the details panel should look something like this:
Unfortunately the 3D text is partially penetrating the sphere mesh. To fix this we will be applying a translation to the Text Render component. We wish to apply this translation to the Text Render child component as we want this translation to remain the same regardless of the position of our actor. Instead of using the widget we can use the Transform section of the Details panel. You will notice a 3x3 field matrix under the Transform section. The top row represents the location of the component in 3D space, the second row the rotation, and the bottom row the scale. We want to move our 3D text vertically by a small amount and reduce the scale of our sphere so that our text sits above our sphere mesh.
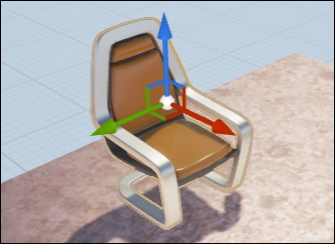
3D game engines will use an arbitrary 3D co-ordinate system to accurately gauge the transformation of objects in 3D space. These co-ordinate systems are made up of three axis—X, Y, and Z. We gauge the direction of the co-ordinate axis by the direction in which the axis increases in a positive manner.
To better understand how axis work, we will take your position as a developer as a reference. If you were to see your own Unreal axis set, you would see a red axis (the X axis) extend outwards from your chest towards the screen. This is because the X axis in Unreal Engine increases in a positive manner forwards into the screen. In a similar fashion you would see a green axis extend out of your right-hand side (the Y axis), and finally you would have a blue axis extending upwards from your head (the Z axis). As an example, imagine the chair in the following screenshot is the chair you are sitting in:
We need to translate the text component 30cm positively along the Z axis. To do this, ensure that you have the Text Render component selected in the component hierarchy and simply change the third field in the top row of the Transform section of the Details panel to 30.0. However, our text render component is still intersecting with the sphere, we now need to scale down or shrink our sphere mesh component.
To scale down the sphere, make sure the Sphere Mesh component is selected in the component hierarchy, then press R to bring up the Scale Transform widget. You'll notice, as you hover your mouse over the different sections of the widget, that they will change to a yellow color. This means that if you were to press and hold the left mouse button, any movement of the mouse will result in a scale change on that axis. To scale the sphere along all axis uniformly, there is a small white box in the widget where all the axis meet. If your mouse is situated over this box, all of the axis will change to a yellow color. With this white box selected, click and drag the mouse to scale the sphere to half the size it was before. Or, alternatively, change all of the values in the bottom row of the transform matrix to 0.5.
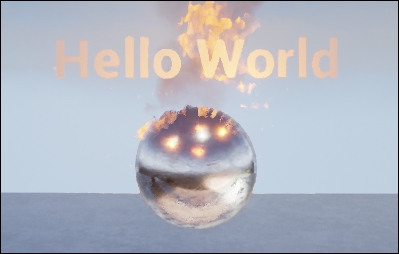
This will move our text render component up and out of our smaller sphere mesh, resulting in something that looks like this:

Our little sphere has come a long way, however we need to add something to our actor to make it stand out. This brings our other new component into focus, the Particle system. Particle systems are components that allow us to attach previously created particle effects to our actors. The creation of these particle effects and a more in-depth description will be detailed in the Boss Mode Activated chapter.
For now, we can use the new component's Details panel to modify which particle effect we would like to use and how it is transformed. With the Particle System component selected in the hierarchy, select the Template dropdown field in the Particles section and select P_Fire. This will use the P_Fire particle system template for the particle component. You may notice that the particle system is quite large initially; I scaled the system to about 1/3 of the original size. You can do this by using the scale widget or the transform field in the Details panel with the particle system component selected.
We are not done yet, Unreal Engine boasts a very flexible and feature-rich renderer. One of the most commonly used features is the Material system. Materials are pre-built visual effects we would like to apply to our surfaces. Materials encompass all surface details such as textures, color, and physical properties such as roughness and luminescence. The creation of Materials along with an in-depth description is covered in the Boss Mode Activated chapter. For now we can use a pre-made material for our Sphere Mesh. With the Sphere mesh component selected, click the dropdown field under the Materials section of the Details panel. Search in the list for M_Metal_Burnished_Steel. You'll notice that when the material is selected, the appearance of the sphere will change. You now see something similar to this:
And that is it! We are done setting up our game world for the Hello World project. Now you can click the large play button in the Toolbar at the top of the Editor window and fly around your new game world! You will notice at the top of the screen there are a few options, these in-editor play options will be explained in the next chapter Blueprints and Barrels. Congratulations on making your first Unreal Engine project Hello Unreal! All of the concepts presented in this project will be expanded on in much more detail in the following chapters. What you have learned here is only the beginning; there are many more interesting features and techniques yet to come.