
In this chapter, we will cover the following recipes:
- Making a tileable scales image in Blender Internal
- Preparing the model to use the UDIM UV tiles
- Baking the tileable scales texture into the UV tiles
- Painting to fix the seams and to modify the baked scales image maps
- Painting the color maps in Blender Internal
- Painting the color maps in Cycles
In this chapter, we are finally going to create the textures for the Gidiosaurus character, meaning all the image textures that we'll need later, to build the shaders for the body and for the armor. Basically, the essential images we need are:
- A grayscale reptilian scales image to be used as a bump map and to color the skin
- Painted image textures for the skin diffuse coloration
- A tileable image for the worn armor metallic surface
- A bump image for the armor decoration patterns
In this chapter, we'll focus on the skin of the Gidiosaurus, and the last two textures for the armor will be treated in the next chapter.
The most difficult and tedious part is, no doubt, rendering the scales on the Gidiosaurus skin; I mean, if we had to paint the scales one by one. Instead, we'll try to obtain the complex scales pattern with the minimum effort possible, using a couple of techniques to speed up the work.
Trying to keep things clear, from now on we'll use two different texture folders: the usual textures one and a textures_making folder, where the latter is used to contain the images we need during the process to produce the final image textures.
So, the first thing to do is to obtain a tileable grayscale reptilian scales image; we'll start from an already existing image obtained from an old and larger texture I had painted in Gimp for a dinosaur model some years ago… but that's a different story.
In any case, if you prefer, you can paint a new reptilian scales image from scratch by using painting software such as Gimp or Photoshop or open source applications such as MyPaint (http://mypaint.intilinux.com/) or Krita (https://krita.org/).
We are taking for granted that in your Blender User Preferences window, you still have the Import Images as Planes addon enabled; if not, start Blender and just enable it as already explained in Chapter 1, Modeling the Character's Base Mesh. Then, follow these steps:
- Select and delete the default Cube primitive in the scene. Select the Camera and the Lamp and move them to the 6th scene layer.
- Click on the main File menu and then on the Import item; select the Images as Plane item.
- Browse to the
textures_makingfolder and select the providedscales.pngimage texture, which is a gray painted scales image:
The "scales.png" image provided with this cookbook
- Press the period (.) key on the numpad to center the view on the selected Plane and then the 7 key on the numpad to switch to the Top Ortho view.
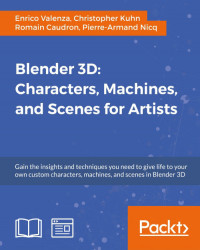
- Go to the Object Modifiers window and assign an Array modifier to the Plane; check the Merge item and leave all the other settings as they are.
- Click on the Copy button to assign a new identical Array modifier, and in the new Array modifier, under the Relative Offset item, change X to 0.000 and Y to 1.000.
- Save the file as
4886OS_10_scales_tiles_01.blend. - Press the period (.) key again on the numpad to center the view on the enlarged Plane, then switch the Viewport Shading mode to Texture (Alt + Z):

The UV mapped Plane with the Array modifiers assigned
As you can see in the preceding screenshot, the mapped Plane is now repeated 4 times.
By zooming towards the middle seams, it's clear that the mapped scales image is not tileable yet:
The visible seams at the borders of the Plane instances
At this point, the file is ready and we can start to paint on the image to make it tileable:
- Click on the mode button (Sets the object interaction mode) on the viewport toolbar to select the Texture Paint mode item.
- Put the mouse cursor on a bright value in the scales image and press the S key to sample it, then go near the color selector in the Brush subpanel under the Tool Shelf to the left and click on the Toggle foreground and background brush colors button (the one with the two opposing arrows) to switch the active color. Otherwise, simply press the X key, put the mouse cursor on a dark area, and press S again to sample it as the opposite color.

Sampling the light and dark colors of the image
- Set the brush's Radius and Strength values, and if you are using a graphic tablet, be sure to have the two tablet pressure sensitivity buttons at the sides of the previous items enabled.
- Start to paint by fixing the scales on the image at the seams areas. Because we can also paint on the Planes duplicated by the Array modifier, and because we are always painting on the same instanced image, it's quite simple to visually join the scales at the four sides, actually making the image tileable:

Painting on the image at the borders to make the scales seamless
It's enough to fix the areas along the middle horizontal and vertical axes of the Planes to cover all the four edges (in fact, fixing two edges is automatically fixing four).
- When you are done, go back into Object Mode and open a new window with UV/Image Editor; press Tab to go into Edit Mode, make the revised image appear, and save it (by clicking on Image | Save as Image in the toolbar or simply press the F3 key) in the
textures_makingfolder asscales_tiles.png:
Saving the tileable scales image with a different name
- Save the file as
4886OS_10_scales_tiles_02.blend.
You might wonder why we didn't use the Make Seamless filter of Gimp (Filters | Map | Make Seamless) to obtain a tileable image in one click; well, the answer is simple: the Make Seamless plugin actually offsets and blends together whole areas of the image, and this can work in several cases, but not for a complex pattern made by scales, where a simple fading is not good enough. In this case, I prefer to paint the joining line between them by hand.
Getting ready
We are taking for granted that in your Blender User Preferences window, you still have the Import Images as Planes addon enabled; if not, start Blender and just enable it as already explained in Chapter 1, Modeling the Character's Base Mesh. Then, follow these steps:
- Select and delete the default Cube primitive in the scene. Select the Camera and the Lamp and move them to the 6th scene layer.
- Click on the main File menu and then on the Import item; select the Images as Plane item.
- Browse to the
textures_makingfolder and select the providedscales.pngimage texture, which is a gray painted scales image:The "scales.png" image provided with this cookbook
- Press the period (.) key on the numpad to center the view on the selected Plane and then the 7 key on the numpad to switch to the Top Ortho view.
- Go to the Object Modifiers window and assign an Array modifier to the Plane; check the Merge item and leave all the other settings as they are.
- Click on the Copy button to assign a new identical Array modifier, and in the new Array modifier, under the Relative Offset item, change X to 0.000 and Y to 1.000.
- Save the file as
4886OS_10_scales_tiles_01.blend. - Press the period (.) key again on the numpad to center the view on the enlarged Plane, then switch the Viewport Shading mode to Texture (Alt + Z):
The UV mapped Plane with the Array modifiers assigned
As you can see in the preceding screenshot, the mapped Plane is now repeated 4 times.
By zooming towards the middle seams, it's clear that the mapped scales image is not tileable yet:
The visible seams at the borders of the Plane instances
At this point, the file is ready and we can start to paint on the image to make it tileable:
- Click on the mode button (Sets the object interaction mode) on the viewport toolbar to select the Texture Paint mode item.
- Put the mouse cursor on a bright value in the scales image and press the S key to sample it, then go near the color selector in the Brush subpanel under the Tool Shelf to the left and click on the Toggle foreground and background brush colors button (the one with the two opposing arrows) to switch the active color. Otherwise, simply press the X key, put the mouse cursor on a dark area, and press S again to sample it as the opposite color.
Sampling the light and dark colors of the image
- Set the brush's Radius and Strength values, and if you are using a graphic tablet, be sure to have the two tablet pressure sensitivity buttons at the sides of the previous items enabled.
- Start to paint by fixing the scales on the image at the seams areas. Because we can also paint on the Planes duplicated by the Array modifier, and because we are always painting on the same instanced image, it's quite simple to visually join the scales at the four sides, actually making the image tileable:
Painting on the image at the borders to make the scales seamless
It's enough to fix the areas along the middle horizontal and vertical axes of the Planes to cover all the four edges (in fact, fixing two edges is automatically fixing four).
- When you are done, go back into Object Mode and open a new window with UV/Image Editor; press Tab to go into Edit Mode, make the revised image appear, and save it (by clicking on Image | Save as Image in the toolbar or simply press the F3 key) in the
textures_makingfolder asscales_tiles.png:Saving the tileable scales image with a different name
- Save the file as
4886OS_10_scales_tiles_02.blend.
You might wonder why we didn't use the Make Seamless filter of Gimp (Filters | Map | Make Seamless) to obtain a tileable image in one click; well, the answer is simple: the Make Seamless plugin actually offsets and blends together whole areas of the image, and this can work in several cases, but not for a complex pattern made by scales, where a simple fading is not good enough. In this case, I prefer to paint the joining line between them by hand.
How to do it…
At this point, the file is ready and we can start to paint on the image to make it tileable:
- Click on the mode button (Sets the object interaction mode) on the viewport toolbar to select the Texture Paint mode item.
- Put the mouse cursor on a bright value in the scales image and press the S key to sample it, then go near the color selector in the Brush subpanel under the Tool Shelf to the left and click on the Toggle foreground and background brush colors button (the one with the two opposing arrows) to switch the active color. Otherwise, simply press the X key, put the mouse cursor on a dark area, and press S again to sample it as the opposite color.
Sampling the light and dark colors of the image
- Set the brush's Radius and Strength values, and if you are using a graphic tablet, be sure to have the two tablet pressure sensitivity buttons at the sides of the previous items enabled.
- Start to paint by fixing the scales on the image at the seams areas. Because we can also paint on the Planes duplicated by the Array modifier, and because we are always painting on the same instanced image, it's quite simple to visually join the scales at the four sides, actually making the image tileable:
Painting on the image at the borders to make the scales seamless
It's enough to fix the areas along the middle horizontal and vertical axes of the Planes to cover all the four edges (in fact, fixing two edges is automatically fixing four).
- When you are done, go back into Object Mode and open a new window with UV/Image Editor; press Tab to go into Edit Mode, make the revised image appear, and save it (by clicking on Image | Save as Image in the toolbar or simply press the F3 key) in the
textures_makingfolder asscales_tiles.png:Saving the tileable scales image with a different name
- Save the file as
4886OS_10_scales_tiles_02.blend.
You might wonder why we didn't use the Make Seamless filter of Gimp (Filters | Map | Make Seamless) to obtain a tileable image in one click; well, the answer is simple: the Make Seamless plugin actually offsets and blends together whole areas of the image, and this can work in several cases, but not for a complex pattern made by scales, where a simple fading is not good enough. In this case, I prefer to paint the joining line between them by hand.
How it works…
You might wonder why we didn't use the Make Seamless filter of Gimp (Filters | Map | Make Seamless) to obtain a tileable image in one click; well, the answer is simple: the Make Seamless plugin actually offsets and blends together whole areas of the image, and this can work in several cases, but not for a complex pattern made by scales, where a simple fading is not good enough. In this case, I prefer to paint the joining line between them by hand.
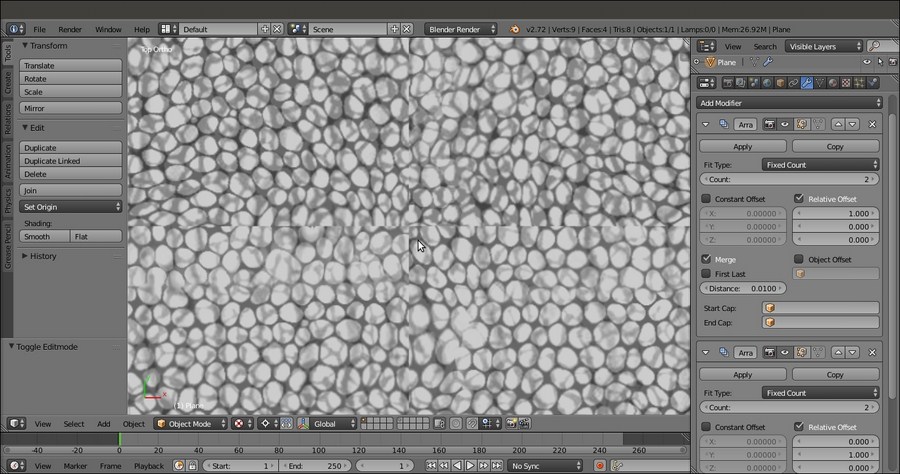
In the previous recipe, we made the scales image texture seamless, ready to be seamlessly mapped on our model. If you go back to Chapter 5, Unwrapping the Low Resolution Mesh, you'll remember that we assigned two different sets of UV coordinate layers to it: the UVMap layer, divided into 5 different tiles (this is called UDIM UV Mapping; it's a popular standard in the industry and means U-Dimension), and the UVMap_scales layer, set up to repeat the scales_tiles.png image pattern at the right size on the model:
The two UV coordinates layers in the UV Maps subpanel
By zooming in and looking carefully at the result of the tiling (in Textured Solid mode, which is enabled under the Shading subpanel of the N viewport sidepanel), you can see that although we used a tileable scales image, we still have seams in some areas. This is obviously due to the fact that the UVMap_scales layer (as you can see in UV/Image Editor in the Edit Mode after selecting all the mesh's vertices) is made up of separated and overlapping islands to obtain a randomly distributed mapping of the scales on the Gidiosaurus skin:
The seams on the Gidiosaurus scales skin
A simple solution to fix these seams is to bake the random scales pattern on the 5 tiles of the UVMap layer and then use the Paint Tool to adjust the gaps. This a step that we have to do in any case to allow further texture modifications such as the painting of befitting facial scales around the eyebrows, the eyes, the nostrils, and so on, but let's go in order.
To be able to bake and then paint on the different tiles in real time through the 3D viewport, we must prepare the file a bit.
Start Blender and open the Gidiosaurus_library.blend file; save it as Gidiosaurus_baking_scales_01.blend:
- Shift-click on the 13th scene layer to disable it and hide the Armor object, then enable the 6th scene layer to show Camera and Lamp. Split the 3D view into two windows and change the left one into a UV/Image Editor window (if it shows the Render Result image datablock, just click on the X icon button to unlink it).
- Put the mouse in the 3D viewport and press the T key to hide the Tool Shelf panel, and then maximize the UV/Image Editor window as much as possible. Go to the Outliner and click on the eye icon to the side of the Camera item to disable its visibility in the viewport.
- Go to the UV Maps subpanel under the Object Data window and be sure to have the UVMap layer selected (the one with the 5 different space tiles); if necessary, click on the camera icon to the right to enable it as the active UV coordinates layer.
Now, let's prepare the materials; remember that, at the moment, we are under the Blender Render engine and not under Cycles:
- Go to the Material window and out of Edit Mode, click on the – icon button to the right of the materials datablock window (Remove the selected material slot) to unlink both the
Enameland theBodymaterial datablocks. - Now click on the + icon button to add 5 material slots, and then add 5 materials by selecting each slot and clicking on the New button.
- Starting from the top one, rename the 5 materials as
Material_U0V0,Material_U1V0,Material_U2V0,Material_U0V1, andMaterial_U1V1.
Adding the 5 materials to the Gidiosaurus object
- Select the
Material U0V0slot and go to the Textures window to click on the New button and add a texture. - Scroll down the vertical panel by rotating the middle mouse wheel and click on the New button under the Image subpanel; in the New Image pop-up panel, click on the Color slot to set the Alpha (A) value to 0.000, then Ctrl + click on the Width slot and right after the default value of 1024, type
*3, then press Enter (in Blender, you can do a math calculation for any parameter like this anywhere). Copy and paste (Ctrl + C and Ctrl + V) the result of the multiplication, 3072, into the Height slot; click on the Name slot to write the texture name asblank_U0V0, then press the OK button at the bottom of the panel:
Adding a blank image texture to the first material
This adds a blank (alpha background) 3072 x 3072 pixels image as a texture on the material.
- Ctrl + left-click on the Unique datablock ID name slot right above the Type (Image or Movie) slot, and rename the default Texture name as
U0V0. Go down to the Mapping subpanel and click on the Map slot to select the UVMap item:
The "Unique datablock ID name" slot, the Image subpanel, and the Mapping subpanel
- Go to the UV/Image Editor to the left side of the screen and click on the double arrows to the side of the New button in the toolbar; from the pop-up menu select the blank_U0V0 item. Slide the toolbar to the right and click on the Image item. In the pop-up menu, select the Save as Image item (or press the F3 key) and save the image in the
texture_makingfolder asblank_U0V0.png, then click on the pin icon button to the right to activate it (Display current image regardless of object selection):
The assigned blank image loaded in the UV/Image Editor window and pinned to be displayed regardless of the object selection
As the image is saved under the Image subpanel, the Source slot caption changes from Generated to Single Image.
- Repeat the procedure for all the remaining four materials, assigning and saving a blank image texture for each material. So inside the
texture_makingfolder, you have saved the images:blank_U0V0,blank_U1V0,blank_U2V0,blank_U0V1, andblank_U1V1. - Start to split the UV/Image Editor window until you have 5 UV/Image Editor windows. Press the Tab key to go into Edit Mode with the mesh; put the mouse in the 3D viewport and press the A key to select all the mesh's vertices and therefore show the UV islands in all the UV/Image Editor windows.
- Enlarge one UV/Image Editor window as much as possible and enable the Keep UV and edit mode mesh selection in sync button on the toolbar.
- If it's the case, deselect everything, then box-select the islands (B key then left-click and drag the mouse) in the U1V0 tile space. In the Material window, select the
Material_U1V0slot and click on the Assign button. Go to the top right UV/Image Editor window and click on the X icon button on the toolbar to unlink the current image datablock (which is still blank_U0V0). Then click on the Image item on the toolbar and from the drop-down list, select theblank_U1V0image. - Press the A key to deselect everything and box-select the islands in the U2V0 tile; select the
Material_U2V0slot and again click on the Assign button. Go to the following image editor and unlink the current image datablock to load theblank_U2V0image. - Repeat for the other two missing tiles and material slots (note that this is not necessary for the U0V0 ones, which are, by default, first assigned to the whole mesh and the first created material and so still remain associated to
Material_U0V0). Then go out of Edit Mode.
The work-space prepared with the 5 UV/Image Editor windows with their respective blank images
As you can see, by selecting the vertices of the UV islands in UV/Image Editor, the corresponding vertices on the mesh are also selected. Moreover, this makes all the UV islands visible in the image editor, even though, we haven't selected a single vertex on the mesh yet (normally, you see only the islands of the selected vertices in the image editor). This way, it's simple to associate a certain UV island with a certain material and a certain group of vertices on the mesh.
- Go to the Material window and select the
Material_U0V0slot. Go to the Texture window and click on the second texture slot right under the U0V0 one. Click on the New button, scroll down to the Image subpanel, and click on the Open button to browse to thetexture_makingfolder and load thescales_tiles.pngimage. - Go to the Mapping subpanel and in the Map slot, select the UVMap_scales UV coordinates layer. Rename the
Unique datablock ID nameslot asscales_tiles. Click on the checkbox to the side of the U0V0 texture slot to disable it (this is just temporary but mandatory for the baking, otherwise it would create a dependency loop, that is, the Circular reference in texture stack message in the top main header and in the Terminal panel as well):
Disabling the blank texture image and loading the "scales_tiles.png" image in the first material
- Click on the button with a black arrow pointing downward, right after the + and –icon buttons, and from the pop-up menu, select the Copy Texture Slot Setting item. Select the
Material_U1V0slot and then click on the second texture slot right under the U1V0 one and click on the New button. Click again on the black arrow button and this time, select Paste Texture Slot Setting:
Copying and pasting the "scales_tiles" texture slot to the other materials
- Repeat this copy and paste for the other three materials, and also remember to disable the first texture slot for all the materials.
- Press Tab to go out of the Edit Mode and save the file.
Thanks to the pin icon button that is enabled for each loaded image, it's possible to keep the different images visible at the same time. At this moment, the 5 different PNG images are blank, so this isn't particularly evident; it will be a lot more clear when we start to actually paint on the model through the 3D viewport.
Getting ready
Start Blender and open the Gidiosaurus_library.blend file; save it as Gidiosaurus_baking_scales_01.blend:
- Shift-click on the 13th scene layer to disable it and hide the Armor object, then enable the 6th scene layer to show Camera and Lamp. Split the 3D view into two windows and change the left one into a UV/Image Editor window (if it shows the Render Result image datablock, just click on the X icon button to unlink it).
- Put the mouse in the 3D viewport and press the T key to hide the Tool Shelf panel, and then maximize the UV/Image Editor window as much as possible. Go to the Outliner and click on the eye icon to the side of the Camera item to disable its visibility in the viewport.
- Go to the UV Maps subpanel under the Object Data window and be sure to have the UVMap layer selected (the one with the 5 different space tiles); if necessary, click on the camera icon to the right to enable it as the active UV coordinates layer.
Now, let's prepare the materials; remember that, at the moment, we are under the Blender Render engine and not under Cycles:
- Go to the Material window and out of Edit Mode, click on the – icon button to the right of the materials datablock window (Remove the selected material slot) to unlink both the
Enameland theBodymaterial datablocks. - Now click on the + icon button to add 5 material slots, and then add 5 materials by selecting each slot and clicking on the New button.
- Starting from the top one, rename the 5 materials as
Material_U0V0,Material_U1V0,Material_U2V0,Material_U0V1, andMaterial_U1V1.Adding the 5 materials to the Gidiosaurus object
- Select the
Material U0V0slot and go to the Textures window to click on the New button and add a texture. - Scroll down the vertical panel by rotating the middle mouse wheel and click on the New button under the Image subpanel; in the New Image pop-up panel, click on the Color slot to set the Alpha (A) value to 0.000, then Ctrl + click on the Width slot and right after the default value of 1024, type
*3, then press Enter (in Blender, you can do a math calculation for any parameter like this anywhere). Copy and paste (Ctrl + C and Ctrl + V) the result of the multiplication, 3072, into the Height slot; click on the Name slot to write the texture name asblank_U0V0, then press the OK button at the bottom of the panel:Adding a blank image texture to the first material
This adds a blank (alpha background) 3072 x 3072 pixels image as a texture on the material.
- Ctrl + left-click on the Unique datablock ID name slot right above the Type (Image or Movie) slot, and rename the default Texture name as
U0V0. Go down to the Mapping subpanel and click on the Map slot to select the UVMap item:The "Unique datablock ID name" slot, the Image subpanel, and the Mapping subpanel
- Go to the UV/Image Editor to the left side of the screen and click on the double arrows to the side of the New button in the toolbar; from the pop-up menu select the blank_U0V0 item. Slide the toolbar to the right and click on the Image item. In the pop-up menu, select the Save as Image item (or press the F3 key) and save the image in the
texture_makingfolder asblank_U0V0.png, then click on the pin icon button to the right to activate it (Display current image regardless of object selection):The assigned blank image loaded in the UV/Image Editor window and pinned to be displayed regardless of the object selection
As the image is saved under the Image subpanel, the Source slot caption changes from Generated to Single Image.
- Repeat the procedure for all the remaining four materials, assigning and saving a blank image texture for each material. So inside the
texture_makingfolder, you have saved the images:blank_U0V0,blank_U1V0,blank_U2V0,blank_U0V1, andblank_U1V1. - Start to split the UV/Image Editor window until you have 5 UV/Image Editor windows. Press the Tab key to go into Edit Mode with the mesh; put the mouse in the 3D viewport and press the A key to select all the mesh's vertices and therefore show the UV islands in all the UV/Image Editor windows.
- Enlarge one UV/Image Editor window as much as possible and enable the Keep UV and edit mode mesh selection in sync button on the toolbar.
- If it's the case, deselect everything, then box-select the islands (B key then left-click and drag the mouse) in the U1V0 tile space. In the Material window, select the
Material_U1V0slot and click on the Assign button. Go to the top right UV/Image Editor window and click on the X icon button on the toolbar to unlink the current image datablock (which is still blank_U0V0). Then click on the Image item on the toolbar and from the drop-down list, select theblank_U1V0image. - Press the A key to deselect everything and box-select the islands in the U2V0 tile; select the
Material_U2V0slot and again click on the Assign button. Go to the following image editor and unlink the current image datablock to load theblank_U2V0image. - Repeat for the other two missing tiles and material slots (note that this is not necessary for the U0V0 ones, which are, by default, first assigned to the whole mesh and the first created material and so still remain associated to
Material_U0V0). Then go out of Edit Mode.The work-space prepared with the 5 UV/Image Editor windows with their respective blank images
As you can see, by selecting the vertices of the UV islands in UV/Image Editor, the corresponding vertices on the mesh are also selected. Moreover, this makes all the UV islands visible in the image editor, even though, we haven't selected a single vertex on the mesh yet (normally, you see only the islands of the selected vertices in the image editor). This way, it's simple to associate a certain UV island with a certain material and a certain group of vertices on the mesh.
- Go to the Material window and select the
Material_U0V0slot. Go to the Texture window and click on the second texture slot right under the U0V0 one. Click on the New button, scroll down to the Image subpanel, and click on the Open button to browse to thetexture_makingfolder and load thescales_tiles.pngimage. - Go to the Mapping subpanel and in the Map slot, select the UVMap_scales UV coordinates layer. Rename the
Unique datablock ID nameslot asscales_tiles. Click on the checkbox to the side of the U0V0 texture slot to disable it (this is just temporary but mandatory for the baking, otherwise it would create a dependency loop, that is, the Circular reference in texture stack message in the top main header and in the Terminal panel as well):Disabling the blank texture image and loading the "scales_tiles.png" image in the first material
- Click on the button with a black arrow pointing downward, right after the + and –icon buttons, and from the pop-up menu, select the Copy Texture Slot Setting item. Select the
Material_U1V0slot and then click on the second texture slot right under the U1V0 one and click on the New button. Click again on the black arrow button and this time, select Paste Texture Slot Setting:Copying and pasting the "scales_tiles" texture slot to the other materials
- Repeat this copy and paste for the other three materials, and also remember to disable the first texture slot for all the materials.
- Press Tab to go out of the Edit Mode and save the file.
Thanks to the pin icon button that is enabled for each loaded image, it's possible to keep the different images visible at the same time. At this moment, the 5 different PNG images are blank, so this isn't particularly evident; it will be a lot more clear when we start to actually paint on the model through the 3D viewport.
How to do it…
Now, let's prepare the materials; remember that, at the moment, we are under the Blender Render engine and not under Cycles:
- Go to the Material window and out of Edit Mode, click on the – icon button to the right of the materials datablock window (Remove the selected material slot) to unlink both the
Enameland theBodymaterial datablocks. - Now click on the + icon button to add 5 material slots, and then add 5 materials by selecting each slot and clicking on the New button.
- Starting from the top one, rename the 5 materials as
Material_U0V0,Material_U1V0,Material_U2V0,Material_U0V1, andMaterial_U1V1.Adding the 5 materials to the Gidiosaurus object
- Select the
Material U0V0slot and go to the Textures window to click on the New button and add a texture. - Scroll down the vertical panel by rotating the middle mouse wheel and click on the New button under the Image subpanel; in the New Image pop-up panel, click on the Color slot to set the Alpha (A) value to 0.000, then Ctrl + click on the Width slot and right after the default value of 1024, type
*3, then press Enter (in Blender, you can do a math calculation for any parameter like this anywhere). Copy and paste (Ctrl + C and Ctrl + V) the result of the multiplication, 3072, into the Height slot; click on the Name slot to write the texture name asblank_U0V0, then press the OK button at the bottom of the panel:Adding a blank image texture to the first material
This adds a blank (alpha background) 3072 x 3072 pixels image as a texture on the material.
- Ctrl + left-click on the Unique datablock ID name slot right above the Type (Image or Movie) slot, and rename the default Texture name as
U0V0. Go down to the Mapping subpanel and click on the Map slot to select the UVMap item:The "Unique datablock ID name" slot, the Image subpanel, and the Mapping subpanel
- Go to the UV/Image Editor to the left side of the screen and click on the double arrows to the side of the New button in the toolbar; from the pop-up menu select the blank_U0V0 item. Slide the toolbar to the right and click on the Image item. In the pop-up menu, select the Save as Image item (or press the F3 key) and save the image in the
texture_makingfolder asblank_U0V0.png, then click on the pin icon button to the right to activate it (Display current image regardless of object selection):The assigned blank image loaded in the UV/Image Editor window and pinned to be displayed regardless of the object selection
As the image is saved under the Image subpanel, the Source slot caption changes from Generated to Single Image.
- Repeat the procedure for all the remaining four materials, assigning and saving a blank image texture for each material. So inside the
texture_makingfolder, you have saved the images:blank_U0V0,blank_U1V0,blank_U2V0,blank_U0V1, andblank_U1V1. - Start to split the UV/Image Editor window until you have 5 UV/Image Editor windows. Press the Tab key to go into Edit Mode with the mesh; put the mouse in the 3D viewport and press the A key to select all the mesh's vertices and therefore show the UV islands in all the UV/Image Editor windows.
- Enlarge one UV/Image Editor window as much as possible and enable the Keep UV and edit mode mesh selection in sync button on the toolbar.
- If it's the case, deselect everything, then box-select the islands (B key then left-click and drag the mouse) in the U1V0 tile space. In the Material window, select the
Material_U1V0slot and click on the Assign button. Go to the top right UV/Image Editor window and click on the X icon button on the toolbar to unlink the current image datablock (which is still blank_U0V0). Then click on the Image item on the toolbar and from the drop-down list, select theblank_U1V0image. - Press the A key to deselect everything and box-select the islands in the U2V0 tile; select the
Material_U2V0slot and again click on the Assign button. Go to the following image editor and unlink the current image datablock to load theblank_U2V0image. - Repeat for the other two missing tiles and material slots (note that this is not necessary for the U0V0 ones, which are, by default, first assigned to the whole mesh and the first created material and so still remain associated to
Material_U0V0). Then go out of Edit Mode.The work-space prepared with the 5 UV/Image Editor windows with their respective blank images
As you can see, by selecting the vertices of the UV islands in UV/Image Editor, the corresponding vertices on the mesh are also selected. Moreover, this makes all the UV islands visible in the image editor, even though, we haven't selected a single vertex on the mesh yet (normally, you see only the islands of the selected vertices in the image editor). This way, it's simple to associate a certain UV island with a certain material and a certain group of vertices on the mesh.
- Go to the Material window and select the
Material_U0V0slot. Go to the Texture window and click on the second texture slot right under the U0V0 one. Click on the New button, scroll down to the Image subpanel, and click on the Open button to browse to thetexture_makingfolder and load thescales_tiles.pngimage. - Go to the Mapping subpanel and in the Map slot, select the UVMap_scales UV coordinates layer. Rename the
Unique datablock ID nameslot asscales_tiles. Click on the checkbox to the side of the U0V0 texture slot to disable it (this is just temporary but mandatory for the baking, otherwise it would create a dependency loop, that is, the Circular reference in texture stack message in the top main header and in the Terminal panel as well):Disabling the blank texture image and loading the "scales_tiles.png" image in the first material
- Click on the button with a black arrow pointing downward, right after the + and –icon buttons, and from the pop-up menu, select the Copy Texture Slot Setting item. Select the
Material_U1V0slot and then click on the second texture slot right under the U1V0 one and click on the New button. Click again on the black arrow button and this time, select Paste Texture Slot Setting:Copying and pasting the "scales_tiles" texture slot to the other materials
- Repeat this copy and paste for the other three materials, and also remember to disable the first texture slot for all the materials.
- Press Tab to go out of the Edit Mode and save the file.
Thanks to the pin icon button that is enabled for each loaded image, it's possible to keep the different images visible at the same time. At this moment, the 5 different PNG images are blank, so this isn't particularly evident; it will be a lot more clear when we start to actually paint on the model through the 3D viewport.
How it works…
Thanks to the pin icon button that is enabled for each loaded image, it's possible to keep the different images visible at the same time. At this moment, the 5 different PNG images are blank, so this isn't particularly evident; it will be a lot more clear when we start to actually paint on the model through the 3D viewport.
What we have to do now is to bake the scales_tiles.png image map (used in all the materials and mapped on the UVMap_scales coordinates layer) on the 5 tiles of the UVMap coordinates layer.
At this moment, Blender is not able to bake automatically outside of the default U0V0 tile space yet, so a bit of additional work is needed; nothing particularly difficult by the way. The steps are as follows:
- Press Tab to go into Edit Mode again and then put the mouse in the blank_U0V0 UV/Image Editor window; press the N key to call the Properties sidepanel and under the Display subpanel, check the Normalized item:

The Normalized item in the Display subpanel under the N Properties sidepanel of the UV/Image Editor window
- Press N again to hide the Properties sidepanel. Go to the UV Maps subpanel under the Object Data window and click on the + icon button to the right to add a new UV coordinates layer (UVMap.001), then rename it UVMap_temp (or whatever you prefer).
We are now going to create a new UV coordinates layer for the baking by moving all the islands in the outside tiles to the space of the default one; but before we go on, we must be sure about two things:
- In the toolbar of the blank_U0V0 image editor window, the Keep UV and edit mode mesh selection in sync button must now be disabled
- In the pop-up menu, accessible by clicking on the UVs item in the image editor toolbar, the Constrain to Image Bounds item must be deselected:

The "Keep UV and edit mode mesh selection in sync" button and the Constrain to Image Bounds item
Go to the blank_U0V0 image editor window; if you prefer, maximize it (mouse cursor into the window and press Ctrl + Up Arrow). If necessary, press A to deselect all the islands.
- Now, box-select the islands on the U1V0 tile, and move them to the default U0V0 tile space (G | X | -1 | Enter):

The UV islands of the U1V0 tile space, box-selected and moved to the default U0V0 tile space
- Deselect everything and box-select the islands at U2V0, then move them to the default space, which is the same as the previous one (G | X | -2 | Enter).
- Repeat for the last 2 islands tiles (G | Y | -1 | Enter) and (G | X | -1 | Enter and then G | Y | -1 | Enter), then rearrange the image editor windows.
- Go to the Object Data window and in the UV Maps subpanel, be sure to have the UVMap_temp layer, the last one, enabled as the active one, that is, the camera icon to the right side of the UVMap_temp item must be the one enabled and visible (Set the map active for rendering):

The new UVMap_temp coordinates layer
- Out of Edit Mode, go to the Render window and then go to the Bake subpanel (usually at the bottom of the panel). If necessary, click on the Bake Mode slot to select Textures, then set the Margin value to 8 or higher; and check the Clear item flag. Be sure to have the Gidiosaurus object still selected and press the Bake button.
After a while, the baked scales textures appear on the 5 PNG images, baked according to the UV islands of the 5 tiles of the UVMap layer:

The 5 baked images and the Bake subpanel under the Render window
- Click on the Image item on the UV/Image Editor toolbar and from the pop-up menu, select the Save All Images item or if you want to preserve your blank images (we are going to use them again later), just save each image at a time (Save As Image item or F3 key) with the names
baked_U0V0.png,baked_U1V0.png, and so on:
Saving the baked image maps
Opening the texture_making folder on your desktop, you will now find the baked textures:
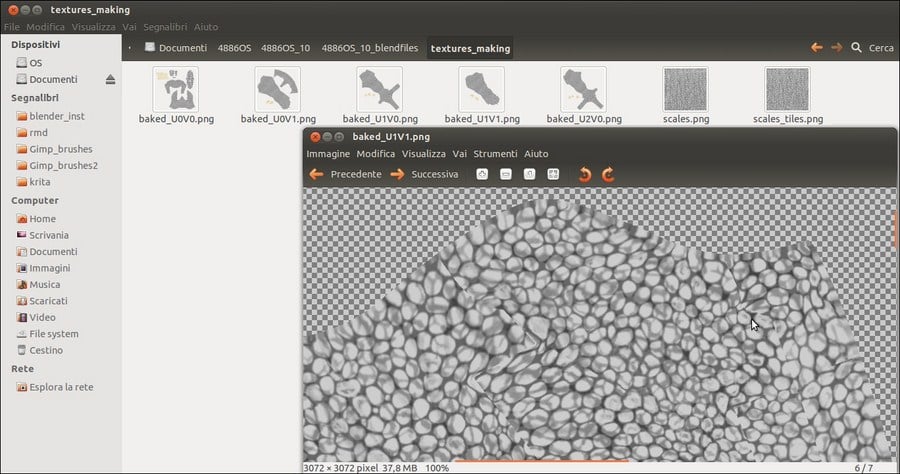
The baked textures saved inside the "texture_making" folder
As you can see in the information bar at the bottom of the GNOME image viewer (I'm working in Linux Ubuntu), each image saved from Blender is 37.8 megabytes.
The large size of the images can of course be reduced (a lot) by opening them in Gimp (or any other 2D application) and re-saving.
All the UV islands have been moved to the default U0V0 tile space, which is the only one where the baking happens, but because each image is associated with a different part of the mesh, each image is correctly baked with the right islands and textures.
In fact, inside Blender, and in our case, the location of each tile in the UV space doesn't actually matter; we made a new UV coordinates layer and kept the old one just in case the model should be exported to a different 3D application.
To move the islands exactly by the correct number of pixels, we enabled the Normalized item in the Display subpanel of the image editor N sidepanel to display the UV coordinates from 0.0 to 1.0, rather than in pixels. Anyway, without the Normalized item enabled, it would have been enough to move the islands by 3072 pixels, that is, the width (or/and height) in pixels of the assigned blank image.
As with any other software, Blender is not free from bugs; particularly, the baking section seems to have an annoying bug, which is very difficult to fix because it happens very rarely and randomly, so that it cannot easily be reproduced and consequently submitted to the Blender bug tracker (https://developer.blender.org/maniphest/project/2/type/Bug/).
It's difficult to understand the reason for this, but sometimes the software refuses to do the baking, claiming that No objects or images (are) found to bake to (the message appears on the top right main header and in the Terminal panel as well); in our case, this seems to happen when you switch the active for rendering UV coordinates layers.
If this happens, one thing you can do is check that all the images assigned in the UV/Image Editor windows to the different materials under one UV layer, also appear correctly assigned under the other UV layer (it shouldn't make a difference, but who knows), eventually re-assigning them one at a time.
If the baking still fails, there is a simple workaround; switch to the UVMap coordinates layer instead, rather than the UVMap_temp one, and just move the islands to the default U0V0 space and bake them one at a time. To do this, first bake the islands of the U0V0 tile space and save the image, then move the islands of the U1V0 tile space to the U0V0 tile space, bake and save as a different image, and so on with the islands of all the tiles.
Getting ready
At this moment, Blender is not able to bake automatically outside of the default U0V0 tile space yet, so a bit of additional work is needed; nothing particularly difficult by the way. The steps are as follows:
- Press Tab to go into Edit Mode again and then put the mouse in the blank_U0V0 UV/Image Editor window; press the N key to call the Properties sidepanel and under the Display subpanel, check the Normalized item:
The Normalized item in the Display subpanel under the N Properties sidepanel of the UV/Image Editor window
- Press N again to hide the Properties sidepanel. Go to the UV Maps subpanel under the Object Data window and click on the + icon button to the right to add a new UV coordinates layer (UVMap.001), then rename it UVMap_temp (or whatever you prefer).
We are now going to create a new UV coordinates layer for the baking by moving all the islands in the outside tiles to the space of the default one; but before we go on, we must be sure about two things:
- In the toolbar of the blank_U0V0 image editor window, the Keep UV and edit mode mesh selection in sync button must now be disabled
- In the pop-up menu, accessible by clicking on the UVs item in the image editor toolbar, the Constrain to Image Bounds item must be deselected:
The "Keep UV and edit mode mesh selection in sync" button and the Constrain to Image Bounds item
Go to the blank_U0V0 image editor window; if you prefer, maximize it (mouse cursor into the window and press Ctrl + Up Arrow). If necessary, press A to deselect all the islands.
- Now, box-select the islands on the U1V0 tile, and move them to the default U0V0 tile space (G | X | -1 | Enter):
The UV islands of the U1V0 tile space, box-selected and moved to the default U0V0 tile space
- Deselect everything and box-select the islands at U2V0, then move them to the default space, which is the same as the previous one (G | X | -2 | Enter).
- Repeat for the last 2 islands tiles (G | Y | -1 | Enter) and (G | X | -1 | Enter and then G | Y | -1 | Enter), then rearrange the image editor windows.
- Go to the Object Data window and in the UV Maps subpanel, be sure to have the UVMap_temp layer, the last one, enabled as the active one, that is, the camera icon to the right side of the UVMap_temp item must be the one enabled and visible (Set the map active for rendering):
The new UVMap_temp coordinates layer
- Out of Edit Mode, go to the Render window and then go to the Bake subpanel (usually at the bottom of the panel). If necessary, click on the Bake Mode slot to select Textures, then set the Margin value to 8 or higher; and check the Clear item flag. Be sure to have the Gidiosaurus object still selected and press the Bake button.
After a while, the baked scales textures appear on the 5 PNG images, baked according to the UV islands of the 5 tiles of the UVMap layer:
The 5 baked images and the Bake subpanel under the Render window
- Click on the Image item on the UV/Image Editor toolbar and from the pop-up menu, select the Save All Images item or if you want to preserve your blank images (we are going to use them again later), just save each image at a time (Save As Image item or F3 key) with the names
baked_U0V0.png,baked_U1V0.png, and so on:Saving the baked image maps
Opening the texture_making folder on your desktop, you will now find the baked textures:
The baked textures saved inside the "texture_making" folder
As you can see in the information bar at the bottom of the GNOME image viewer (I'm working in Linux Ubuntu), each image saved from Blender is 37.8 megabytes.
The large size of the images can of course be reduced (a lot) by opening them in Gimp (or any other 2D application) and re-saving.
All the UV islands have been moved to the default U0V0 tile space, which is the only one where the baking happens, but because each image is associated with a different part of the mesh, each image is correctly baked with the right islands and textures.
In fact, inside Blender, and in our case, the location of each tile in the UV space doesn't actually matter; we made a new UV coordinates layer and kept the old one just in case the model should be exported to a different 3D application.
To move the islands exactly by the correct number of pixels, we enabled the Normalized item in the Display subpanel of the image editor N sidepanel to display the UV coordinates from 0.0 to 1.0, rather than in pixels. Anyway, without the Normalized item enabled, it would have been enough to move the islands by 3072 pixels, that is, the width (or/and height) in pixels of the assigned blank image.
As with any other software, Blender is not free from bugs; particularly, the baking section seems to have an annoying bug, which is very difficult to fix because it happens very rarely and randomly, so that it cannot easily be reproduced and consequently submitted to the Blender bug tracker (https://developer.blender.org/maniphest/project/2/type/Bug/).
It's difficult to understand the reason for this, but sometimes the software refuses to do the baking, claiming that No objects or images (are) found to bake to (the message appears on the top right main header and in the Terminal panel as well); in our case, this seems to happen when you switch the active for rendering UV coordinates layers.
If this happens, one thing you can do is check that all the images assigned in the UV/Image Editor windows to the different materials under one UV layer, also appear correctly assigned under the other UV layer (it shouldn't make a difference, but who knows), eventually re-assigning them one at a time.
If the baking still fails, there is a simple workaround; switch to the UVMap coordinates layer instead, rather than the UVMap_temp one, and just move the islands to the default U0V0 space and bake them one at a time. To do this, first bake the islands of the U0V0 tile space and save the image, then move the islands of the U1V0 tile space to the U0V0 tile space, bake and save as a different image, and so on with the islands of all the tiles.
How to do it…
We are now going to create a new UV coordinates layer for the baking by moving all the islands in the outside tiles to the space of the default one; but before we go on, we must be sure about two things:
- In the toolbar of the blank_U0V0 image editor window, the Keep UV and edit mode mesh selection in sync button must now be disabled
- In the pop-up menu, accessible by clicking on the UVs item in the image editor toolbar, the Constrain to Image Bounds item must be deselected:
The "Keep UV and edit mode mesh selection in sync" button and the Constrain to Image Bounds item
Go to the blank_U0V0 image editor window; if you prefer, maximize it (mouse cursor into the window and press Ctrl + Up Arrow). If necessary, press A to deselect all the islands.
- Now, box-select the islands on the U1V0 tile, and move them to the default U0V0 tile space (G | X | -1 | Enter):
The UV islands of the U1V0 tile space, box-selected and moved to the default U0V0 tile space
- Deselect everything and box-select the islands at U2V0, then move them to the default space, which is the same as the previous one (G | X | -2 | Enter).
- Repeat for the last 2 islands tiles (G | Y | -1 | Enter) and (G | X | -1 | Enter and then G | Y | -1 | Enter), then rearrange the image editor windows.
- Go to the Object Data window and in the UV Maps subpanel, be sure to have the UVMap_temp layer, the last one, enabled as the active one, that is, the camera icon to the right side of the UVMap_temp item must be the one enabled and visible (Set the map active for rendering):
The new UVMap_temp coordinates layer
- Out of Edit Mode, go to the Render window and then go to the Bake subpanel (usually at the bottom of the panel). If necessary, click on the Bake Mode slot to select Textures, then set the Margin value to 8 or higher; and check the Clear item flag. Be sure to have the Gidiosaurus object still selected and press the Bake button.
After a while, the baked scales textures appear on the 5 PNG images, baked according to the UV islands of the 5 tiles of the UVMap layer:
The 5 baked images and the Bake subpanel under the Render window
- Click on the Image item on the UV/Image Editor toolbar and from the pop-up menu, select the Save All Images item or if you want to preserve your blank images (we are going to use them again later), just save each image at a time (Save As Image item or F3 key) with the names
baked_U0V0.png,baked_U1V0.png, and so on:Saving the baked image maps
Opening the texture_making folder on your desktop, you will now find the baked textures:
The baked textures saved inside the "texture_making" folder
As you can see in the information bar at the bottom of the GNOME image viewer (I'm working in Linux Ubuntu), each image saved from Blender is 37.8 megabytes.
The large size of the images can of course be reduced (a lot) by opening them in Gimp (or any other 2D application) and re-saving.
All the UV islands have been moved to the default U0V0 tile space, which is the only one where the baking happens, but because each image is associated with a different part of the mesh, each image is correctly baked with the right islands and textures.
In fact, inside Blender, and in our case, the location of each tile in the UV space doesn't actually matter; we made a new UV coordinates layer and kept the old one just in case the model should be exported to a different 3D application.
To move the islands exactly by the correct number of pixels, we enabled the Normalized item in the Display subpanel of the image editor N sidepanel to display the UV coordinates from 0.0 to 1.0, rather than in pixels. Anyway, without the Normalized item enabled, it would have been enough to move the islands by 3072 pixels, that is, the width (or/and height) in pixels of the assigned blank image.
As with any other software, Blender is not free from bugs; particularly, the baking section seems to have an annoying bug, which is very difficult to fix because it happens very rarely and randomly, so that it cannot easily be reproduced and consequently submitted to the Blender bug tracker (https://developer.blender.org/maniphest/project/2/type/Bug/).
It's difficult to understand the reason for this, but sometimes the software refuses to do the baking, claiming that No objects or images (are) found to bake to (the message appears on the top right main header and in the Terminal panel as well); in our case, this seems to happen when you switch the active for rendering UV coordinates layers.
If this happens, one thing you can do is check that all the images assigned in the UV/Image Editor windows to the different materials under one UV layer, also appear correctly assigned under the other UV layer (it shouldn't make a difference, but who knows), eventually re-assigning them one at a time.
If the baking still fails, there is a simple workaround; switch to the UVMap coordinates layer instead, rather than the UVMap_temp one, and just move the islands to the default U0V0 space and bake them one at a time. To do this, first bake the islands of the U0V0 tile space and save the image, then move the islands of the U1V0 tile space to the U0V0 tile space, bake and save as a different image, and so on with the islands of all the tiles.
How it works…
All the UV islands have been moved to the default U0V0 tile space, which is the only one where the baking happens, but because each image is associated with a different part of the mesh, each image is correctly baked with the right islands and textures.
In fact, inside Blender, and in our case, the location of each tile in the UV space doesn't actually matter; we made a new UV coordinates layer and kept the old one just in case the model should be exported to a different 3D application.
To move the islands exactly by the correct number of pixels, we enabled the Normalized item in the Display subpanel of the image editor N sidepanel to display the UV coordinates from 0.0 to 1.0, rather than in pixels. Anyway, without the Normalized item enabled, it would have been enough to move the islands by 3072 pixels, that is, the width (or/and height) in pixels of the assigned blank image.
As with any other software, Blender is not free from bugs; particularly, the baking section seems to have an annoying bug, which is very difficult to fix because it happens very rarely and randomly, so that it cannot easily be reproduced and consequently submitted to the Blender bug tracker (https://developer.blender.org/maniphest/project/2/type/Bug/).
It's difficult to understand the reason for this, but sometimes the software refuses to do the baking, claiming that No objects or images (are) found to bake to (the message appears on the top right main header and in the Terminal panel as well); in our case, this seems to happen when you switch the active for rendering UV coordinates layers.
If this happens, one thing you can do is check that all the images assigned in the UV/Image Editor windows to the different materials under one UV layer, also appear correctly assigned under the other UV layer (it shouldn't make a difference, but who knows), eventually re-assigning them one at a time.
If the baking still fails, there is a simple workaround; switch to the UVMap coordinates layer instead, rather than the UVMap_temp one, and just move the islands to the default U0V0 space and bake them one at a time. To do this, first bake the islands of the U0V0 tile space and save the image, then move the islands of the U1V0 tile space to the U0V0 tile space, bake and save as a different image, and so on with the islands of all the tiles.
There's more…
As with any other software, Blender is not free from bugs; particularly, the baking section seems to have an annoying bug, which is very difficult to fix because it happens very rarely and randomly, so that it cannot easily be reproduced and consequently submitted to the Blender bug tracker (https://developer.blender.org/maniphest/project/2/type/Bug/).
It's difficult to understand the reason for this, but sometimes the software refuses to do the baking, claiming that No objects or images (are) found to bake to (the message appears on the top right main header and in the Terminal panel as well); in our case, this seems to happen when you switch the active for rendering UV coordinates layers.
If this happens, one thing you can do is check that all the images assigned in the UV/Image Editor windows to the different materials under one UV layer, also appear correctly assigned under the other UV layer (it shouldn't make a difference, but who knows), eventually re-assigning them one at a time.
If the baking still fails, there is a simple workaround; switch to the UVMap coordinates layer instead, rather than the UVMap_temp one, and just move the islands to the default U0V0 space and bake them one at a time. To do this, first bake the islands of the U0V0 tile space and save the image, then move the islands of the U1V0 tile space to the U0V0 tile space, bake and save as a different image, and so on with the islands of all the tiles.
In the previous recipe, we baked the randomly tiled scales image map on the 5 tiles of the UVMap coordinates layer. This was necessary for the next step to be able to fix seams and modify certain areas of the baked scales images through the Paint Tool.
In order to paint in real time on both the model and on all the images assigned to the 5 different UV tiles, and at the same time, once again we need to first prepare the file. To be more precise, we must assign 5 different materials to the mesh, one for each tile and each one with the appropriate image texture.
Start Blender and re-open the Gidiosaurus_baking_scales_01.blend file; save the file as Gidiosaurus_baking_scales_02.blend.
- Minimize the image editor windows on the left as much as possible, then also minimize the Outliner, the Material, and the Texture windows on the right to make room for the 3D viewport.
- Click on the Viewport Shading button in the 3D viewport toolbar and switch the shading mode from Material to Solid, then press the T key to call the Tool Shelf. Then switch from Object Mode to Texture Paint mode by clicking on the mode button in the toolbar:

Switching to Texture Paint mode
- Click on the Options tab inside the Tool Shelf and under the Project Paint subpanel, enable the Occlude, Null, and Normal items:

Items to be enabled under the Options tab
- Click on the Tools tab inside the Tool Shelf to go back to the Brush subpanel options.
At this point, we are ready to start to paint both directly on the model in the 3D viewport or also in the UV/Image Editor windows (just for all eventualities, I suggest you make a copy of the baked scales images before starting to paint):
- Zoom in on a part of the Gidiosaurus object in the 3D viewport, for example, the head.
- Put the mouse cursor on a bright value of the scales image on the model and press the S key to sample it, then go near the color selector in the Brush subpanel under the Tool Shelf to the left and click on the Toggle foreground and background brush colors button (the one with the two opposing arrows) to switch the active color. Otherwise, simply press the X key, put the mouse cursor on a dark area, and press S again to sample it as the opposite color.
- Scroll down and click on the New button (Add new palette) at the bottom of the Brush subpanel; + and – icon buttons will have appeared above the color switcher. Click on the + icon button to add the active color to the palette, then switch the colors and click on the + button again to add a new color to the palette.
- Set the brush's Radius value to 6 and Strength value to 1.000, and if you are using a graphic tablet, be sure to have the 2 tablet pressure sensitivity buttons at the sides of the previous items enabled. Change the default Palette name in Scales.

Setting a palette and the brush strength and radius
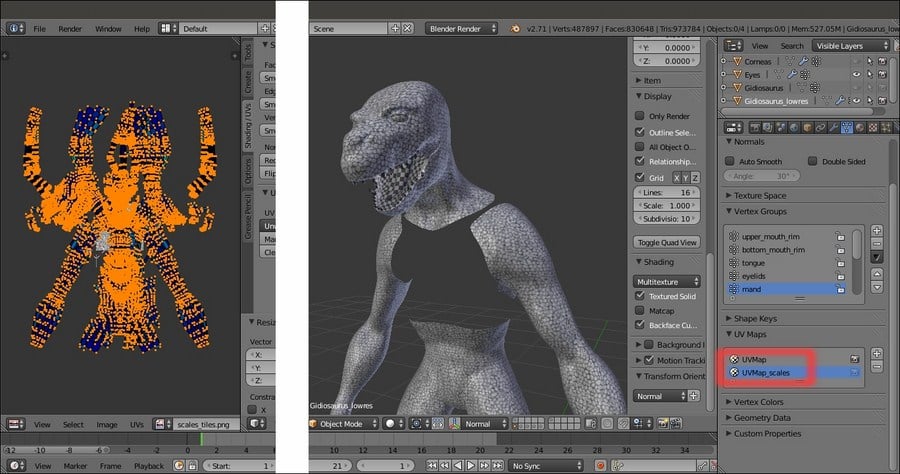
- Simply start to paint on the model, re-drawing the scales where there are seams by flipping the color as you need to, by pressing the X key and painting the dark folds and the light scales. The two colors we sampled, used with the pressure sensitivity enabled, should be enough, but feel free to sample new ones and add it to the palette as you go on:

Painting on the model to fix the image texture seams
- From time to time, click on the Slots tab in the Tool Shelf and click on the Save All Images button.
- Do most of the fixing you can, across the entire Gidiosaurus body, keeping in mind that it's quite useless to spend time fixing seams in areas that will later be covered by the Armor (for example, the top of the head).
- When you are done, be sure to have saved all the edited images as explained in step 6 (but you can also do it one image at a time through the Image | Save Image item in each editor window toolbar or by pressing the Alt + S shortcut).
- Now, be sure to have the
Material_U0V0slot selected as active in the Material window and go to the Texture window; left-click on the empty slot right under the U0V0 one and then click on the New button to add a new image texture. - Scroll down to the Image subpanel and click on the New button. In the New Image pop-up panel, write
added_scales_U0V0in the Name slot, then set the Width and Height values to 3072 and the Alpha (A) value to 0.000 (basically add a new blank and background transparent image as shown in step 5 of the How to do it… section of the Preparing the model to use the UDIM UV tiles recipe):
Adding a new texture paint slot layer
- Go to the Shading subpanel of the Material window and enable the Shadeless item for the
Material_U0V0slot. Then go to the 3D viewport toolbar and change Viewport Shading from Solid to Material. - If not selected already, click on the Slots tab in the Tool Shelf panel and select the
added_scales_U0V0item that appears under theU0V0.pngonce inside the Available Paint Slots window. - Directly in the 3D view, start to paint new scales on the eyebrows to replace the randomly distributed ones; use the light color of the palette to conceal the old scales on the first layer, and the dark color to draw the new ones. Try to build a consistent pattern, also using photos of real reptiles as references. When you are done, save the image in the
texture_makingfolder:
Painting new scales on the eyebrow
- Draw new scales around the nostrils and the rim of the mouth:

Painting new scales also around the nostrils and at the rim of the mouth
The Blender Paint Tool also has other handy brushes; a particularly useful one is the Smear brush, which smudges the borders or any blotch in the scales.
To access the brushes, just click on the big window in the Brush subpanel under the Tool Shelf and click on the chosen one to select it:

The brushes selection pop-up menu
Remember to always save the painted images before closing Blender, otherwise you'll lose them.
Also remember that if you have more than one texture layer to save, it's necessary to load each one of them into an UV/Image Editor window. This is actually very quick and easy, just select each layer in the Available Paint Slots window (in the Slots subpanel under the Slots tab) to make it appear in the image editor window and save it through the Image | Save As Image menu in the editor toolbar.
Once saved the first time, it's possible to re-save all of them in one single click, through the Save All Images items, both in the tab, as well as in the toolbar menu.
- Save the file as
Gidiosaurus_painting_scales_fix.blend.Note
In the textures and blend files provided with this cookbook, you'll find textures fixed only in the head area; I leave the task of finishing the fixing and drawing of new scales on the rest of the body (for example, bigger scales can be added to the upper side of the hand fingers, feet, shoulders, and so on) to you.
The new Blender 2.73 texture paint layering feature works simply by adding a new texture slot to the material, and automatically setting it as required, by the type of texture you selected in the Add Texture Paint Slot; in fact, by going to the Texture window, it is possible to see the added new texture slot and also, if necessary, to change the settings:

The added texture paint slot also appearing as a texture slot in the Texture window
Nonetheless, it is a great addition to Blender that can simplify the texture painting workflow a lot.
To bake the added scales as a single image with the background scales images, perform the following steps:
- Enter Edit Mode and click on the Select button for
Material_U0V0to select the vertices assigned to that tile. - Go to the top left UV/Image Editor window and press Alt + N to call the New Image pop-up menu; add a new blank image of 3072 x 3072 pixels named
baked_scales_U0V0, and save it inside thetextures_makingfolder. - Go out of Edit Mode and if it's the case, click on the double arrows icon to the left side of the image name datablock to re-assign the just-created
Untitledimage. - Repeat for the other four materials, naming the new images according to the tile and saving them inside the
texture_makingfolder as well. - Go to the UV Maps subpanel under the Object Data window to make the UVMap_temp coordinates layer active.
- Go to the Render window, and be sure that the Bake Mode under the Bake subpanel is set to Textures, then click on the Bake button.
- After the baking is done, click on the Image item in the toolbar of one of the image editors and select the Save All Images item.
Not necessarily everything has to be fixed by painting in Blender; for example, it would be enough to fix the scales on only the half of the head, export the painted image texture, and open it in Gimp (or any other 2D image editing software):

The scales "U0V0.png" image map and the "added_scales_U0V0.png" layer in Gimp
Then, by duplicating the layer and mirroring it, plus a little bit of painting to adjust the seams, it's really simple to obtain the missing half of the new scales texture:

The duplicated and mirrored "added_scales_U0V0.png" layer in Gimp
Of course, if you want to fix every side and part by hand-painting on the model in Blender to obtain a more natural looking result, no one is going to stop you!
Getting ready
Start Blender and re-open the Gidiosaurus_baking_scales_01.blend file; save the file as Gidiosaurus_baking_scales_02.blend.
- Minimize the image editor windows on the left as much as possible, then also minimize the Outliner, the Material, and the Texture windows on the right to make room for the 3D viewport.
- Click on the Viewport Shading button in the 3D viewport toolbar and switch the shading mode from Material to Solid, then press the T key to call the Tool Shelf. Then switch from Object Mode to Texture Paint mode by clicking on the mode button in the toolbar:
Switching to Texture Paint mode
- Click on the Options tab inside the Tool Shelf and under the Project Paint subpanel, enable the Occlude, Null, and Normal items:
Items to be enabled under the Options tab
- Click on the Tools tab inside the Tool Shelf to go back to the Brush subpanel options.
At this point, we are ready to start to paint both directly on the model in the 3D viewport or also in the UV/Image Editor windows (just for all eventualities, I suggest you make a copy of the baked scales images before starting to paint):
- Zoom in on a part of the Gidiosaurus object in the 3D viewport, for example, the head.
- Put the mouse cursor on a bright value of the scales image on the model and press the S key to sample it, then go near the color selector in the Brush subpanel under the Tool Shelf to the left and click on the Toggle foreground and background brush colors button (the one with the two opposing arrows) to switch the active color. Otherwise, simply press the X key, put the mouse cursor on a dark area, and press S again to sample it as the opposite color.
- Scroll down and click on the New button (Add new palette) at the bottom of the Brush subpanel; + and – icon buttons will have appeared above the color switcher. Click on the + icon button to add the active color to the palette, then switch the colors and click on the + button again to add a new color to the palette.
- Set the brush's Radius value to 6 and Strength value to 1.000, and if you are using a graphic tablet, be sure to have the 2 tablet pressure sensitivity buttons at the sides of the previous items enabled. Change the default Palette name in Scales.
Setting a palette and the brush strength and radius
- Simply start to paint on the model, re-drawing the scales where there are seams by flipping the color as you need to, by pressing the X key and painting the dark folds and the light scales. The two colors we sampled, used with the pressure sensitivity enabled, should be enough, but feel free to sample new ones and add it to the palette as you go on:
Painting on the model to fix the image texture seams
- From time to time, click on the Slots tab in the Tool Shelf and click on the Save All Images button.
- Do most of the fixing you can, across the entire Gidiosaurus body, keeping in mind that it's quite useless to spend time fixing seams in areas that will later be covered by the Armor (for example, the top of the head).
- When you are done, be sure to have saved all the edited images as explained in step 6 (but you can also do it one image at a time through the Image | Save Image item in each editor window toolbar or by pressing the Alt + S shortcut).
- Now, be sure to have the
Material_U0V0slot selected as active in the Material window and go to the Texture window; left-click on the empty slot right under the U0V0 one and then click on the New button to add a new image texture. - Scroll down to the Image subpanel and click on the New button. In the New Image pop-up panel, write
added_scales_U0V0in the Name slot, then set the Width and Height values to 3072 and the Alpha (A) value to 0.000 (basically add a new blank and background transparent image as shown in step 5 of the How to do it… section of the Preparing the model to use the UDIM UV tiles recipe):Adding a new texture paint slot layer
- Go to the Shading subpanel of the Material window and enable the Shadeless item for the
Material_U0V0slot. Then go to the 3D viewport toolbar and change Viewport Shading from Solid to Material. - If not selected already, click on the Slots tab in the Tool Shelf panel and select the
added_scales_U0V0item that appears under theU0V0.pngonce inside the Available Paint Slots window. - Directly in the 3D view, start to paint new scales on the eyebrows to replace the randomly distributed ones; use the light color of the palette to conceal the old scales on the first layer, and the dark color to draw the new ones. Try to build a consistent pattern, also using photos of real reptiles as references. When you are done, save the image in the
texture_makingfolder:Painting new scales on the eyebrow
- Draw new scales around the nostrils and the rim of the mouth:
Painting new scales also around the nostrils and at the rim of the mouth
The Blender Paint Tool also has other handy brushes; a particularly useful one is the Smear brush, which smudges the borders or any blotch in the scales.
To access the brushes, just click on the big window in the Brush subpanel under the Tool Shelf and click on the chosen one to select it:
The brushes selection pop-up menu
Remember to always save the painted images before closing Blender, otherwise you'll lose them.
Also remember that if you have more than one texture layer to save, it's necessary to load each one of them into an UV/Image Editor window. This is actually very quick and easy, just select each layer in the Available Paint Slots window (in the Slots subpanel under the Slots tab) to make it appear in the image editor window and save it through the Image | Save As Image menu in the editor toolbar.
Once saved the first time, it's possible to re-save all of them in one single click, through the Save All Images items, both in the tab, as well as in the toolbar menu.
- Save the file as
Gidiosaurus_painting_scales_fix.blend.Note
In the textures and blend files provided with this cookbook, you'll find textures fixed only in the head area; I leave the task of finishing the fixing and drawing of new scales on the rest of the body (for example, bigger scales can be added to the upper side of the hand fingers, feet, shoulders, and so on) to you.
The new Blender 2.73 texture paint layering feature works simply by adding a new texture slot to the material, and automatically setting it as required, by the type of texture you selected in the Add Texture Paint Slot; in fact, by going to the Texture window, it is possible to see the added new texture slot and also, if necessary, to change the settings:
The added texture paint slot also appearing as a texture slot in the Texture window
Nonetheless, it is a great addition to Blender that can simplify the texture painting workflow a lot.
To bake the added scales as a single image with the background scales images, perform the following steps:
- Enter Edit Mode and click on the Select button for
Material_U0V0to select the vertices assigned to that tile. - Go to the top left UV/Image Editor window and press Alt + N to call the New Image pop-up menu; add a new blank image of 3072 x 3072 pixels named
baked_scales_U0V0, and save it inside thetextures_makingfolder. - Go out of Edit Mode and if it's the case, click on the double arrows icon to the left side of the image name datablock to re-assign the just-created
Untitledimage. - Repeat for the other four materials, naming the new images according to the tile and saving them inside the
texture_makingfolder as well. - Go to the UV Maps subpanel under the Object Data window to make the UVMap_temp coordinates layer active.
- Go to the Render window, and be sure that the Bake Mode under the Bake subpanel is set to Textures, then click on the Bake button.
- After the baking is done, click on the Image item in the toolbar of one of the image editors and select the Save All Images item.
Not necessarily everything has to be fixed by painting in Blender; for example, it would be enough to fix the scales on only the half of the head, export the painted image texture, and open it in Gimp (or any other 2D image editing software):
The scales "U0V0.png" image map and the "added_scales_U0V0.png" layer in Gimp
Then, by duplicating the layer and mirroring it, plus a little bit of painting to adjust the seams, it's really simple to obtain the missing half of the new scales texture:
The duplicated and mirrored "added_scales_U0V0.png" layer in Gimp
Of course, if you want to fix every side and part by hand-painting on the model in Blender to obtain a more natural looking result, no one is going to stop you!
How to do it…
At this point, we are ready to start to paint both directly on the model in the 3D viewport or also in the UV/Image Editor windows (just for all eventualities, I suggest you make a copy of the baked scales images before starting to paint):
- Zoom in on a part of the Gidiosaurus object in the 3D viewport, for example, the head.
- Put the mouse cursor on a bright value of the scales image on the model and press the S key to sample it, then go near the color selector in the Brush subpanel under the Tool Shelf to the left and click on the Toggle foreground and background brush colors button (the one with the two opposing arrows) to switch the active color. Otherwise, simply press the X key, put the mouse cursor on a dark area, and press S again to sample it as the opposite color.
- Scroll down and click on the New button (Add new palette) at the bottom of the Brush subpanel; + and – icon buttons will have appeared above the color switcher. Click on the + icon button to add the active color to the palette, then switch the colors and click on the + button again to add a new color to the palette.
- Set the brush's Radius value to 6 and Strength value to 1.000, and if you are using a graphic tablet, be sure to have the 2 tablet pressure sensitivity buttons at the sides of the previous items enabled. Change the default Palette name in Scales.
Setting a palette and the brush strength and radius
- Simply start to paint on the model, re-drawing the scales where there are seams by flipping the color as you need to, by pressing the X key and painting the dark folds and the light scales. The two colors we sampled, used with the pressure sensitivity enabled, should be enough, but feel free to sample new ones and add it to the palette as you go on:
Painting on the model to fix the image texture seams
- From time to time, click on the Slots tab in the Tool Shelf and click on the Save All Images button.
- Do most of the fixing you can, across the entire Gidiosaurus body, keeping in mind that it's quite useless to spend time fixing seams in areas that will later be covered by the Armor (for example, the top of the head).
- When you are done, be sure to have saved all the edited images as explained in step 6 (but you can also do it one image at a time through the Image | Save Image item in each editor window toolbar or by pressing the Alt + S shortcut).
- Now, be sure to have the
Material_U0V0slot selected as active in the Material window and go to the Texture window; left-click on the empty slot right under the U0V0 one and then click on the New button to add a new image texture. - Scroll down to the Image subpanel and click on the New button. In the New Image pop-up panel, write
added_scales_U0V0in the Name slot, then set the Width and Height values to 3072 and the Alpha (A) value to 0.000 (basically add a new blank and background transparent image as shown in step 5 of the How to do it… section of the Preparing the model to use the UDIM UV tiles recipe):Adding a new texture paint slot layer
- Go to the Shading subpanel of the Material window and enable the Shadeless item for the
Material_U0V0slot. Then go to the 3D viewport toolbar and change Viewport Shading from Solid to Material. - If not selected already, click on the Slots tab in the Tool Shelf panel and select the
added_scales_U0V0item that appears under theU0V0.pngonce inside the Available Paint Slots window. - Directly in the 3D view, start to paint new scales on the eyebrows to replace the randomly distributed ones; use the light color of the palette to conceal the old scales on the first layer, and the dark color to draw the new ones. Try to build a consistent pattern, also using photos of real reptiles as references. When you are done, save the image in the
texture_makingfolder:Painting new scales on the eyebrow
- Draw new scales around the nostrils and the rim of the mouth:
Painting new scales also around the nostrils and at the rim of the mouth
The Blender Paint Tool also has other handy brushes; a particularly useful one is the Smear brush, which smudges the borders or any blotch in the scales.
To access the brushes, just click on the big window in the Brush subpanel under the Tool Shelf and click on the chosen one to select it:
The brushes selection pop-up menu
Remember to always save the painted images before closing Blender, otherwise you'll lose them.
Also remember that if you have more than one texture layer to save, it's necessary to load each one of them into an UV/Image Editor window. This is actually very quick and easy, just select each layer in the Available Paint Slots window (in the Slots subpanel under the Slots tab) to make it appear in the image editor window and save it through the Image | Save As Image menu in the editor toolbar.
Once saved the first time, it's possible to re-save all of them in one single click, through the Save All Images items, both in the tab, as well as in the toolbar menu.
- Save the file as
Gidiosaurus_painting_scales_fix.blend.Note
In the textures and blend files provided with this cookbook, you'll find textures fixed only in the head area; I leave the task of finishing the fixing and drawing of new scales on the rest of the body (for example, bigger scales can be added to the upper side of the hand fingers, feet, shoulders, and so on) to you.
The new Blender 2.73 texture paint layering feature works simply by adding a new texture slot to the material, and automatically setting it as required, by the type of texture you selected in the Add Texture Paint Slot; in fact, by going to the Texture window, it is possible to see the added new texture slot and also, if necessary, to change the settings:
The added texture paint slot also appearing as a texture slot in the Texture window
Nonetheless, it is a great addition to Blender that can simplify the texture painting workflow a lot.
To bake the added scales as a single image with the background scales images, perform the following steps:
- Enter Edit Mode and click on the Select button for
Material_U0V0to select the vertices assigned to that tile. - Go to the top left UV/Image Editor window and press Alt + N to call the New Image pop-up menu; add a new blank image of 3072 x 3072 pixels named
baked_scales_U0V0, and save it inside thetextures_makingfolder. - Go out of Edit Mode and if it's the case, click on the double arrows icon to the left side of the image name datablock to re-assign the just-created
Untitledimage. - Repeat for the other four materials, naming the new images according to the tile and saving them inside the
texture_makingfolder as well. - Go to the UV Maps subpanel under the Object Data window to make the UVMap_temp coordinates layer active.
- Go to the Render window, and be sure that the Bake Mode under the Bake subpanel is set to Textures, then click on the Bake button.
- After the baking is done, click on the Image item in the toolbar of one of the image editors and select the Save All Images item.
Not necessarily everything has to be fixed by painting in Blender; for example, it would be enough to fix the scales on only the half of the head, export the painted image texture, and open it in Gimp (or any other 2D image editing software):
The scales "U0V0.png" image map and the "added_scales_U0V0.png" layer in Gimp
Then, by duplicating the layer and mirroring it, plus a little bit of painting to adjust the seams, it's really simple to obtain the missing half of the new scales texture:
The duplicated and mirrored "added_scales_U0V0.png" layer in Gimp
Of course, if you want to fix every side and part by hand-painting on the model in Blender to obtain a more natural looking result, no one is going to stop you!
How it works…
The new Blender 2.73 texture paint layering feature works simply by adding a new texture slot to the material, and automatically setting it as required, by the type of texture you selected in the Add Texture Paint Slot; in fact, by going to the Texture window, it is possible to see the added new texture slot and also, if necessary, to change the settings:
The added texture paint slot also appearing as a texture slot in the Texture window
Nonetheless, it is a great addition to Blender that can simplify the texture painting workflow a lot.
To bake the added scales as a single image with the background scales images, perform the following steps:
- Enter Edit Mode and click on the Select button for
Material_U0V0to select the vertices assigned to that tile. - Go to the top left UV/Image Editor window and press Alt + N to call the New Image pop-up menu; add a new blank image of 3072 x 3072 pixels named
baked_scales_U0V0, and save it inside thetextures_makingfolder. - Go out of Edit Mode and if it's the case, click on the double arrows icon to the left side of the image name datablock to re-assign the just-created
Untitledimage. - Repeat for the other four materials, naming the new images according to the tile and saving them inside the
texture_makingfolder as well. - Go to the UV Maps subpanel under the Object Data window to make the UVMap_temp coordinates layer active.
- Go to the Render window, and be sure that the Bake Mode under the Bake subpanel is set to Textures, then click on the Bake button.
- After the baking is done, click on the Image item in the toolbar of one of the image editors and select the Save All Images item.
Not necessarily everything has to be fixed by painting in Blender; for example, it would be enough to fix the scales on only the half of the head, export the painted image texture, and open it in Gimp (or any other 2D image editing software):
The scales "U0V0.png" image map and the "added_scales_U0V0.png" layer in Gimp
Then, by duplicating the layer and mirroring it, plus a little bit of painting to adjust the seams, it's really simple to obtain the missing half of the new scales texture:
The duplicated and mirrored "added_scales_U0V0.png" layer in Gimp
Of course, if you want to fix every side and part by hand-painting on the model in Blender to obtain a more natural looking result, no one is going to stop you!
There's more…
To bake the added scales as a single image with the background scales images, perform the following steps:
- Enter Edit Mode and click on the Select button for
Material_U0V0to select the vertices assigned to that tile. - Go to the top left UV/Image Editor window and press Alt + N to call the New Image pop-up menu; add a new blank image of 3072 x 3072 pixels named
baked_scales_U0V0, and save it inside thetextures_makingfolder. - Go out of Edit Mode and if it's the case, click on the double arrows icon to the left side of the image name datablock to re-assign the just-created
Untitledimage. - Repeat for the other four materials, naming the new images according to the tile and saving them inside the
texture_makingfolder as well. - Go to the UV Maps subpanel under the Object Data window to make the UVMap_temp coordinates layer active.
- Go to the Render window, and be sure that the Bake Mode under the Bake subpanel is set to Textures, then click on the Bake button.
- After the baking is done, click on the Image item in the toolbar of one of the image editors and select the Save All Images item.
Not necessarily everything has to be fixed by painting in Blender; for example, it would be enough to fix the scales on only the half of the head, export the painted image texture, and open it in Gimp (or any other 2D image editing software):
The scales "U0V0.png" image map and the "added_scales_U0V0.png" layer in Gimp
Then, by duplicating the layer and mirroring it, plus a little bit of painting to adjust the seams, it's really simple to obtain the missing half of the new scales texture:
The duplicated and mirrored "added_scales_U0V0.png" layer in Gimp
Of course, if you want to fix every side and part by hand-painting on the model in Blender to obtain a more natural looking result, no one is going to stop you!
After having obtained the scales textures, we must now paint the diffuse color of the Gidiosaurus character.
Start Blender and open the Gidiosaurus_baking_scales.blend file:
- Go to the main Properties panel and be sure to have the UVMap coordinates layer selected and active, in the UV Maps subpanel under the Object Data window.
- Go to the Material window and select the
Material_U0V0slot, then go to the Texture window and be sure to have the scales_tiles texture slot selected; left-click on the X icon button to the right side of the name datablock to unlink it (Shift + left-click to remove it from the file):
Unlinking the scales_tiles texture slot datablock
- Select and enable (by clicking on the checkbox to the right) the U0V0 texture slot. Repeat the procedure at steps 2 and 3 for all 5 materials.
I'll take for granted that you have preserved your blank images and that they are the ones loaded into the current file; otherwise, substitute them with new blank images (you have to do this both in the Texture window as well as in the UV/Image Editor windows) by following steps 5 and 7 of the Preparing the model to use the UDIM UV tiles recipe in this chapter.
- Minimize the image editor windows to the left and the Material and Texture panels to the right as much as possible, then click on the mode button (Sets the object interaction mode) on the toolbar to go into Texture Paint mode. Press T with the mouse pointer over the 3D view to call the Tool Shelf and click on the Viewport Shading button on the toolbar to switch to Solid mode:

Switching to Solid viewport shading mode
- Just to verify that everything works correctly, select a black color (or any other one) in the color wheel under the Brush subpanel and trace a continuous stroke in the 3D viewport that envelopes all the Gidiosaurus body parts:

Testing that everything works correctly with a single stroke on the mesh
By enlarging the UV/Image Editor windows, you will see that after the stroke, each image has been updated with the corresponding painting (pay no attention to the over-imposed and repeated for each window UV islands):

The test stroke correctly visible inside each one of the UV/Image Editor windows
- Rearrange the image editor windows, then press Ctrl + Z to undo the stroke and save the file as
Gidiosaurus_painting_BI.blend.
We are now ready to paint the basic color for the Gidiosaurus character. But first, one more little thing:
- Select the Gidiosaurus object and enter Edit Mode; select the vertices of all the teeth and all the talons, then assign a new vertex group renamed enamel; press Ctrl + I to invert the selection and go out of Edit Mode.
- Now, start by selecting a medium dark greenish color (R 0.349, G 0.510, B 0.435) in the color wheel under the Brush subpanel. Scroll down and go to the bottom of the subpanel and click on the New button to create a new palette, then click on the + icon button (Add Swatch) above the Foreground Color slot (the left one) to add the color to the palette. Rename the default Palette name as
Gidiosaurus_colors. - In the 3D viewport toolbar, click on the Face selection masking for painting button to enable the masking tool; now it's possible to paint only on the part of the mesh that has selected vertices in Edit Mode, so in this case we want to paint only on the skin, leaving the teeth and the talons blank.
- Click on the Brush window and select the Fill brush; if necessary, click on the greenish color box added to the palette (called Swatch) to load it as the foreground color (note that with the Fill brush, the background color swatch disappears and the foreground color swatch becomes the only one available). Set the Strength value to 1.000 and click on the Gidiosaurus object in the 3D viewport.
After a while, all the paintable parts of the mesh are filled with the active color (and therefore also the textures in the UV/Image Editor windows; there are weird straight lines, probably a bug, but not a problem in this case because they don't show on the mesh and we can fill in the texture's backgrounds later anyway). If any tiny part is left out, just click on one of the parts again to fill it:

The Fill brush and the Mask button in the 3D view toolbar
- Now select the TexDraw brush and a darker and more saturated green color (R 0.129, G 0.275, B 0.125) as the foreground color, and add it to the palette.
- Under the Tool Shelf, go to the Options tab and be sure to have the Occlude, Cull and Normal items disabled still; then go into the Ortho Side view.
- Now it's time to use a tablet, if you have one; enable both the tablet pressure sensitivity buttons to the side of the Radius and Strength items and start to shade the Gidiosaurus body on the head, shoulders, arms, and legs:

Painting colors on the model
- Select a brownish color (R 0.204, G 0.188, B 0.133) and add it to the palette; disable the tablet pressure sensitivity for Radius and lower the Strength to 0.500. Go into the Front view, maximize the 3D viewport (mouse pointer in the window and press Ctrl + Up Arrow), and keep on adding shades to the hands, feet, and legs:

Shading the character's limbs with darker hues
- Increase the Radius value to 100 (using the slider or by pressing the F key and moving the mouse pointer in the 3D view) and painting on the head and the shoulders:

Shading the head and shoulders
- If, for any reason, it becomes difficult to paint directly on the model through the 3D viewport, you can maximize the involved UV/Image Editor window (mouse pointer in the window and press Ctrl + Up Arrow), click on the Mode button (Editing context being displayed) in the toolbar (which by default shows View), and switch it to Paint. Press T to call the Tool Shelf and go on with the painting, smudging, or whatever, directly on the texture image:

Painting directly on the image map in the UV/Image Editor window
For example, this is the way I painted the inside of the mouth and the tongue, then went back to the 3D viewport to smudge and soften the joining line of the pink tissue with the green skin at the borders:

Working on the inside of the mouth in the UV/Image Editor window
I'm not going to show you every step in this process, but basically this is the procedure I used to paint the diffuse coloration for the character. I also added lighter and warmer colors for the face's areas close to the mouth and more bluish and colder hues to de-saturate the brownish hands and feet, and then inverting the enamel vertex group to paint in Edit Mode, through the use of the Mask tool, the teeth and talons as well:

The completed Gidiosaurus diffuse color texturing
To have a look at the final Gidiosaurus_colors palette, open the
Gidiosaurus_painting_BI_02.blendfile provided. - When you are done, go to the top left UV/Image Editor window, blank_U0V0, and click on the Image item in the toolbar. Save the image texture in the
textures_makingfolder asU0V0_col.png, and do the same with the other 4 image textures. - To keep the palette, save the file.
There is not that much to explain about this recipe, except I just want to highlight the fact that we disabled the Occlude, Cull, and Normal items in the Options tab under the Tool Shelf. This is so we were able to paint (from the Side view) on both sides of the model at the same time; in fact, with these settings disabled, the mesh is not occluding itself. It seems that all three items must be disabled for this to work.
Instead, to smear and/or soften the texture on some parts, for example, the inside of the mouth, we had to re-enable them, in order to prevent our mouth-painting from accidentally overwriting our skin-painting.
Remember, the Occlude, Cull, and Normal items should always be enabled if you want to paint only on the model's surface right under your brush. You can disable them to paint on the front/outer and the back/inside of the mesh at the same time.
Getting ready
Start Blender and open the Gidiosaurus_baking_scales.blend file:
- Go to the main Properties panel and be sure to have the UVMap coordinates layer selected and active, in the UV Maps subpanel under the Object Data window.
- Go to the Material window and select the
Material_U0V0slot, then go to the Texture window and be sure to have the scales_tiles texture slot selected; left-click on the X icon button to the right side of the name datablock to unlink it (Shift + left-click to remove it from the file):Unlinking the scales_tiles texture slot datablock
- Select and enable (by clicking on the checkbox to the right) the U0V0 texture slot. Repeat the procedure at steps 2 and 3 for all 5 materials.
I'll take for granted that you have preserved your blank images and that they are the ones loaded into the current file; otherwise, substitute them with new blank images (you have to do this both in the Texture window as well as in the UV/Image Editor windows) by following steps 5 and 7 of the Preparing the model to use the UDIM UV tiles recipe in this chapter.
- Minimize the image editor windows to the left and the Material and Texture panels to the right as much as possible, then click on the mode button (Sets the object interaction mode) on the toolbar to go into Texture Paint mode. Press T with the mouse pointer over the 3D view to call the Tool Shelf and click on the Viewport Shading button on the toolbar to switch to Solid mode:
Switching to Solid viewport shading mode
- Just to verify that everything works correctly, select a black color (or any other one) in the color wheel under the Brush subpanel and trace a continuous stroke in the 3D viewport that envelopes all the Gidiosaurus body parts:
Testing that everything works correctly with a single stroke on the mesh
By enlarging the UV/Image Editor windows, you will see that after the stroke, each image has been updated with the corresponding painting (pay no attention to the over-imposed and repeated for each window UV islands):
The test stroke correctly visible inside each one of the UV/Image Editor windows
- Rearrange the image editor windows, then press Ctrl + Z to undo the stroke and save the file as
Gidiosaurus_painting_BI.blend.
We are now ready to paint the basic color for the Gidiosaurus character. But first, one more little thing:
- Select the Gidiosaurus object and enter Edit Mode; select the vertices of all the teeth and all the talons, then assign a new vertex group renamed enamel; press Ctrl + I to invert the selection and go out of Edit Mode.
- Now, start by selecting a medium dark greenish color (R 0.349, G 0.510, B 0.435) in the color wheel under the Brush subpanel. Scroll down and go to the bottom of the subpanel and click on the New button to create a new palette, then click on the + icon button (Add Swatch) above the Foreground Color slot (the left one) to add the color to the palette. Rename the default Palette name as
Gidiosaurus_colors. - In the 3D viewport toolbar, click on the Face selection masking for painting button to enable the masking tool; now it's possible to paint only on the part of the mesh that has selected vertices in Edit Mode, so in this case we want to paint only on the skin, leaving the teeth and the talons blank.
- Click on the Brush window and select the Fill brush; if necessary, click on the greenish color box added to the palette (called Swatch) to load it as the foreground color (note that with the Fill brush, the background color swatch disappears and the foreground color swatch becomes the only one available). Set the Strength value to 1.000 and click on the Gidiosaurus object in the 3D viewport.
After a while, all the paintable parts of the mesh are filled with the active color (and therefore also the textures in the UV/Image Editor windows; there are weird straight lines, probably a bug, but not a problem in this case because they don't show on the mesh and we can fill in the texture's backgrounds later anyway). If any tiny part is left out, just click on one of the parts again to fill it:
The Fill brush and the Mask button in the 3D view toolbar
- Now select the TexDraw brush and a darker and more saturated green color (R 0.129, G 0.275, B 0.125) as the foreground color, and add it to the palette.
- Under the Tool Shelf, go to the Options tab and be sure to have the Occlude, Cull and Normal items disabled still; then go into the Ortho Side view.
- Now it's time to use a tablet, if you have one; enable both the tablet pressure sensitivity buttons to the side of the Radius and Strength items and start to shade the Gidiosaurus body on the head, shoulders, arms, and legs:
Painting colors on the model
- Select a brownish color (R 0.204, G 0.188, B 0.133) and add it to the palette; disable the tablet pressure sensitivity for Radius and lower the Strength to 0.500. Go into the Front view, maximize the 3D viewport (mouse pointer in the window and press Ctrl + Up Arrow), and keep on adding shades to the hands, feet, and legs:
Shading the character's limbs with darker hues
- Increase the Radius value to 100 (using the slider or by pressing the F key and moving the mouse pointer in the 3D view) and painting on the head and the shoulders:
Shading the head and shoulders
- If, for any reason, it becomes difficult to paint directly on the model through the 3D viewport, you can maximize the involved UV/Image Editor window (mouse pointer in the window and press Ctrl + Up Arrow), click on the Mode button (Editing context being displayed) in the toolbar (which by default shows View), and switch it to Paint. Press T to call the Tool Shelf and go on with the painting, smudging, or whatever, directly on the texture image:
Painting directly on the image map in the UV/Image Editor window
For example, this is the way I painted the inside of the mouth and the tongue, then went back to the 3D viewport to smudge and soften the joining line of the pink tissue with the green skin at the borders:
Working on the inside of the mouth in the UV/Image Editor window
I'm not going to show you every step in this process, but basically this is the procedure I used to paint the diffuse coloration for the character. I also added lighter and warmer colors for the face's areas close to the mouth and more bluish and colder hues to de-saturate the brownish hands and feet, and then inverting the enamel vertex group to paint in Edit Mode, through the use of the Mask tool, the teeth and talons as well:
The completed Gidiosaurus diffuse color texturing
To have a look at the final Gidiosaurus_colors palette, open the
Gidiosaurus_painting_BI_02.blendfile provided. - When you are done, go to the top left UV/Image Editor window, blank_U0V0, and click on the Image item in the toolbar. Save the image texture in the
textures_makingfolder asU0V0_col.png, and do the same with the other 4 image textures. - To keep the palette, save the file.
There is not that much to explain about this recipe, except I just want to highlight the fact that we disabled the Occlude, Cull, and Normal items in the Options tab under the Tool Shelf. This is so we were able to paint (from the Side view) on both sides of the model at the same time; in fact, with these settings disabled, the mesh is not occluding itself. It seems that all three items must be disabled for this to work.
Instead, to smear and/or soften the texture on some parts, for example, the inside of the mouth, we had to re-enable them, in order to prevent our mouth-painting from accidentally overwriting our skin-painting.
Remember, the Occlude, Cull, and Normal items should always be enabled if you want to paint only on the model's surface right under your brush. You can disable them to paint on the front/outer and the back/inside of the mesh at the same time.
How to do it…
We are now ready to paint the basic color for the Gidiosaurus character. But first, one more little thing:
- Select the Gidiosaurus object and enter Edit Mode; select the vertices of all the teeth and all the talons, then assign a new vertex group renamed enamel; press Ctrl + I to invert the selection and go out of Edit Mode.
- Now, start by selecting a medium dark greenish color (R 0.349, G 0.510, B 0.435) in the color wheel under the Brush subpanel. Scroll down and go to the bottom of the subpanel and click on the New button to create a new palette, then click on the + icon button (Add Swatch) above the Foreground Color slot (the left one) to add the color to the palette. Rename the default Palette name as
Gidiosaurus_colors. - In the 3D viewport toolbar, click on the Face selection masking for painting button to enable the masking tool; now it's possible to paint only on the part of the mesh that has selected vertices in Edit Mode, so in this case we want to paint only on the skin, leaving the teeth and the talons blank.
- Click on the Brush window and select the Fill brush; if necessary, click on the greenish color box added to the palette (called Swatch) to load it as the foreground color (note that with the Fill brush, the background color swatch disappears and the foreground color swatch becomes the only one available). Set the Strength value to 1.000 and click on the Gidiosaurus object in the 3D viewport.
After a while, all the paintable parts of the mesh are filled with the active color (and therefore also the textures in the UV/Image Editor windows; there are weird straight lines, probably a bug, but not a problem in this case because they don't show on the mesh and we can fill in the texture's backgrounds later anyway). If any tiny part is left out, just click on one of the parts again to fill it:
The Fill brush and the Mask button in the 3D view toolbar
- Now select the TexDraw brush and a darker and more saturated green color (R 0.129, G 0.275, B 0.125) as the foreground color, and add it to the palette.
- Under the Tool Shelf, go to the Options tab and be sure to have the Occlude, Cull and Normal items disabled still; then go into the Ortho Side view.
- Now it's time to use a tablet, if you have one; enable both the tablet pressure sensitivity buttons to the side of the Radius and Strength items and start to shade the Gidiosaurus body on the head, shoulders, arms, and legs:
Painting colors on the model
- Select a brownish color (R 0.204, G 0.188, B 0.133) and add it to the palette; disable the tablet pressure sensitivity for Radius and lower the Strength to 0.500. Go into the Front view, maximize the 3D viewport (mouse pointer in the window and press Ctrl + Up Arrow), and keep on adding shades to the hands, feet, and legs:
Shading the character's limbs with darker hues
- Increase the Radius value to 100 (using the slider or by pressing the F key and moving the mouse pointer in the 3D view) and painting on the head and the shoulders:
Shading the head and shoulders
- If, for any reason, it becomes difficult to paint directly on the model through the 3D viewport, you can maximize the involved UV/Image Editor window (mouse pointer in the window and press Ctrl + Up Arrow), click on the Mode button (Editing context being displayed) in the toolbar (which by default shows View), and switch it to Paint. Press T to call the Tool Shelf and go on with the painting, smudging, or whatever, directly on the texture image:
Painting directly on the image map in the UV/Image Editor window
For example, this is the way I painted the inside of the mouth and the tongue, then went back to the 3D viewport to smudge and soften the joining line of the pink tissue with the green skin at the borders:
Working on the inside of the mouth in the UV/Image Editor window
I'm not going to show you every step in this process, but basically this is the procedure I used to paint the diffuse coloration for the character. I also added lighter and warmer colors for the face's areas close to the mouth and more bluish and colder hues to de-saturate the brownish hands and feet, and then inverting the enamel vertex group to paint in Edit Mode, through the use of the Mask tool, the teeth and talons as well:
The completed Gidiosaurus diffuse color texturing
To have a look at the final Gidiosaurus_colors palette, open the
Gidiosaurus_painting_BI_02.blendfile provided. - When you are done, go to the top left UV/Image Editor window, blank_U0V0, and click on the Image item in the toolbar. Save the image texture in the
textures_makingfolder asU0V0_col.png, and do the same with the other 4 image textures. - To keep the palette, save the file.
There is not that much to explain about this recipe, except I just want to highlight the fact that we disabled the Occlude, Cull, and Normal items in the Options tab under the Tool Shelf. This is so we were able to paint (from the Side view) on both sides of the model at the same time; in fact, with these settings disabled, the mesh is not occluding itself. It seems that all three items must be disabled for this to work.
Instead, to smear and/or soften the texture on some parts, for example, the inside of the mouth, we had to re-enable them, in order to prevent our mouth-painting from accidentally overwriting our skin-painting.
Remember, the Occlude, Cull, and Normal items should always be enabled if you want to paint only on the model's surface right under your brush. You can disable them to paint on the front/outer and the back/inside of the mesh at the same time.
How it works…
There is not that much to explain about this recipe, except I just want to highlight the fact that we disabled the Occlude, Cull, and Normal items in the Options tab under the Tool Shelf. This is so we were able to paint (from the Side view) on both sides of the model at the same time; in fact, with these settings disabled, the mesh is not occluding itself. It seems that all three items must be disabled for this to work.
Instead, to smear and/or soften the texture on some parts, for example, the inside of the mouth, we had to re-enable them, in order to prevent our mouth-painting from accidentally overwriting our skin-painting.
Remember, the Occlude, Cull, and Normal items should always be enabled if you want to paint only on the model's surface right under your brush. You can disable them to paint on the front/outer and the back/inside of the mesh at the same time.
There are no differences in painting in Blender Internal or in Cycles, because the Paint Tool is exactly the same; the only difference is in the preparation of the materials.
In this recipe, we are not going to repeat the procedure already explained in the previous one; we'll just set up the file for the painting and test whether it's possible to paint in real time on all 5 image textures at the same time, as it is in Blender Internal (spoiler: it is).
Let's start with the Gidiosaurus_painting_BI.blend file; in that file, we already have the UV/Image Editor windows set and the 5 materials assigned to the 5 different UDIM tiles and parts of the mesh.
In case you want to start with a brand new file, here you need to repeat the steps of the Preparing the model to use the UDIM UV tiles recipe in this chapter. Then, continue with the following:
- Be sure you're in Object Mode.
- Go to the main top header and click on the Engine to use for rendering button; switch from Blender Render to Cycles Render.
- Split the 3D view into two horizontal rows and change the top one into a Node Editor window; press the N key to get rid of the Properties sidepanel.
- In the Material window, select the Material_U0V0 slot; click on the Use Nodes button or select the Use Nodes checkbox in the Node Editor toolbar:

Enabling the nodes for the materials under Cycles
- Put the mouse pointer inside the Node Editor window and add an Image Texture node (press the Shift + A keys and in the pop-up menu, go to the Texture item to select Image Texture). Connect its Color output to the Color input socket of the Diffuse BSDF node.
At this point, if we haven't already painted the color textures in Blender Internal, we should load the
blank_U0V0.pngimage in the Image Texture node and then do the same for the other 4 materials.Instead, because we already have the color textures, let's load them in the Cycles materials. To see whether everything works as it should, we'll paint on them through the 3D viewport.
- Click on the double arrows to the side of the Open button in the Image Texture node and select the U0V0_col.png item from the pop-up menu (remember that the 5 color textures are already loaded inside the blend file):

Selecting one of the already loaded images in the Image Texture node for the materials under Cycles
- Repeat step 4 to step 6 for the other 4 materials.
Now, the steps are really simple:
- Go to the Brush subpanel and switch the foreground color with the background black color.
- Trace in the 3D viewport, a continuous stroke enveloping all the Gidiosaurus body parts:

The single stroke test under Cycles
This is the proof that it works exactly as in Blender Internal.
- Press Ctrl + Z to undo the stroke and save the file as
Gidiosaurus_painting_Cycles.blend.
Getting ready
Let's start with the Gidiosaurus_painting_BI.blend file; in that file, we already have the UV/Image Editor windows set and the 5 materials assigned to the 5 different UDIM tiles and parts of the mesh.
In case you want to start with a brand new file, here you need to repeat the steps of the Preparing the model to use the UDIM UV tiles recipe in this chapter. Then, continue with the following:
- Be sure you're in Object Mode.
- Go to the main top header and click on the Engine to use for rendering button; switch from Blender Render to Cycles Render.
- Split the 3D view into two horizontal rows and change the top one into a Node Editor window; press the N key to get rid of the Properties sidepanel.
- In the Material window, select the Material_U0V0 slot; click on the Use Nodes button or select the Use Nodes checkbox in the Node Editor toolbar:
Enabling the nodes for the materials under Cycles
- Put the mouse pointer inside the Node Editor window and add an Image Texture node (press the Shift + A keys and in the pop-up menu, go to the Texture item to select Image Texture). Connect its Color output to the Color input socket of the Diffuse BSDF node.
At this point, if we haven't already painted the color textures in Blender Internal, we should load the
blank_U0V0.pngimage in the Image Texture node and then do the same for the other 4 materials.Instead, because we already have the color textures, let's load them in the Cycles materials. To see whether everything works as it should, we'll paint on them through the 3D viewport.
- Click on the double arrows to the side of the Open button in the Image Texture node and select the U0V0_col.png item from the pop-up menu (remember that the 5 color textures are already loaded inside the blend file):
Selecting one of the already loaded images in the Image Texture node for the materials under Cycles
- Repeat step 4 to step 6 for the other 4 materials.
Now, the steps are really simple:
- Go to the Brush subpanel and switch the foreground color with the background black color.
- Trace in the 3D viewport, a continuous stroke enveloping all the Gidiosaurus body parts:
The single stroke test under Cycles
This is the proof that it works exactly as in Blender Internal.
- Press Ctrl + Z to undo the stroke and save the file as
Gidiosaurus_painting_Cycles.blend.
How to do it…
Now, the steps are really simple:
- Go to the Brush subpanel and switch the foreground color with the background black color.
- Trace in the 3D viewport, a continuous stroke enveloping all the Gidiosaurus body parts:
The single stroke test under Cycles
This is the proof that it works exactly as in Blender Internal.
- Press Ctrl + Z to undo the stroke and save the file as
Gidiosaurus_painting_Cycles.blend.