

Here's what we've discussed so far, we discussed about how to set up our project to use GLFW library on Windows. In this section, we'll discuss how to set up OpenGL on a Mac system. So, let's get started.
To download and install the essential libraries onto your Mac system, we'll have to install a package manager for Mac known as Homebrew. Homebrew will help us in installing all the necessary packages and libraries to run our OpenGL code.
To install Homebrew, go to https://brew.sh/, copy the path highlighted in the following screenshot, paste it into your Terminal, and then hit Enter. The prompt will download and install Homebrew on your system:
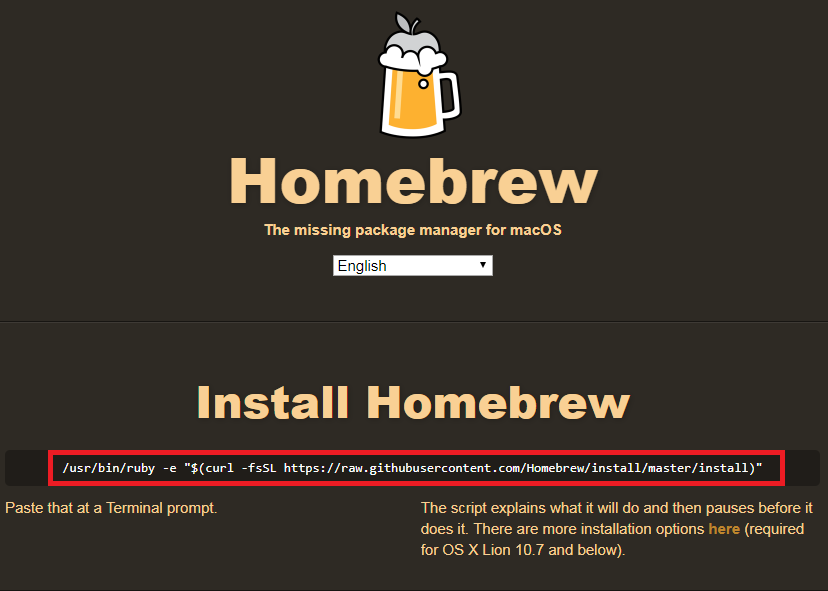
Path on Homebrew homepage
Once we've installed Homebrew, we'll download the GLFW and GLEW libraries onto our system. Let's install GLFW first. To do that, we need to type the following command in the Terminal window:
brew install glfw3In the preceding command, you must have observed we've included the number 3; the reason for that is that if you just type glfw, it installs an older version, which we don't want, so inserting glfw3 will install the latest version. Hit Enter and the libraries will be downloaded onto your system.
Now, we're going to do the same process for GLEW; type the following command in the Terminal:
brew install glew We don't need to put any version for this; just press Enter and the necessary files will be downloaded. That's it for the libraries to download onto our system.
Note
Make a note that, since we're installing the libraries on the system itself and not in our project, whenever you move your project to a different system, you will have to install these libraries onto that particular system.
Once we've downloaded and installed all the essential libraries with the help of Homebrew, we'll now move on to setting up Xcode for OpenGL.
In this section, we'll discuss how to set up Xcode to run our OpenGL code. Follow these steps and carry out the setup process:
- Open up Xcode and click on the
Create a new Xcode projectoption. - Go to
OS X|Application, selectCommand Line Tool, and then clickNext. - You will get the following window; fill in the necessary details, as highlighted in the following screenshot:
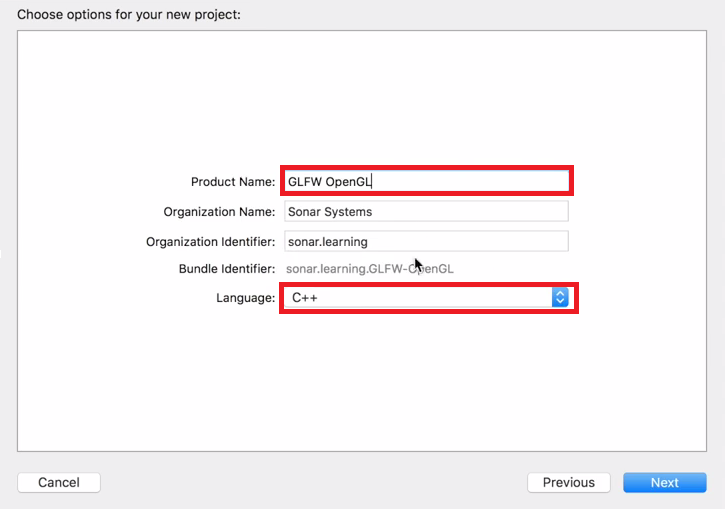
Basic details for a project
- In the preceding screenshot, make sure that the
Languageoption is always set to C++, and then clickNext. TheOrganization NameandOrganization identifierproperties, you can set to whatever you want. - Next, set the location you would like to store and save the project to. Then, click on the
Createbutton. Next, we have just a plain C++ project ready. Before we begin with our code, we need to follow a few more steps necessary to set up our project. - First of all, in Xcode, click on your project and go to
Build Settings. InBuild Settings, go to theSearch Pathssection and click onHeader Search Paths.Then, click on+and type/usr/local/include. This will allow us to#includeGLEW and GLFW in ourmain.cppfile. - Now go to
Build Phases, then click onLink Binary With Libraries, and click the+button. Typeopenglin the search bar, selectOpenGL.framework, and then click on theAddbutton.
- Again click on the
+button, then click onAdd Other.... Now, press Cmd + Shift + G, and it will open up ago-tofolder search bar. In it, type/usr/local. Then click onCellar, go to theglew|libfolder, selectlibGLEW.1.12.0.dylibwithout the little arrow, and then clickOpen.
Note
The arrow is just a shortcut, an alias, and we don't want that. We also don't want the MX version, just the regular .dy non-alias lib.
- Click
+again, then clickAdd Other..., press Cmd + Shift + G, and type/usr/local. Now go toCellar, and go toglfw|lib. Select the non-aliaslibglfw3.3.1.dyliband clickOpen.
With all the steps executed, our project is now set up to use GLEW and GLFW with OpenGL on Mac. We can now go to the main.cpp file on Xcode and start writing our code for creating the OpenGL rendering window.