Book Image

Learn Clip Studio Paint - Second Edition

By : Liz Staley
Book Image

Learn Clip Studio Paint - Second Edition

By: Liz Staley

Overview of this book

Clip Studio Paint, the successor to Manga Studio, is used by over four million illustrators and comic creators around the world. This book will guide you through every step of learning this software, from system requirements and installation, all the way through to exporting your work for print or the web. Learn how to create new documents, customize tools to fit your working style, use ruler tools to create anything from straight lines to intricate backgrounds, add 3D elements, create comic panels using the specialized panel tools, utilize screentones and materials, add text and word balloons to your comics, create sound effects, easily flat and color your comics using reference layers, and bring your drawings to life using the animation features. By the end of this book, you will be able to navigate the Clip Studio Interface and program preferences, customize the various tools, and be able to create your own black-and-white and color illustrations and comics from start to finish.
Table of Contents (21 chapters)

Using the Mesh Transform tool to warp text

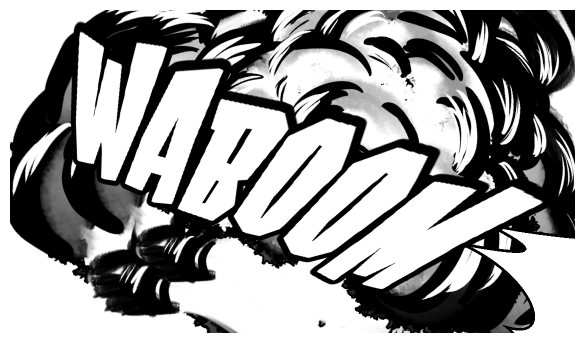
Lots of sound effects in comics follow curves or the line of action to emphasize the art on the page. In the following screenshot, the sound effect for the explosion is angled and shaped to emphasize the action:

Though you can hand-draw sound effects like this if you want to (and hand-lettering is a great skill to have!), you can also create curved and warped text using the Mesh Transform tool.

Follow these steps to create a warped sound effect:

  1. Ensure that your text layer is active by locating it in the Layer palette and clicking on it to highlight it.
  2. In the File Menu, click on Layer, and then click on Duplicate Layer to create a copy of the text layer. Alternatively, you can also click on the layer in the Layer palette and drag it to the New Layer icon in the bottom corner to create a copy of the layer.
  3. With the layer copy selected...