

3D navigation is essential when working on any project in Blender, so let's practice what we learned in the Basic 3D Navigation Controls section of Chapter 1, Introduction to 3D and the Blender User Interface, before learning one more very important navigation feature.
As we have already learned, Blender's 3D navigation controls are all about using the middle mouse button (MMB). Let's start by rotating the view:
- Move your mouse into the 3D Viewport.
- Press and hold the middle mouse button.
- Drag your mouse around to rotate the viewing angle.
Notice that the focal point of the view is focused on the Viking dummy in the center. When we rotate, our view always orbits around the current focal point. We'll see why this is important after we practice our other controls.
Once you're comfortable with orbiting the Viking dummy, let's try panning:
- Make sure the mouse is still in the 3D Viewport.
- Hold down the Shift key, then press and hold the middle mouse button.
- Drag your mouse around to pan the view.
Panning shifts the focal point of the Viewport. If we rotate the view now, we will orbit around the new focal point. Both orbiting and zooming are relative to the focal point. Let's give zooming a shot now:
- Once again, make sure the mouse is in the 3D Viewport.
- Hold down the Ctrl key, then press and hold the middle mouse button.
- Drag your mouse up and down to zoom in and out.
As we rotate, pan, and zoom around the scene, the focal point of the Viewport will inevitably get stuck in an awkward position. Eventually, navigating the Viewport will become very difficult and frustrating. This is a common issue in all 3D software.
To fix this issue, we can choose an object that we want to focus on, then frame it by using the View Selected feature (also known as the Frame Selected feature). First, we'll pick an object that we want to work with:
- Select the Dummy object by clicking on it in the 3D Viewport or in the Outliner.
The object will have an orange outline in the Viewport to indicate that it is selected. Now, we need to frame it. There are many ways to do this, but Blender 2.8 has a new pie menu that we can use for easy Viewport navigation.
- Move the mouse over the 3D Viewport so that the keyboard shortcuts behave correctly.
- Press the Tilde key (~ ) to bring up the View pie menu.
The View pie menu is one of many pie menus in Blender 2.8. When activated, pie menus bring up a quick list of menu options in a circular pattern around the mouse, as shown in the following screenshot:
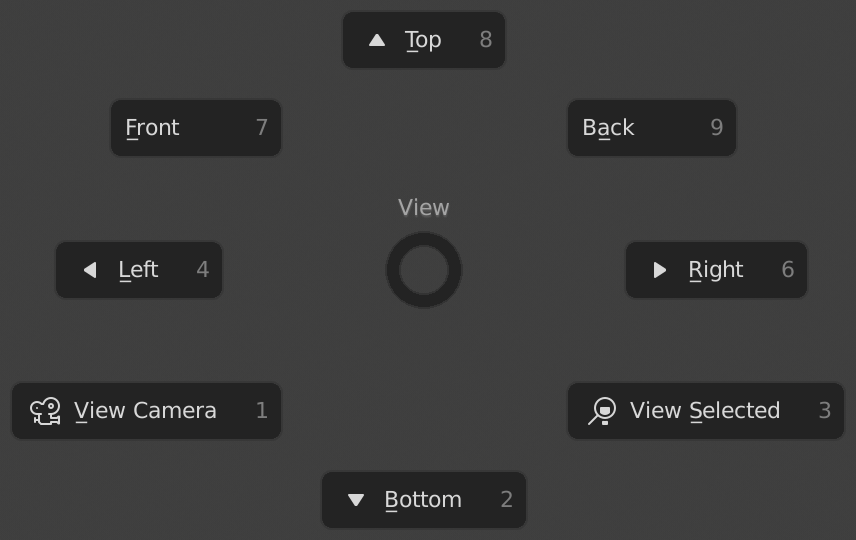
Each option on the pie menu takes up a slice of space around the mouse (like a slice of pie) and can be selected by simply moving your mouse in the direction of the menu option you want and then clicking.
We will become familiar with the other options of this pie menu later in this book, but for now, we just need the View Selected option:
- Make sure the View pie menu is still open.
- Move the mouse diagonally down and to the right to highlight the View Selected option.
- Click while the View Selected option is highlighted.
The nice thing about pie menus is that you don't have to click directly on the menu option; all you have to do is aim the mouse in the general direction of the "slice" of the pie menu that you want and then click.
Excellent – the Viewport's focal point has been reset so that the Dummy object is centered in the view. You should get familiar with using this navigation feature since it will come up over and over again in our workflow.
Play around with the navigation controls until you're comfortable with them – you'll be using them from here on out. Practice rotating, panning, and zooming. Try selecting different objects in the scene and use the View Selected option to frame them within the 3D Viewport. One more time, here are the navigation controls we covered:
- Rotate: MMB and drag
- Zoom: Ctrl + MMB and drag OR scroll wheel.
- Pan: Shift + MMB and drag.
- View Selected: Tilde ~ hotkey | View Selected OR period . on the number pad.
When you feel comfortable with these controls, you can move on to the next section of this chapter, where we'll have a look at Blender's new Toolbar.