

In Blender 2.8, there is a new user-friendly Toolbar attached to the left-hand side of the 3D Viewport. The Toolbar provides an assortment of large icons, with each icon representing a tool. By default, the Toolbar is collapsed into a single column, but we can expand it to show the names of all of the tools. Let's expand the Toolbar now:
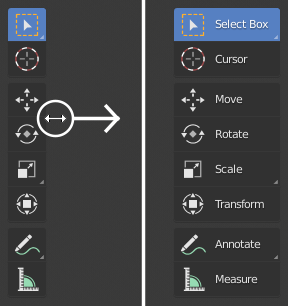
- Hover your mouse over the right-hand side edge of the Toolbar until your mouse turns into a double arrow.
- Left-click and drag to the right to expand the Toolbar, as shown in the following screenshot:
Now that the Toolbar has been expanded, let's learn about some of the tools.
The first tool in the Toolbar is the Select Box tool, which is highlighted in blue to indicate that it is active. When a tool is active, it can be used by clicking in the 3D Viewport with the Left Mouse Button (LMB). The Select Box tool lets us draw a box selection by clicking and dragging over multiple objects.
Directly beneath the Select Box tool is the Cursor tool. This will let us place the 3D cursor in the scene. You'll learn more about what the 3D cursor is and how to use it in the next project, so don't worry about it for now.
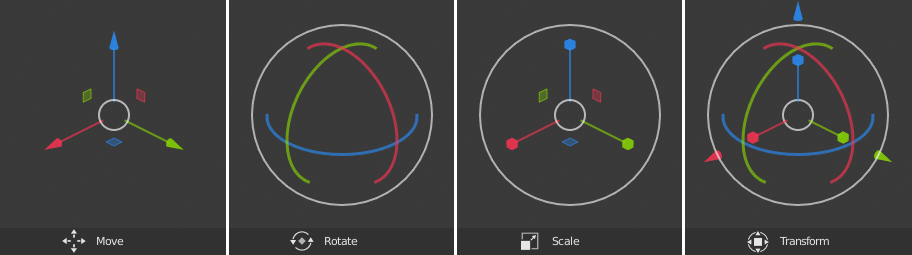
The next four tools are used for transformations: Move, Rotate, Scale, and Transform. The names of these tools should sound familiar from what we learned in the first chapter. Clicking on a tool in the Toolbar will activate it, and a gizmo will appear in the 3D Viewport. We use gizmos to interact with the tools from the Toolbar. The gizmos for the four transform tools are shown in the following image:
Let's learn more about these four gizmos:
- Move: The Move tool gizmo has three colored arrows, one for each axis (red for X, green for Y, and blue for Z). Clicking and dragging on these arrows will move the selected object.
- Rotate: The Rotate gizmo also has three colored handles, but this time they are shaped like semicircles instead of arrows. The colors still correspond to the same X, Y, and Z axes. Clicking and dragging on these semicircles will rotate the selected object.
- Scale: This gizmo looks almost identical to the Move gizmo but, instead of little arrows, the tips are shaped like little cubes. Clicking and dragging on these little cubes will scale the selected object.
-
Transform: The Transform gizmo is just a combination of the previous three gizmos. Some users like to have all of these gizmos active at once, but it can be a little overwhelming.
The last few tools in the Toolbar are for advanced workflows, so we'll skip them for now. Next, we'll practice with the basic transformation tools by moving, rotating, and scaling the three arrow objects in the scene.