Book Image

Unreal Engine 4.x Scripting with C++ Cookbook - Second Edition

By : John P. Doran, William Sherif, Stephen Whittle
Book Image

Unreal Engine 4.x Scripting with C++ Cookbook - Second Edition

By: John P. Doran, William Sherif, Stephen Whittle

Overview of this book

Unreal Engine 4 (UE4) is a popular and award-winning game engine that powers some of the most popular games. A truly powerful tool for game development, there has never been a better time to use it for both commercial and independent projects. With more than 100 recipes, this book shows how to unleash the power of C++ while developing games with Unreal Engine. This book takes you on a journey to jumpstart your C++ and UE4 development skills. You will start off by setting up UE4 for C++ development and learn how to work with Visual Studio, a popular code editor. You will learn how to create C++ classes and structs the Unreal way. This will be followed by exploring memory management, smart pointers, and debugging your code. You will then learn how to make your own Actors and Components through code and how to handle input and collision events. You will also get exposure to many elements of game development including creating user interfaces, artificial intelligence, and writing code with networked play in mind. You will also learn how to add on to the Unreal Editor itself. With a range of task-oriented recipes, this book provides actionable information about writing code for games with UE4 using C++. By the end of the book, you will be empowered to become a top-notch developer with UE4 using C++ as your scripting language!
Table of Contents (16 chapters)

Extension – changing the color theme in Visual Studio

By default, you cannot save the changes you make to the font colors and background settings that you make in the Fonts and Colors dialog. To fix this issue, Visual Studio has a feature called Themes. If you go to Tools | Options | Environment | General, you can change the theme to one of the three pre-installed stock themes (Light, Blue, and Dark):

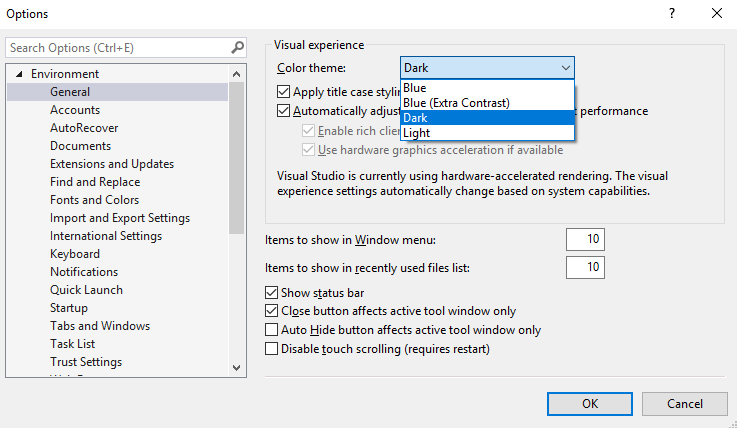
A different theme completely changes the look of Visual Studio, from the colors of the title bars to the background color of the text editor window.

You can also customize the theme of Visual Studio completely, but you'll need an extension to do so. Extensions are little programs that can be installed into Visual Studio to modify its behavior.

By default, your customized color settings cannot be saved or reloaded into another Visual Studio installation without the extension. With the extension, you will also be able to save your own color theme to share with others. You can also load the color settings made by another person or by yourself into a fresh copy of Visual Studio.

How to do it...

  1. Go to Tools | Extensions and Updates....
  2. From the dialog that appears, choose Online in the panel on the left-hand side. Start typing Theme Editor into the search box on the right. The Color Theme Editor for Visual Studio option will pop up in your search results:
  1. Click the small Download button in the top right-hand corner of the entry. Click through the installation dialog prompts, allowing the plugin to install. You'll then notice on the bottom of the window that it is scheduled for installation but will wait until Visual Studio is closed.
  1. Close the window and Visual Studio, saving our project. After our program has closed, the VSIX Installer window will come up to confirm that you want to install the software. Click on the Modify button and it should start:
Alternatively, visit https://marketplace.visualstudio.com/items?itemName=VisualStudioPlatformTeam.VisualStudio2017ColorThemeEditor and download/install the extension by double-clicking the .vsix file that comes from your browser.
  1. Once it has finished installing, open up Visual Studio again and open our project. One of the quickest ways to do so is from the Recent section on the Start Page:
  1. After restarting, go to Tools | Customize Colors to open the Color Themes editor page:
The Color Themes editor page
  1. From the Color Themes dialog that appears, click on the little palette-shaped icon on the upper-right corner of the theme that you want to use as your base or starting theme (I've clicked on the palette for the Light theme here, as you can see in the following screenshot):
  1. A copy of the theme will appear in the Custom Themes section in the lower part of the Color Themes window. Click on Edit Theme to modify the theme that is the middle button that appears when you hover over the custom theme. When you are editing the theme, you can change everything from the font text color to the C++ keyword color.
  1. The main area you are interested in is the C++ Text Editor section. To gain access to all the C++ Text Editor options, be sure to select the Show All Elements option at the top of the Theme Editor window, as shown in the following screenshot:
Be sure to select the Show All Elements option in the Theme Editor window to show text editor settings specific to C++. Otherwise, you'll be left with only Chrome/GUI-type modifications being possible.
  1. Note that, while most of the settings you are interested in will be under Text Editor | C/C++, some will not have the C++ subheading. For example, the setting for the main/plain text inside the editor window (for all languages) is under Text Editor | Plain Text (without the C++ subheading).
  1. Select the theme to use from Tools | Options | Environment | General. Any new themes you have created will appear automatically in the drop-down menu.

How it works...

Once we load the plugin, it integrates into Visual Studio quite nicely. Exporting and uploading your themes to share with others is quite easy too.

Adding a theme to your Visual Studio installs it as an extension in Tools | Extensions and Updates.... To remove a theme, simply Uninstall its extension: