Book Image

Unreal Engine 4 Game Development Quick Start Guide

By : Rachel Cordone
Book Image

Unreal Engine 4 Game Development Quick Start Guide

By: Rachel Cordone

Overview of this book

Unreal Engine is a popular game engine used by developers for building high-end 2D and 3D games. This book is a practical guide designed to help you get started with Unreal Engine 4 and confidently develop interactive games. You’ll begin with a quick introduction to the Unreal Engine 4 (UE4) ecosystem. Next, you’ll learn how to create Blueprints and C++ code to define your game's functionality. As you progress, you’ll cover the core systems of UE4 such as Unreal Motion Graphics (UMG), Animation Blueprints, and behaviour trees to further build on your game development knowledge. The concluding chapters will then help you learn how to use replication to create multiplayer games. By the end of this book, you will be well-versed with UE4 and have developed the skills you need to use the framework for developing and deploying robust and intuitive games.
Table of Contents (10 chapters)

Downloading the UE

Before we get into the engine itself, we need to download and install it as follows:

  1. Search the internet for Unreal Engine, or head to this address at https://www.unrealengine.com.
  2. Create a free account with Epic Games and log in to it.
  3. In the top right of the Unreal Engine site, you will find a link to the download. Download the Epic Games launcher.
  4. Once it's done downloading, go ahead and install it.
  5. Once that's done, open it up. This will load the Epic Games launcher.
  6. When the launcher opens, click the Unreal Engine button on the left-hand side:
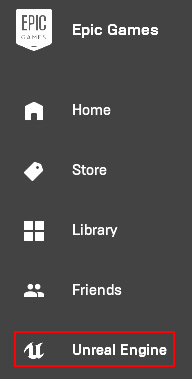
  1. Here, you will have four useful tabs at the top:

Here is a description of the items you can see in the preceding screenshot:

  • Unreal Engine: In addition to featured content, there are links to AnswerHub (like Stack Overflow, but UE4-specific), Forums, and a Wiki, with tutorials and engine documentation. There are also links to the Roadmap and Blog to see current and upcoming developments involving the engine.
  • Learn: This is a more detailed tab for developers to find tutorials and documentation. This tab also includes demos and other samples. This is a great place to find inspiration for features that might otherwise not have been on your mind.
  • Marketplace: This is the UE asset store. Art, code, animation, and plugins can all be found here. There is a free section to get you started, and frequent sales, so keep an eye on it!
  • Library: This tab keeps track of your currently installed engine versions, your projects, and your marketplace purchases for easy installation.
  1. This Library tab is where we will begin. You can choose to install any engine version all the way back to 4.0.2, but, for the purpose of this book, we will be using the latest version, which is 4.22.1 at the time of writing.
  2. To start the installation, press the plus sign next to Engine Versions and select 4.22.1 with the drop-down arrow, and then press Install:

Once that's done, the Install button should change to Launch, for example. For each project's initial setup, you'll press this button to launch whichever engine version you want the project to use. After that, the project will appear in your My Projects list and you can launch them that way. You can also right-click on a project in the My Projects list to create a shortcut for it. That way, you won't even need to run the Epic Games launcher to dive right back into your project.

For now, hit the Launch button on 4.22.1. The project browser will appear, as follows:

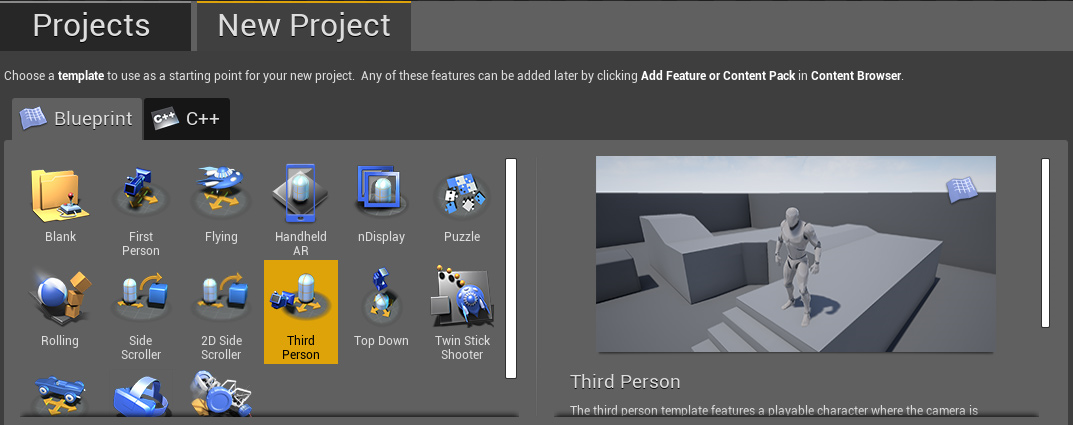
All of your existing projects will show in the Projects tab along with their engine version. Projects cannot be opened with a previous version of the engine, but it's usually fine to open a project with a later engine version.

You will just need to make sure any plugins your project uses will be compatible with the newer engine version.

Using project templates

In the New Project tab, you will find templates for various project types. These templates will give you a great head start, so you won't need to reinvent code that is common to specific game types. The templates are as follows:

  • Blank: Only use this option if none of the following templates fit your project's genre. Usually, one of the other templates will cover what you need to get started, and everything about the template can be customized or deleted. But if your game project doesn't fall under anything else, you can use this option to create your entire game from scratch.
  • First Person: This is the standard shooter template. It includes a first person arm mesh and a weapon that fires projectiles.
  • Flying: This is a third-person view of a spaceship that can be flown around.
  • Handheld AR: This includes everything you need to get started with augmented reality on a phone. Make sure your device supports ARKit for iOS devices, or ARCore for Android!
  • nDisplay: This option is used for multimonitor/cave display setups. It is rarely used, but is an incredibly useful template when you need it.
  • Puzzle: Most people associate the UE with top-of-the-line graphics, but even simple puzzle games can benefit from the workflow that Blueprints present.
  • Rolling: Ball-based games will find their home here. All of these templates have keyboard, gamepad, and touch inputs already set up as appropriate. Here, the ball can be controlled with any of the three options.
  • Side Scroller / 2D Side Scroller: This is a standard Metroidvania camera setup. Which of these two you use depends on whether your art assets will be 2D or 3D.
  • Third Person: This is a free rotating camera with a keyboard-controlled player, common for platformers and action games.
  • Top Down: This can be easily confused with the Third Person template, but this one has a fixed camera with a Diablo style click-to-move player.
  • Twin Stick Shooter: This is the Top Down shooter template. Don't let the icon fool you; this template is just as suitable for a Hotline Miami style human player as it is for a bullet-hell spaceship one.
  • Vehicle: This is the racing template. Another great feature of these templates is the ability to combine them. For instance, if you wanted to make a GTA style game where you could run around or drive cars, you could choose the Third Person template, and once you're in the Unreal editor, you could add the Vehicle template to your project as well.
  • Virtual Reality: This includes hand models, teleportation, and grabbable objects.
  • Vehicle Advanced: If your project needs more realistic vehicles than the simple physics of the vehicle template, this would be your choice.

Most of these templates can be used in both Blueprint and C++ projects (augmented reality (AR) and virtual reality (VR) templates are Blueprint only). Unless your goal is to solely use Blueprints or C++, don't worry too much about which project type to use. C++ can be added to Blueprint projects and vice versa.

One major exception to this is if you need to alter any of the engine code itself, or if you need dedicated servers for your game. Using the UE through the launcher with the official engine versions allows us to extend from the engine and its classes, but it doesn't let us modify the engine code directly. If you do need to do this, you will need to download and compile the engine yourself, which is fairly simple but outside the scope of this quick start guide. Most of the time, you can create and deploy your entire game without needing to touch the engine code.

Initial project setup

For this book, we will be using a Blueprint project with the Third Person template, so select that.

Next, we need to choose from a few other options. These can also be changed later, so don't worry about choosing incorrectly. Here are the selections we need to make:

  • Desktop / Console or Mobile: For this book, we will be using Desktop / Console as our target hardware.
  • Maximum Quality or Scalable: We will use Maximum Quality here. Graphics settings can be changed once the project is created, and we will discuss some of those options later in this chapter.
  • With or Without Starter Content: Most of the time, you'll want to include the starter content for quick prototyping. These assets can always be deleted from your project once they're no longer needed, but they are a great help when creating test levels:

Now, give your project a name and location and click Create Project. I will be naming the project AwesomeGame, because we're awesome and your game will be awesome:

Now, we have to wait while the project is being created. This will take a while, and it might seem like it gets stuck at 90-something percent, but give it time and eventually, we'll get our first look at the editor!