

Understanding the components of a 3D sculpture
First, we're going to learn how 3D sculptures are represented by the computer. Traditional sculpting is often done with clay. Clay is an earthy blobby mess with no real structure; it's just out there waiting for us to play with it and make art! Digital sculpting in software such as Blender tries to capture the creativity and free-form nature of traditional sculpting. However, in digital sculpting, there is an underlying structure that we need to be aware of as artists. Although we like to think of our digital sculptures as clay, they are actually 3D models that are made up of small geometric shapes called polygons. The word polygon refers to a flat shape with multiple corners. Polygons are made up of three main components, as presented in the following diagram:

Figure 2.1 – The components of a polygon
The three main components of a polygon are as follows:
- Vertex (the plural form of the word is Vertices): These are the corners of a polygon; each vertex represents a single point in 3D space.
- Edge: This is a line that connects two vertices, edges make up the sides of a polygon.
- Face: This is the solid inner area of a polygon that forms the visible surface between three or more edges.
A vertex by itself is not a polygon; it has no dimension. An edge can be made between two vertices; however, an edge by itself is not a polygon either. We require at least three vertices and three edges in order to create a polygon. There are three types of polygons that we need to know about to make 3D art:
- The simplest polygons are Triangles (often abbreviated to Tris). Triangles have three vertices, three edges, and one face.
- The most common type of polygons are Quadrilaterals (often abbreviated to Quads). These have four vertices, four edges, and one face.
- Polygons with more than four vertices are known as n-gons. We do not usually use n-gons because they can cause issues with the surfaces of our 3D models.
Collectively, these simple geometric shapes are known as the geometry of the 3D model. When we interconnect all the little pieces of geometry together, they create a mesh. A mesh is the primary type of 3D model that we use when creating 3D models (that includes our sculptures).
We promised not to get too technical in this chapter, so that's plenty of information for now. Let's examine these components in the context of a 3D scene.
Getting ready
Launch Blender and start a new project with the sculpting preset by choosing File | New | Sculpting. We'll start this section by enabling a few viewport overlays that will show us the components of the model in the 3D Viewport.
How to do it…
First, let's enable our Statistics overlay so that Blender will display information about the model:
- Locate the Viewport Overlays pop-over menu in the upper-right corner of the 3D Viewport.
- Click on the little down arrow to open the pop-over menu..
- Check the box labeled Statistics.
Perfect! Now we have some additional information in the upper-left corner of the 3D Viewport, as shown in the following image::
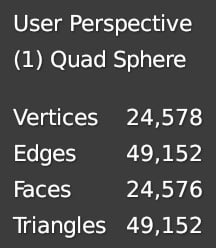
Figure 2.2 – The statistics overlay as seen in the upper-left corner of the 3D Viewport
Here, the name of our active object is displayed. In this example, the object is called Quad Sphere. The statistics for the geometry are displayed beneath the name. These statistics serve as a summary of the model, but we can do better than that. Let's turn on another overlay so that we can view the polygons:
- Open the Viewport Overlays pop-over menu again.
- Check the box labeled Wireframe.
- Use the slider next to the Wireframe checkbox to increase the value from
0.500to1.000so that the full wireframe will be displayed.
Now we can view the little quadrilaterals that the Quad Sphere's mesh is made out of. It should appear similar to the following diagram:
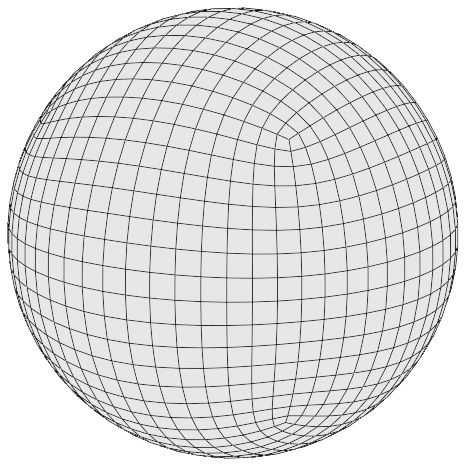
Figure 2.3 – The wireframe of the sphere (this diagram has been simplified for better visibility in this book)
This overlay is helpful when trying to understand how the geometry of the sculpture is arranged. Usually, we don't want to leave it turned on while we're sculpting because it can be a visual distraction. In this chapter, we'll be toggling this overlay on and off several times to help demonstrate what happens to the polygons as we sculpt. For now, we're done with this overlay. Toggle it back off so that we can move on and try out some sculpting tools!
How it works…
As you will have observed from the statistics, the Quad Sphere model has 24,578 vertices, 49,152 edges, and 24,576 faces. That's more information than we need. As a general rule, we only care about the number of polygons, which is referred to as the model's poly count. However, the poly count isn't always the most accurate representation of the complexity of our model. If we divide all of the quads and n-gons into their simplest forms, we will get the number of triangles in the model, which is known as the tri count. Blender includes the tri count for the model in the statistics overlay, so we can see that this model has 49,152 triangles.
That sounds like a lot, right? Wrong! This is actually a relatively low number of polygons when it comes to 3D sculptures. The childHead.blend example model that we explored in Chapter 1, Exploring Blender's User Interface for Sculpting, has 241,200 triangles, and even that is just scraping the surface of how many polygons Blender can handle.
So, why are there so many? Well, it's pretty simple. Triangles are always flat. We can't have a triangle with curved edges. So, we need to combine lots of triangles together to make the model look as though it's made out of clay with smooth round forms. When observed from afar, all of these tiny pieces of flat geometry should look smooth and round.
Some 3D modeling workflows are focused on arranging the geometry into specific patterns that give us good results without requiring many polygons. However, sculpting is designed around allowing us to create the shapes of the sculpture without having to focus on the geometry. To achieve this, the poly count is greatly increased – sometimes, into the millions. Once we have enough polygons, we can push them around with our sculpting tools to make any shape that we like.