
Pushing polys with the basic sculpting mode
Your patience has paid off. It's finally time to try out some sculpting tools! In this section, we will discover how the basic Draw brush can be used to push the polygons of the model around to change the shape of the sculpture.
Getting ready
Let's pick up where we left off in the Understanding the components of a 3D sculpture section. We have a fresh file using the sculpting preset, and we have the Statistics overlay turned on.
Since we will be using tools, it would be helpful to expand the Toolbar on the left-hand side of the 3D Viewport so that we can view the names of the tools. Please refer back to the Expanding and collapsing the Toolbar and the Sidebar section of Chapter 1, Exploring Blender's User Interface for Sculpting.
Don't forget to use a graphics tablet as you follow along with the sculpting instructions. Please refer back to the Setting up your graphics tablet's stylus buttons section of Chapter 1, Exploring Blender's User Interface for Sculpting.
Important Note
If you do not have a graphics tablet, you can click with the left mouse button to use brushes instead of pressing down with the pen tip. Additionally, you can use the middle mouse button instead of the upper side button on the pen for navigation.
You might also experience inconsistencies with brush functionality because a mouse has no pressure sensitivity. If your brushes aren't working while using a mouse, check that the pen pressure for Radius and Strength are turned off in the Tool Settings menu.
How to do it…
As you can see in the upper-left corner of the 3D Viewport header, the sculpting preset has already set our Interaction Mode to Sculpt Mode, so we're ready to go! Now we can try out the Draw brush to begin sculpting:
- Locate the Draw brush at the top of the Toolbar.
- The active brush will be highlighted in blue. If the Draw brush is not already active, click on it to activate it.
- Hover your pen over your graphics tablet and align the pointer over the top of the Quad Sphere model.
- Press the tip of your pen onto your graphics tablet to begin drawing on the surface of the Quad Sphere.
Try drawing several brush strokes all over the surface of the model. It doesn't matter what you draw – we're just practicing. You can draw a smiley face, sign your name, or play a game of tic-tac-toe! Fill up the whole surface of the Quad Sphere, just as we've done in the following example:
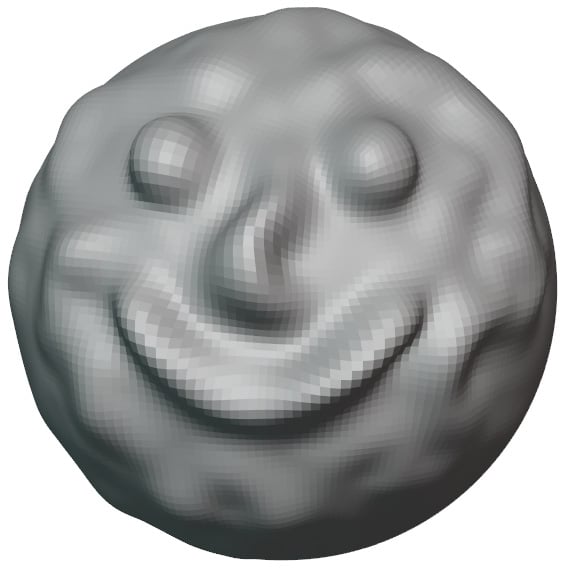
Figure 2.4 – The Quad Sphere after using the Draw brush
Eventually, we will run out of surface area to draw on, so we need to rotate the 3D Viewport around the sculpture so that we can sculpt the other areas of the Quad Sphere. Let's use the upper side button on our tablet pen to orbit around the model:
- Hover your pen over the 3D Viewport (do not press the tip of the pen down – keep it hovering slightly above the surface of the graphics tablet).
- Press and hold the upper side button on your pen (this button should be bound to the middle mouse button).
- While holding the upper side button, drag the pen to orbit around the model until you see an area of the Quad Sphere that you have not yet sculpted on.
- Let go of the upper side button of the pen to stop orbiting.
We will be doing this a lot, so practice this style of navigating until you're comfortable enough to move on. Don't forget that sculpting is a 3D process; we must keep orbiting around our object to sculpt details on all sides.
Additionally, it is important to zoom in and out while working on our sculptures. By default, the size of the Draw brush is relative to the view, so the effective size changes as we zoom in and out. If we zoom far away from our model, we can make very large brush strokes, and if we zoom very close to the surface of the model, we can draw finer details. Let's try this now:
- Hover your pen over the 3D Viewport (do not press the tip of the pen down – keep it hovering slightly above the surface of the graphics tablet).
- Press and hold the Ctrl key on your keyboard and the upper side button on your pen.
- While holding the Ctrl key and the upper side button, drag the pen downward to zoom out far away from the Quad Sphere.
- Let go of the Ctrl key and the upper side button of the pen to stop zooming.
- Use your pen to draw on the quad Quad Sphere.
Notice that because we are far away from the Quad Sphere, our brush strokes have a much larger impact on the sculpture. Next, let's try the opposite.
- While holding the Ctrl key and the upper side button, drag the pen upward to zoom in up close to the surface of the Quad Sphere.
- Let go of the Ctrl key and the upper side button of the pen to stop zooming.
- Use your pen to draw on the Quad Sphere again.
This time, we can make small details with each stroke of the brush.
It's very common to zoom out and increase the brush size while working on larger forms and, conversely, to zoom in and decrease the brush size while working on smaller details. However, zooming in and out isn't the most practical way to change the brush size. Quite often, we will want to change the brush size without changing our view.
Let's learn how to adjust the brush settings. Take a look at the Tool Settings section in the header of the 3D Viewport. Most of the settings we require are easily accessible from here:

Figure 2.5 – The Tool Settings section for the Draw brush
The size of the brush is determined by the Radius setting. By default, the radius of the Draw brush is set to 50 px. This radius unit is relative to the view, so 50 px means that the brush radius is 50 pixels on our screen. You can change the size of the brush by clicking and dragging the Radius slider.
This is simple enough, but we have a bit of a disadvantage to using this slider. We aren't able to easily view the size of the brush while we're adjusting it. Let's learn a hotkey for adjusting the brush radius instead:
- Hover your pen over the 3D Viewport before pressing the following hotkey.
- Press the F hotkey to begin changing the brush radius.
- Drag your pen to the left to decrease the radius, or drag your pen to the right to increase the radius.
- When you've got a brush radius you like, tap your pen down onto the graphics tablet.
Wasn't that easier than using the slider? Having this visual feedback while we adjust the brush size speeds up our workflow.
The next brush setting that we can adjust is the Strength setting. The strength determines how intense the brush effect will be. With a strength of 0.000, we will have no intensity at all, and the brush will do nothing. With a strength of 1.000, our brush will be at full intensity. Most brushes in Blender default to half strength, 0.500, which we can see in the Tool Settings at the top of the 3D Viewport.. So far, we've been using the Draw brush at half strength, so let's try turning it up to full:
- Click and drag the Strength slider to increase the intensity of the brush to
1.000. - Use your pen to draw on the Quad Sphere again.
Notice how we can raise the polygons twice as high now? Being able to adjust the strength is very useful, but we're not done yet. There is a pressure icon next to the Strength slider. By default, this button is turned on. But what does it do? While this feature is toggled on, we can control the intensity of our brush by varying the pressure on our pen tablet. Let's try it.
- If the pressure button isn't already highlighted blue, click on it to activate the strength pressure.
- Use your pen to draw on the Quad Sphere.
- While drawing, press your pen harder against your graphics tablet to increase the intensity of the brush.
Pen pressure can be modulated as much as you like during brush strokes. This gives us a lot of control over our brush strokes, and it is one of the main reasons we use graphics tablets for sculpting instead of a mouse. Just like adjusting the radius, we can also use a keyboard shortcut to adjust the brush strength.
- Hover your pen over the 3D Viewport before pressing the following keyboard shortcut.
- Press the Shift + F keyboard shortcut to begin changing the brush strength.
- Drag your pen to the left to decrease the strength, or drag your pen to the right to increase the strength.
- When you've got a brush strength that you like, tap your pen down onto the graphics tablet.
The Draw brush behaves in a pretty straightforward manner. As we draw, it raises the surface of the model upward, but it can also be used to press the surface inward if we reverse the direction of the brush. The Direction of the brush is represented by the little + and - buttons in the Tool Settings at the top of the 3D Viewport.. Currently, the direction is set to Add, as indicated by the blue highlight on the + button. Let's try changing it to Subtract.
- Locate the + and - buttons in the Tool Settings section of the 3D Viewport header.
- Click on the - button to change the brush direction to Subtract.
- Use your pen to draw on the surface of the Quad Sphere model.
Excellent! Now we can subtract from the model to create grooves in the surface. Once again, we have a hotkey that we can use instead of having to reach up to the Tool Settings.
- Hold the Ctrl key to temporarily invert the brush direction.
- While holding Ctrl, use your pen to draw on the surface of the Quad Sphere model.
- Let go of the Ctrl key to return to the original brush direction.
Very good. Since the Ctrl key makes switching direction very accessible, we should switch the Draw brush direction back to its default direction to avoid confusion. Switch the direction to Add by clicking on the + button in Tool Settings.
There are, of course, other brush settings, but we'll save those for later.
How it works…
Customizing our brush settings gives us a lot of control over how each brush feels. A large radius will allow us to make very large changes to the sculpture, while a small radius is helpful for smaller details. We tend to change brush radius very often while sculpting, so you should get used to using the F hotkey.
Strength is also important for getting our brush to behave exactly the way we want. When combined with pressure, the strength setting works as an upper bound to how intense the brush stroke will be. If strength is set to 1.000, then we will get full intensity while pressing firmly on the tablet. If it is set to 0.500, then we will max out at half intensity while pressing firmly on the tablet. Since we are using a graphics tablet with pressure sensitivity, we can usually keep the strength around 0.800 and press firmly or less firmly to get the intensity we like. Feel free to adjust the strength whenever you need to; just don't set it to 0.000 because no strength means that the brush will have no effect at all.
The direction of the brush gives us quick access to move the surface inward and outward with a single toggle. This gives each brush dual functionality and opens up a lot of possibilities. Some of the advanced brushes don't have a direction, but they can still be toggled to a secondary function while we hold the Ctrl key.
There's more…
Everything we did in this section utilized the basic sculpting mode. In this mode, the brushes push around the geometry to modify the shape of the model. If you read the information in the statistics overlay, you'll notice that the tri count of the Quad Sphere stayed exactly the same while we used the Draw brush. That's because basic Sculpt Mode can only modify the polygons that we already have; it does not create or remove polygons.
The basic Sculpt Mode is useful for all types of modeling. We can temporarily hop into basic sculpting mode and push the polygons around, then hop back out of the Sculpt Mode once we've made the changes we like. However, for the purposes of this book, the basic sculpting mode runs into limitations very quickly. So, what happens when we need more polygons? For that, we require a more advanced sculpting mode, which we will learn about in the next section.