
Exploring the most powerful sculpting mode – multiresolution
The previous techniques in this chapter focused on the early stages of sculpting. Dyntopo and the Voxel Remesher are both focused on adding new polygons to support new major forms to our sculptures. But what do we do when we're done adding new major forms? Eventually, we'll want to start adding details to our sculptures, and for that, we require a very high resolution. If we want to get down to the highest frequency details such as skin pores, we're going to need hundreds of thousands, if not millions, of polygons.
However, increasing our resolution with something like the Voxel Remesher tends to make our work unwieldy. Often, our computers will slow down while working with anything over a few hundred thousand polygons. The Voxel Remesher is not designed for that.
Instead, what we need is a way to keep our model at a low resolution, but somehow also store a high-resolution version of the model that we can sculpt details onto. Luckily, we have a feature that does exactly that: it's called multiresolution.
For the sake of completeness in this chapter, we'll take a quick look at how multiresolution works. However, this is a very deep subject, so we won't go into much depth until Chapter 5, Learning the Power of Subdivision and the Multiresolution Workflow.
Getting ready
To demonstrate the power of the multiresolution workflow, we need a finished sculpture as an example.
Download the multiResolutionHand.blend example file from the GitHub repository at https://github.com/PacktPublishing/Sculpting-the-Blender-Way/blob/main/Chapter02/multiResolutionHand.blend.
Once you've downloaded the example file, open it in Blender by either double-clicking on the file or dragging the file into the Blender window and choosing Open. Inside this file, you'll find a sculpture of a hand, which you can view in the following diagram:

Figure 2.21 – The hand model as it appears in the .blend file
This hand is looking a little anticlimactic, isn't it? Where are all the high-resolution details? Good question. If you lower your expectations, all art can be beautiful! Just kidding! This is the low-resolution version of the hand sculpture. If you take a look at the information in the statistics overlay, you can see that this hand has 2,794 triangles. Most multiresolution sculptures start with a low tri count such as this before adding in the higher resolution.
Let's find out how we can activate the high-resolution details of this hand sculpture.
How to do it…
To activate the high-resolution details of this sculpture, we need to turn our attention to the Properties editor. Currently, the Properties editor is displaying the modifiers for the active object. In this case, the hand has a Multires modifier, as you can see in the following screenshot:
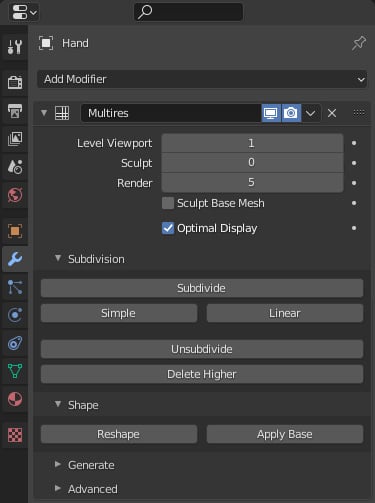
Figure 2.22 – The Multires modifier attached to the hand object
This modifier helps our computers to stay running fast by allowing us to preview the sculpture at different resolutions. Since we are in Sculpt Mode, the modifier is using the setting for the Sculpt resolution level, which can be found between the Level Viewport and Render resolution levels at the top of the modifier.
Right now, the Sculpt resolution is set to 0, which means that none of the extra details are being displayed. Let's increase it and see what happens:
- Hover your mouse or pen over the right-hand side edge of the Sculpt level number field.
- Two arrow indicators will appear along the left-hand and right-hand edges of the field. Clicking on these arrows acts as a quick shortcut to increase or decrease the number in the field.
- Click or tap your pen on the right arrow indicator, >, to increase the Sculpt resolution to
1:
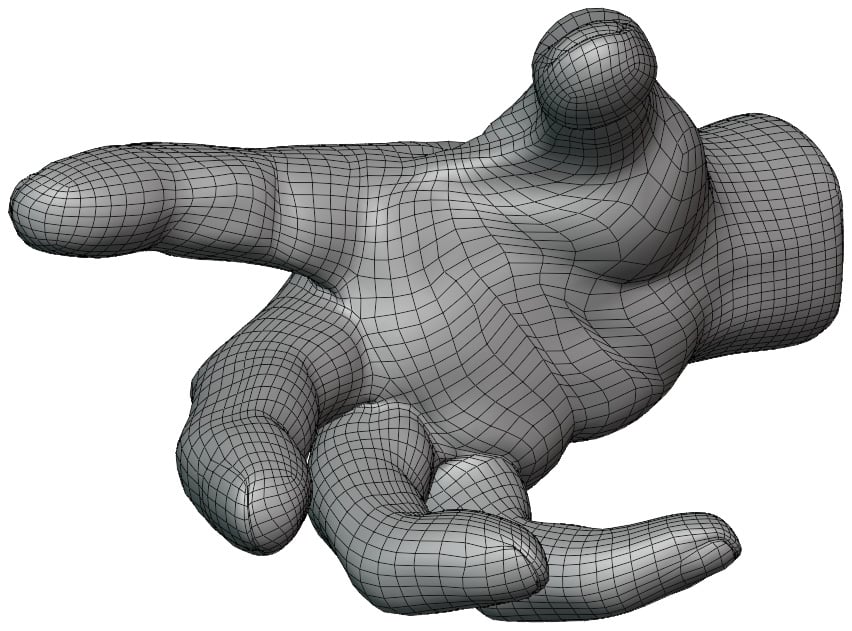
Figure 2.23 – The hand model after increasing the resolution to 1
Neat! If we check the statistics, we'll see that the hand now has 11,176 triangles. That's a pretty big jump from the previous resolution. In fact, it's exactly four times as many triangles as we had before. Each level or resolution quadruples the number of triangles in the sculpture, so the poly count is going to skyrocket by the time we're done.
From this point forward, the wireframe is just a visual distraction. Let's turn it off and increase the resolution again:
- Use the Viewport Overlays popover menu to turn off the Wireframe setting.
- Increase the Sculpt resolution level in the Multires modifier to
2.Notice that the details of the hand are starting to appear; the fingernails are starting to come in and a few of the creases in the palm are showing up as well.
- Increase the Sculpt resolution level in the Multires modifier to
3.
Depending on how powerful your computer is, this might be as high as we can go. However, this sculpture has extra details that can only be viewed if we go all the way up to level 5. If your computer can handle it, take it all the way up, and examine the details of the hand.
You can view the highest resolution in the following diagram:
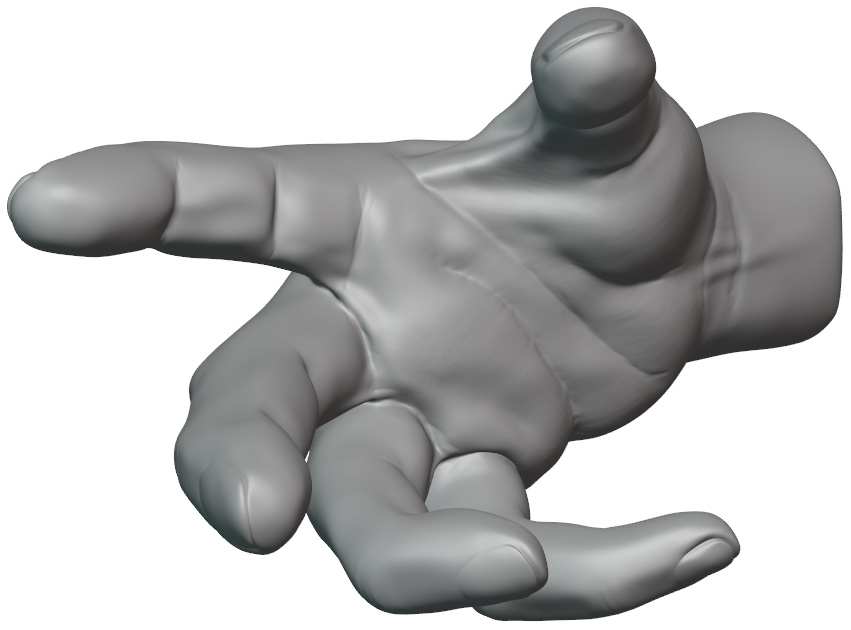
Figure 2.24 – The hand model after increasing the resolution to 5
Pretty cool! Feel free to orbit around the model and observe the details of the high-resolution hand.
How it works…
The Multiresolution modifier has allowed us to store all of this high-resolution detail in an optimized way. Additionally, we have access to a performance-saving feature called Fast Navigate. This feature is on by default; however, it can be toggled under the Options pop-over menu in the upper-right corner of the header of the 3D Viewport. The fast navigate feature will display the highest resolution of the sculpture while we are looking at the model and sculpting it, and it will toggle down to a lower resolution while we orbit around the sculpture so that our computers can stay running fast while we navigate around the scene.
Multiresolution is the gold standard of sculpting workflows. The other workflows, Dyntopo and voxel remeshing, are intended to be used before this stage in the sculpting process, with the ultimate goal of preparing a mesh for multiresolution.
Note that we do not go back to the Voxel Remesher or Dyntopo once we begin using multiresolution. We begin multiresolution once all of our major forms are in place. To prepare for multiresolution, we need to arrange our topology in a particular fashion that is well optimized for the multiresolution workflow. A mesh that has been prepared for multiresolution is called a Base Mesh. We will learn how to create a base mesh in Chapter 4, How to Make a Base Mesh for a 3D Sculpture.
There's more…
Here's a quick summary of the workflows that we discussed in this chapter:
- Basic sculpting mode: This is useful for pushing polygons around, but we run into limitations pretty quickly when we need to add major forms or add high-resolution details.
- Dyntopo: This is a way to quickly add polygons while sculpting. It is particularly helpful when paired with the Snake Hook brush. Dyntopo has fallen out of favor and is no longer considered the best way to sculpt by most sculptors.
- Voxel Remesher: This allows us to quickly block out major forms and remesh the sculpture to support any new shapes that we create. It is useful for the early stages of our model as we work our way from low detail to high detail.
- Multiresolution: This is the golden standard of sculpting. The goal is to get to this point so that we can add high-frequency details and work with millions of polygons in an optimized way.
If you're coming from the popular sculpting software of ZBrush, you might already be familiar with the features discussed in this chapter but under different names. For reference, here is a list of the equivalent features between ZBrush and Blender:
- ZBrush's Sculptris Pro feature is equivalent to Blender's Dyntopo.
- ZBrush's Dynamesh feature is equivalent to Blender's Voxel Remesher.
- ZBrush's Subdivision Levels feature is equivalent to Blender's multiresolution.
Now we have a solid foundation for our technical sculpting knowledge. Understanding these workflows is important for us to be able to make informed decisions for our artistic sculpting processes. Now that we understand how Blender does things under the hood, we'll have a much easier time creating sculptures!