

Game design fundamentals
Game design is a young art. With any art, there are some very basic fundamentals that must be thought about before you can explore. We will go through ways in which developers like to capture their thoughts in a “document.” Then, we will start with a micro-lecture on how each decision should be deliberately as granular as possible. Then, we will build on those decisions with iteration. Finally, we will go through an explanation of concepting. Let’s get started with a discussion of design documents.
Game design document
There was a time where our team had some downtime between our development sprints in which we wanted to all jump on board with a new tool. Our project management was using the Atlassian stack (Jira, Confluence, etc.), but we wanted to see what would be better, so we looked through several different software. This included Hack N’ Plan, Trello, Notion, and several other tools. We used all these tools to see which ones would end up getting used after our break. In the end, we found out we liked Jira for the project management and tasking, but for everything else we stuck with Miro. Miro ended up being our concepting boards and design/workflow brainstorming tool. This happened organically through other tools just not being used by the majority of the team.
No matter how small it seems your game is going to be, there will be some sort of documentation that will need to take place. There are strong organizational reasons behind making a document, but the strongest reason is that when we put something down on paper or draw it out in a collaborative space, we tend to take time to more seriously consider its merits. This pause is sometimes referred to as heuristic design. This can be done alone or in collaboration.
Some designers wish to draw up a beautifully written, well-outlined document in a word processor or an online collaboration tool. This gives a neat outline and the ability to write each detail exactly. When the scope of the game is going to be larger, this works out well. The writers tend to be technical writers and well-versed in the art of documenting processes. The approach is to have a single source of truth for any part of the game that anyone can refer to while developing, but to go to this extent may not be the best method for you or your team.
Another option for game design documents is done through collaborative brainstorming software. This allows users to work together to make flowcharts, draw, and outline in a creative manner. This manner is the direct opposite of the curated form of the aforementioned written document approach, but serves a different need. The creative form tends to be more intimate and art-focused. Some pre-concept art sketches are done, flowcharts are drawn up quickly to draw out questions about the gameplay elements, and ideas can be swiftly drawn upon and tossed away or kept. This way of designing wouldn’t work well for a large-scale team as there is no real organization of sorts. New members would have a hard time onboarding in these situations.

Figure 2.1: Example of a flowchart
Neither of these options is the magic pill to make a game design document, but rest assured, your team needs to have some sort of document to keep your ideas written down. Ideas are fleeting on the mind and some of the best ideas slip into the ether if they aren’t written down to keep. Experiment with your team to find the option that best suits them. There is a saying in design groups: “The best tool is the tool your team will actually use”.
We’ve gone over quite a few options for game design documents and shown that they have pros and cons. Even though there isn’t a perfect way right off the bat, a great starting point would be to start with a more visual and collaborative approach. If you are together, this could be a dry erase board with sticky notes. The dry erase board allows for non-permanent thoughts, while the sticky notes would be tasks that need completing. Place them on the left side for “need to be completed,” and move them to the right side when they are complete.
I recommend you spend some time over in our GitHub repo created for this book. I’ve added a GDD images folder in there for you to take a look at a large scale of examples to see what we’ll work through in the next set of chapters.
https://github.com/PacktPublishing/Unity-3D-Game-Development
Now that we have started documenting our game design, we need to take our thoughts and make deliberate choices with them to make them concrete.
Deliberate decisions
Although this part of the chapter may be slightly shorter than others, take this section to heart: being a designer means building an immersive world that makes sense, even when it doesn’t make sense. The player subconsciously makes observations at an alarming rate. The more that the player can see non-congruent pieces to the puzzle that is the game environment or character, the more immersion is broken. The best way to fix any immersion-breaking issue is deliberate decisions.
To give a very simple explanation of this, take the example of door handles. You’ve seen them your whole life and used them intuitively. In fact, when you have to deal with a poorly designed door handle is when your actual, real-life immersion breaking happens. If you have ever grabbed a handle to a door and tried to pull inward, only to find out the door was designed to be pushed, you’ve encountered this issue. If the door was designed to only be allowed to move in one direction, the correct design for an exit is a flat panel where the door handle would be. This immediately implies “push.”
Every level, mesh, texture, concept, and feeling needs to be deliberately thought about with an attempt to implement. Only after you have a strong reason to place something in a certain way without giving in to clichés is when you then can explore other unique aspects to build something truly unique.
The project you will be making and playing with in this book has undergone prolonged and deliberate thought. To emphasize this, in each section, you will see a set of questions that are answered in as much detail as needed in a concise manner.
Iterative production
Game development has an interesting need for immersion to be at the forefront of play. To get this immersion as complete as we can get it, the development team needs to continuously ask whether the direction it is going in works well. Very often, the game that you began developing is not what you will ultimately end up with. This cycle is called an iterative design or production.
There are a multitude of patterns you can use when you undertake iterative design. The approach that will be described here is not the only definitive approach to completing a design, but it is a good starting point from where your team can branch off as it sees fit.
Iteration needs to happen often and early for a game to grow in terms of how easy it is to understand. There is a concept called MVP, or Minimum Viable Product, where game developers make the minimum amount of gameplay elements required to give the game to testers. This should take very little time and the feedback is invaluable. When you hand this off to the testers, there will be feedback that you and your team could not have seen as you are very close to the product. Make sure to listen to the feedback carefully with an open mind as their experience could be common among your players. We’re working toward a deliberately designed experience for as many players as possible. This feedback forces you and your team to iterate on the design, and possibly cut or add game mechanics, to respond to the main testing feedback.
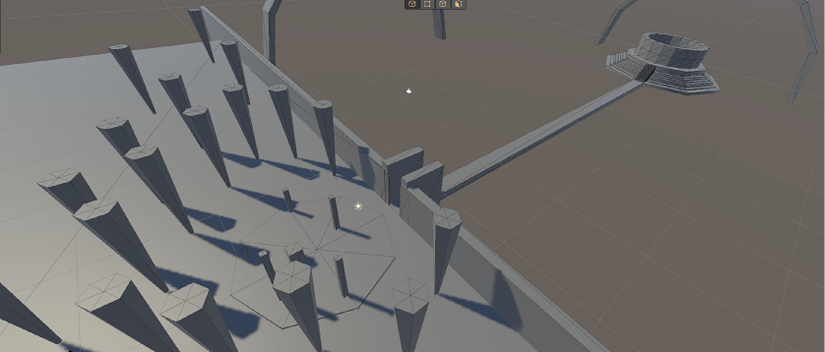

Figure 2.2 a, b: Examples of iterations in level design
After having iterations resolve major holes in your design, you then move into a vertical slice (which will be covered in the Vertical slice section of this chapter) of the game. This should be an iteration where you are comfortable with the basics of the movement and primary game mechanics. Your team will want to make a full game loop from start to finish with a single level that houses a win and lose condition. Then, you guessed it, test again, but this time with new testers that have never seen this game. Ask similar questions and some new ones that have surfaced during internal playtesting.
The loop for development should seem repetitive, and it is:
- Think and test
- Create and test
- Update and test
Then, continue this approach until you are at number of iterations until it’s a shippable product. The most important portion of each step is the testing. Make sure to take feedback from testing as strong indications of where improvement is required. We will begin this cycle with conceptualization.
Concepting
You need to make a game and you have a group ready to go. You are comfortable with deliberately making granular decisions and know the iterative process. Now you need to get a concept started.
The first step to getting a project going is to explore what emotion you and your team want your players to experience. With our art form being so young and malleable, we can pursue this emotion any way we like. This is the power of the game developer. Once you know what emotions you are focused on as regards the experience players will have, start thinking about how you can create it as a gameplay experience.
If the emotion is fear, you could have the player deal with spaces that are dark, with just a flashlight as their primary defense tool. This may lead you to explore sound design as your development focus since vision will not be the primary experience tool.
If the emotion is grieving, then you may work through a narrative focus, where you play a child who has lost a family member and the players work through a narrative-driven gameplay in a dream world. This pushes storytelling and pacing, with a tight understanding of color theory as well as the stages of grief through a child’s perspective.
We could go on for a while regarding concepts as there is an infinite number of scenarios. Choose what your primary goal is and then work toward it. After this, you may want to put some of these ideas to paper to get an idea of what the feelings of the immersion will be, from an artistic viewpoint. This could potentially be silhouettes of character concepts. It could also be architectural designs.
It could also be a collection of pictures you’ve saved that gave you a feeling of the emotion you want to evoke that you can draw ideas from.
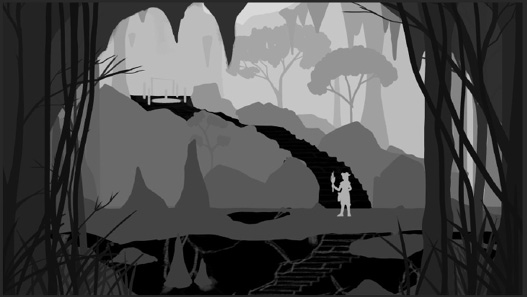

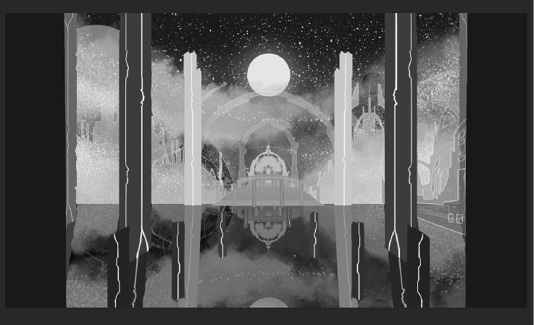
Figure 2.3 a, b, c: Concepts used in project
Either way, the prominent action is to get the ideas started visually. After you have some art panels drawn up and you have a visual idea of how this may be built, we then make a Unity project.