

Putting the building blocks together
With the building blocks squared away, it's time to do a little Unity-specific housekeeping before wrapping up this chapter. Specifically, we need to know more about how Unity handles C# scripts attached to game objects.
For this example, we'll keep using our LearningCurve script and Main Camera GameObject.
Scripts become components
All GameObject components are scripts, whether they're written by you or the good people at Unity. The only difference is that Unity-specific components such as Transform, and their respective scripts just aren't supposed to be edited by users.
The moment a script that you have created is dropped onto a GameObject, it becomes another component of that object, which is why it appears in the Inspector panel. To Unity, it walks, talks, and acts like any other component, complete with public variables underneath the component that can be changed at any time. Even though we aren't supposed to edit the components provided by Unity, we can still access their properties and methods, making them powerful development tools.
Unity also makes some automatic readability adjustments when a script becomes a component. You might have noticed in Figures 2.3 and 2.5 that when we added LearningCurve to Main Camera, Unity displayed it as Learning Curve, with CurrentAge changing to Current Age.
We looked at how to update a variable in the Inspector panel in the Variables act as placeholders section, but it's important to touch on how this works in more detail. There are three situations in which you can modify a property value:
- In Play Mode in the Unity Editor window
- In Development Mode in the Unity Editor window
- In the Visual Studio code editor
Changes made in Play Mode take effect in real time, which is great for testing and fine-tuning gameplay. However, it's important to note that any changes made while in Play Mode will be lost when you stop the game and return to Development Mode.
When you're in Development Mode, any changes that you make to the variables will be saved by Unity. This means that if you were to quit Unity and then restart it, the changes would be retained.
The changes that you make to values in the Inspector panel while in Play Mode do not modify your script, but they will override any values you had assigned in your script when in Development Mode.
Any changes made in Play Mode will always reset automatically when you stop Play Mode. If you need to undo any changes made in the Inspector panel, you can reset the script to its default (sometimes called initial) values. Click on the three vertical dots icon to the right of any component, and then select Reset, as shown in the following screenshot:
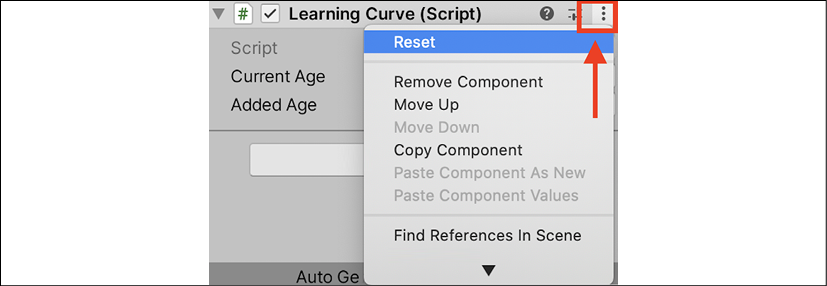
Figure 2.10: Script reset option in the Inspector
This should give you some peace of mind—if your variables get out of hand, there's always the hard reset.
A helping hand from MonoBehaviour
Since C# scripts are classes, how does Unity know to make some scripts components and not others? The short answer is that LearningCurve (and any script created in Unity) inherits from MonoBehaviour (a default class provided by Unity). This tells Unity that the C# class can be transformed into a component.
The topic of class inheritance is a bit advanced for this point of your programming journey; think of it as the MonoBehaviour class lending a few of its variables and methods to LearningCurve. Chapter 5, Working with Classes, Struct, and OOP, will cover class inheritance in practical detail.
The Start() and Update() methods that we've used belong to MonoBehaviour, which Unity runs automatically on any script attached to a GameObject. The Start() method runs once when the scene starts playing, while the Update() method runs once per frame (depending on the frame rate of your machine).
Now that your familiarity with Unity's documentation has gotten a nice bump, I've put together a short optional challenge for you to tackle!
Hero's trial – MonoBehaviour in the Scripting API
Now it's time for you to get comfortable using the Unity documentation on your own, and what better way than to look up some of the common MonoBehaviour methods:
- Try searching for the
Start()andUpdate()methods in the Scripting API to gain a better understanding of what they do in Unity, and when - If you're feeling brave, go the extra step and have a look at the
MonoBehaviourclass in the manual for a more detailed explanation