

To create a radar to show the relative positions of the objects, follow these steps:
- Create a new Unity 3D project with a textured Terrain. Download the Environment standard asset, which is part of the Standard Assets package contents, by going to Window | Asset Store | Search Online | Standard Assets.
- Create a terrain by navigating to the Create | 3D Object | Terrain menu.
- Change the size of Terrain to 20 x 20 and position it at (-10, 0, -10) so that its center is at (0, 0, 0):
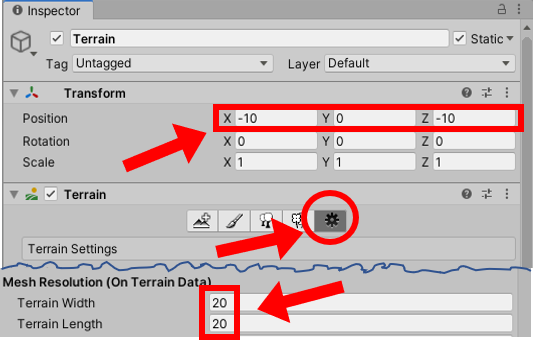
Figure 2.35 – Terrain settings for this recipe
- Texture paint your Terrain with the SandAlbedo option, as shown in the following screenshot. You need to select the Paint Texture tool in the Terrain component, then click Edit Terrain Layers and select the Create Layers button. After that, you must select the SandAlbedo texture from the imported Environment assets:
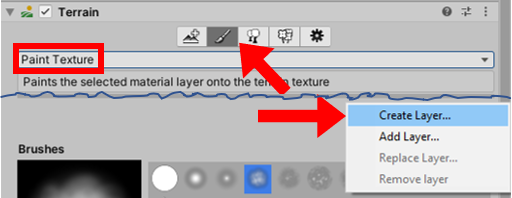
Figure 2.36 – Settings for painting the terrain
- Import the provided folder; that is, Images.
- Create a 3D Cube GameObject at Position (2, 0.5, 2). Create a Cube tag and tag this GameObject with this new tag. Texture this GameObject with the yellow image called icon32_square_red by dragging the icon32_square_red image from the Project window over this GameObject in the Hierarchy window.
- Duplicate the cube GameObject and move it to Position (6, 0.5, 2).
- Create a 3D Sphere GameObject at Position (0, 0.5, 4). Create a tag called Sphere and tag this GameObject with this new tag. Texture this GameObject with the red image called icon32_square_yellow.
- Import the Characters standard asset package into your project.
- From the Standard Assets folder in the Project window, drag the ThirdPersonController prefab into the scene and position it at (0, 1, 0).
- Tag this ThirdPersonController GameObject as Player (selecting this built-in tag means that the camera we'll add will automatically track this player object, without us having to manually set the target for the camera).
- Remove the Main Camera GameObject.
- Import the Cameras standard asset package into your project.
- From the Standard Assets folder in the Project window, drag the Multi-PurposeCameraRig prefab into the scene.
- In the Hierarchy window, add a UI RawImage GameObject to the scene named RawImage-radar.
- Ensure that the RawImage-radar GameObject is selected in the Hierarchy window. From the Images folder in the Project window, drag the radarBackground image into the Raw Image (Script) public property's Texture.
- In Rect Transform, position RawImage-radar at the top left using the Anchor Presets item. Then, set both Width and Height to 200 pixels.
- Create a new UI RawImage named RawImage-blip. Assign it the yellowCircleBlackBorder texture image file from the Project window. Tag this GameObject as Blip. In the Project window, create a new empty prefab asset file named blip-sphere and drag the RawImage-blip GameObject into this prefab to store all its properties.
Create a prefab by selecting Asset | Create Prefab and then dragging an object from the scene onto the "empty" prefab asset that appears.
- Set the texture of the RawImage-blip GameObject to redSquareBlackBorder from the Project window. Tag this GameObject as Blip. In the Project window, create a new empty prefab asset file named blip-cube and drag the RawImage-blip GameObject into this prefab to store all its properties.
- Delete the RawImage-blip GameObject from the Hierarchy window.
- Create a C# script class called Radar containing the following code and add an instance as a scripted component to the RawImage-radar GameObject:
using UnityEngine;
using UnityEngine.UI;

public class Radar : MonoBehaviour {
   public float insideRadarDistance = 20;
   public float blipSizePercentage = 5;
   public GameObject rawImageBlipCube;
   public GameObject rawImageBlipSphere;
   private RawImage rawImageRadarBackground;
   private Transform playerTransform;
   private float radarWidth;
   private float radarHeight;
   private float blipHeight;
   private float blipWidth;

   void Start() {
         rawImageRadarBackground = GetComponent<RawImage>();
         playerTransform =
             GameObject.FindGameObjectWithTag("Player").transform;
         radarWidth = rawImageRadarBackground.rectTransform.rect.width;
         radarHeight = rawImageRadarBackground.rectTransform.rect.height;
         blipHeight = radarHeight * blipSizePercentage / 100;
         blipWidth = radarWidth * blipSizePercentage / 100;
   }

   void Update() {
         RemoveAllBlips();
         FindAndDisplayBlipsForTag("Cube", rawImageBlipCube);
         FindAndDisplayBlipsForTag("Sphere", rawImageBlipSphere);
   }

   private void FindAndDisplayBlipsForTag(string tag, GameObject prefabBlip) {
         Vector3 playerPos = playerTransform.position;
         GameObject[] targets = GameObject.FindGameObjectsWithTag(tag);
         foreach (GameObject target in targets) {
               Vector3 targetPos = target.transform.position;
               float distanceToTarget = Vector3.Distance(targetPos,
                   playerPos);
               if ((distanceToTarget <= insideRadarDistance))
                CalculateBlipPositionAndDrawBlip (playerPos, targetPos,
                    prefabBlip);
         }
   }

    private void CalculateBlipPositionAndDrawBlip (Vector3 playerPos, Vector3
        targetPos, GameObject prefabBlip) {
         Vector3 normalisedTargetPosition = NormalizedPosition(playerPos,
             targetPos);
         Vector2 blipPosition =
             CalculateBlipPosition(normalisedTargetPosition);
         DrawBlip(blipPosition, prefabBlip);
   }

   private void RemoveAllBlips() {
         GameObject[] blips = GameObject.FindGameObjectsWithTag("Blip");
         foreach (GameObject blip in blips)
               Destroy(blip);
   }

   private Vector3 NormalizedPosition(Vector3 playerPos, Vector3 targetPos) {
         float normalisedyTargetX = (targetPos.x - playerPos.x) /
             insideRadarDistance;
         float normalisedyTargetZ = (targetPos.z - playerPos.z) /
             insideRadarDistance;
         return new Vector3(normalisedyTargetX, 0, normalisedyTargetZ);
   }

   private Vector2 CalculateBlipPosition(Vector3 targetPos) {
         float angleToTarget = Mathf.Atan2(targetPos.x, targetPos.z) *
             Mathf.Rad2Deg;
         float anglePlayer = playerTransform.eulerAngles.y;
         float angleRadarDegrees = angleToTarget - anglePlayer - 90;
         float normalizedDistanceToTarget = targetPos.magnitude;
         float angleRadians = angleRadarDegrees * Mathf.Deg2Rad;
         float blipX = normalizedDistanceToTarget * Mathf.Cos(angleRadians);
         float blipY = normalizedDistanceToTarget * Mathf.Sin(angleRadians);
         blipX *= radarWidth / 2;
         blipY *= radarHeight / 2;
         blipX += radarWidth / 2;
         blipY += radarHeight / 2;
         return new Vector2(blipX, blipY);
   }

   private void DrawBlip(Vector2 pos, GameObject blipPrefab) {
         GameObject blipGO = (GameObject)Instantiate(blipPrefab);
         blipGO.transform.SetParent(transform.parent);
         RectTransform rt = blipGO.GetComponent<RectTransform>();
         rt.SetInsetAndSizeFromParentEdge(RectTransform.Edge.Left, pos.x,
             blipWidth);
         rt.SetInsetAndSizeFromParentEdge(RectTransform.Edge.Top, pos.y,
             blipHeight);
   }
}
- Run your game. You will see two red squares and one yellow circle on the radar, showing the relative positions of the red cubes and the yellow sphere. If you move too far away, the blips will disappear.
At the time of writing, the Standard Assets package has not been updated for Unity 2020.1. When using it in recipes, two errors will appear. These need to be resolved before playing your recipe. The solutions for resolving these are as follows:
In ForcedReset.cs, add the following code:
using UnityEngine.UI;
// change GUITexture to Image
[RequireComponent(typeof (Image))]
In SimpleActivatorMenu.cs, add the following code:
// change GUIText to TEXT
public Text camSwitchButton;
These solutions are based on a post at https://answers.unity.com/questions/1638555/guitexture-adn-guitext-are-obsolete-standard-asset.html, where a complete explanation can be found.