

Let us start by creating our first—empty—application, and deploying it to the emulator or an actual Windows Phone device.
After installing everything, go ahead and open up Microsoft Visual Studio 2010 Express for Windows Phone or your Visual Studio 2010 if you have another version installed.
Go to File | New | Project. The New Project window will pop up as shown in the following screenshot:

Among the installed templates (on the left-hand side of the New Project window) we can find XNA Game Studio 4.0. Click it and select Windows Phone Game (4.0) in the middle of the screen.
At the bottom of the window, we can give our game a proper name and choose a file location for our game. Click on the OK button.
Next we get asked which platform of Windows Phone we want to develop for, that is 7.0 or 7.1. Go ahead and choose Windows Phone OS 7.1 as illustrated in the following screenshot and click on OK.

Note
With Windows Phone OS 7.0, Microsoft means the Windows Phone 7 Mango devices. Windows Phone OS 7.1 means the Windows Phone 7.5 Tango devices.
Now XNA Game Studio created a new project that contains a class called Game1. This is our main game class. Don't worry about the code yet, we will go over this in the next chapters. The important part is that everything is set up for us to begin.
Take a look at the toolbars at the top. There you can find a drop-down menu where we can select what device we want to deploy to.
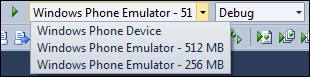
We can choose between a Windows Phone device, an emulator with 512 MB RAM, and an emulator with 256 MB RAM. The latter aims at the low end devices. Choose Windows Phone Emulator – 512 MB. If you want to deploy to an actual device, choose Windows Phone Device; make sure it is connected to your PC and that the Zune Software is running. The device also needs to be unlocked. During development, it can be wise to make sure the device doesn't lock automatically. This can be done via Settings | Lock + Wallpaper | Screen time out after.
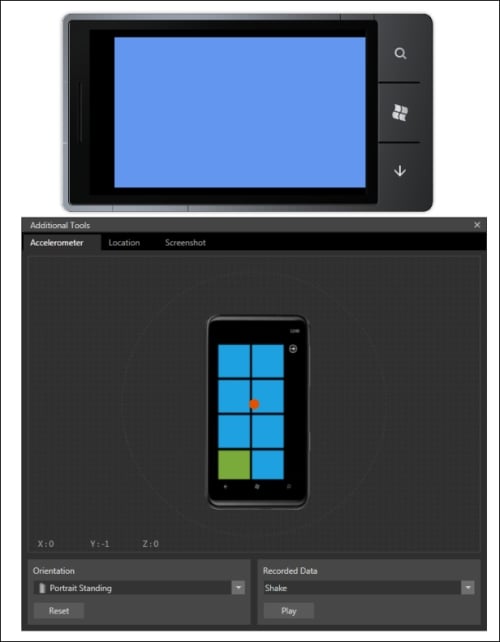
When you press F5, our game will be compiled and then deployed. After everything is loaded correctly, two different screens pop up. With the Additional Tools window, we can simulate the accelerometer, GPS data, and take screenshots. On the phone emulator, we can see an empty, cornflower blue screen.
This might not seem like a lot, but our entire render loop has been made, and we are ready to start loading content and displaying models. Let's get going!