Book Image

ZBrush 4 Sculpting for Games: Beginner's Guide

By : Manuel Scherer
Book Image

ZBrush 4 Sculpting for Games: Beginner's Guide

By: Manuel Scherer

Overview of this book

ZBrush is a fantastic tool for creating models for use in computer games. Using a wide range of powerful tools you can create models for vehicles, props, environments, and characters. This book makes creating game art in ZBrush fast and easy. It covers everything you need to create models of all kinds for your game projects, even if you've never used ZBrush before. Built around four complete ZBrush projects, the book gives you everything you need to sculpt props, vehicles, and creatures in ZBrush. You'll start by creating a "spooky tree" model, mastering the sculpting, texturing, and decoration skills that are essential for all ZBrush topics. Next you'll move to man-made objects with a sci-fi drone. Next you'll see how to sculpt monsters and other creatures, deal with cloth and other soft materials, and prepare the model to become an animated, controllable character in a game. The final project returns to machines, building a complete, detailed spaceship for use in your sci-fi games.
Table of Contents (24 chapters)
ZBrush 4 Sculpting for Games
Credits
About the Author
About the Reviewers
www.PacktPub.com
Preface

Time for action - adding details to the rear exhausts


Let's explore some more hard surface sculpting:

  1. 1. First isolate one rear exhaust by Ctrl + Shift clicking on one of them.

  2. 2. Then Ctrl + Shift and drag on the canvas to invert the visibility.

  3. 3. Hide the second exhaust, as done previously in step 1, by Ctrl + Shift-clicking.

  4. 4. Invert the visibility again, like in step 2, with Ctrl +Shift + drag. You should now have isolated the two rear exhausts.

  5. 5. Smooth the outer hard edges of the upper exhaust like we did with the air outlets.

  6. 6. Pick the TrimAdaptive brush and lay in some dents, as shown in the subsequent image:

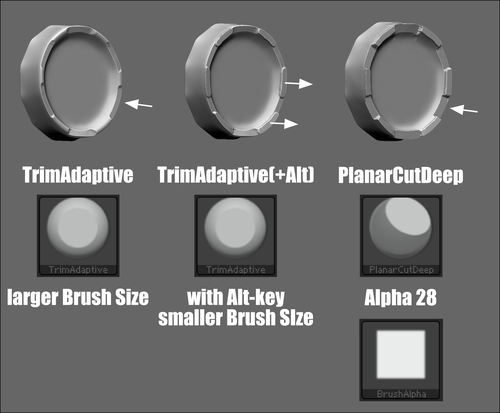
  7. 7. Lower your draw size, so that the cursor's diameter matches the rim's diameter. Refine the peaks while holding the Alt-key, as shown in the previous image.

  8. 8. Finally, pick the PlanarCutDeep brush from the brushes tab in Lightbox. We can navigate inside Lightbox by clicking and dragging.

  9. 9. Change the alpha of the PlanarCutDeep brush to Alpha 28. Changing the alpha can be...