

The first thing you will want to do when you start using a new piece of software is, either set up your own hotkeys or familiarize yourself with the default hotkeys. This is very important for speeding up your workflow. If you do not use hotkeys, you will have to constantly go through menus and scroll through windows to find the tools that you need, which will undoubtedly slow you down.
1. First you will need to go into the Windows menu item on the top menu bar.
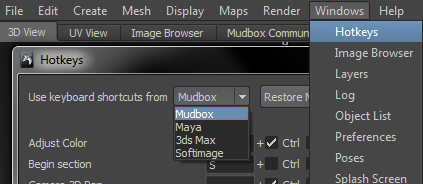
2. Next, you will click on Hotkeys to bring up the hotkey window as shown in the next screenshot.
3. You will notice a drop-down menu that reads Use keyboard shortcuts from with a Restore Mudbox Defaults button next to it. Within this menu you can set your default hotkeys to resemble a 3D software that you are accustomed to using.
This will help you transition smoothly into using Mudbox. If you are new to all 3D software, or use a software package that is not on this list, then using Mudbox hotkeys should suffice.
The following screenshot shows the options available in Mudbox 2013:
After choosing a default set of keys, you can now go in and change any hotkeys that you would like to customize. Let's say, I would like Eyedropper to activate when I press the E key and the left mouse button together. What you will do is change the current letter that is in the box next to Eyedropper to E and you will make sure there is a check in the box next to LMB (Left Mouse Button). It should look like the following screenshot:

Once all your hotkeys are set up as desired, you will be able to use quick keystrokes to access a large number of tools without ever taking your eyes off your project. The more you get comfortable with your hotkeys, the faster you will get at switching between tools.
When you first start using a particular software, you probably won't know exactly which tools you will be using most often. With that in mind, you will want to revisit your hotkey customization after getting a feel for your workflow and which tools you use the most.
Another thing you want to think about, when setting up your hotkeys, is how easy it is to use the hotkey. For example, I tend to make hotkeys that relate to the tool in some way in order to make it easier to remember.
For example, the Create Curve tool has a good hotkey already set for it, Ctrl + C, for the reasons mentioned as follows:
One reason it is a good hotkey is that the first letter of the tool is also the letter of the key being used for the hotkey. I can relate C to curve.
Another reason this could be a good hotkey is because if creating curves is something that I find myself doing often, then all I have to do is use my pinky finger on the Ctrl key and my pointer finger on the C key. You may think "Yeah? So what?" but if I were to set the hotkey to Ctrl + Alt + U it's a bit more of a stretch on my fingers and I would not want to do that frequently.
The point is, key location and frequency of use are things you want to think about to speed up your workflow and stay comfortable while using your hotkeys.