

If you don't have any resource files, you can download sample content from http://www.packtpub.com/support (select Unreal Development Kit Game Design Cookbook from the drop-down list) including textures, models, sounds, and animation. Note that UDK likes textures which have squared dimensions (or powers of 2) such as 256 x 256.
Download the book's content from the above mentioned URL and extract it into a folder such as
C:\Packt\. In the main extracted folder...\Files\select the\Developmentand\UDKGamesubfolders and copy or merge them into your UDK installationC:\UDK\~\where ~ is the version number. These files do not replace any default UDK files, but add additional content referred to in the book. The extra folder...\Files\Provided Contentcontains a few additional files such as 3ds Max source scenes. Look for the included archive ImportTest.rar and extract that to a subfolder\ImportTest.In UDK, in the Content Browser, select YOURFOLDER and choose Import as discussed above. You can import multiple assets at one go. Select the files extracted to
C:\UDK\~\UDKGame\Content\Packt\ImportTestand press Open.When UDK notices the SWF file it will give the following warning:

All the other assets will still come in. As mentioned earlier, SWF file import should be from assets in the
C:\UDK\~\UDKGame\Flash\UI\folder, not from the\UDKGame\Contentfolder. Don't import the SWF now; instead, move it where it should be, then import it separately. When they are used later in the lessons, each important file's requirements are talked about more.The rest of the content will go into a package we'll call Packt UDK (just treat it as a throw-away package). While it's possible to do so, it isn't a good idea to press Okay to all if the content is not all of the same type, and here it isn't. There are textures, meshes, and .WAV files. So check that each item you import has the appropriate Group (Mesh, Texture, Mesh, Wav) and press OK for each one. The next few steps detail this.

The included mesh file is an .ASE and was sent out from Autodesk 3DS Max using File | Export Selected with .ASE as the file type. Now you can also use .FBX to transfer between Autodesk modelers and UDK. To import it, it just needs its group name set to Mesh or something to distinguish it from a texture. This goes for the included WAV file, which are sounds, and should have a group named Wavs or Sounds.
The textures mainly import with default settings. Give them the group name Texture. The exception is 256x256_SampleIII_NRM.TGA. The filename ending
_NRMis so named to indicate that it contains a normal map. If you are importing Normal map assets which help describe bumpy surfaces in a material in the Import dialog, they require the Compressing Settings: TC_Default setting to be changed to TC_Normalmap. A properly imported normal map will show up pale pink in the Browser. If it shows up dark blue in the Browser, then it has probably been imported without the correct compression settings.
Having imported all the files, your package needs to be saved. Right-click on it and choose Save. The next screenshot shows the imported content, and the Save Package dialog for committing your .UPK file. When prompted for the folder location to save Packt UDK.UPK choose your own folder that you created earlier. Actually this package is not one we'll use directly in the upcoming projects; so deleting it later on and using content from
\Yourname\Yourname.UPKand\Packt\Packt.UPKinstead will be what's mostly likely to happen.
From time to time you will come across a useful package that someone else has made, such as those that come with many of the video tutorials that exist for UDK. The usage here is for when you want to extract content from an existing package without putting it into your UDKGame folder structure (and then put the extracted content to your own package).
To load the .UPK file click in the Content Browser on the folder icon next to New and Import which has the tool tip (mouse-over): Open an External Package, shown next. This method is okay if all you want to do is select assets from the external package and move them into other packages.

If you simply paste a .UPK into your folder structure
C:\UDK\~\UDKGAME\Contentand restart UDK, the pasted content will show up in the Packages list when you restart. Normally this is considered a safer way to bring in new content.
UDK allows you to open one scene, select any number of objects in the world, and copy them to be pasted into a second scene. Copying and pasting is fairly easy between scenes; just use Copy and Paste from the editor's main Edit menu. You can also right click in the scene and choose Paste Here. Pasting generally works unless you are pasting an object that references another, such as terrain, which also includes Terrain Layer Setup and Terrain Material assets, where those assets may be tied into a particular scene. This example may be unusual, which is why it provides a good illustration for how important package handling can become. Changing UDK default library assets causes all kinds of headaches like this one and should be avoided:
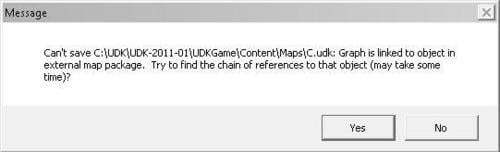
The image above is what shows if you have tried to copy content from one scene to another and some dependencies are not included, and the validity of the pasted content is therefore called into question. The solution is to list the required assets and copy those over too, then reassign them where they ought to go.
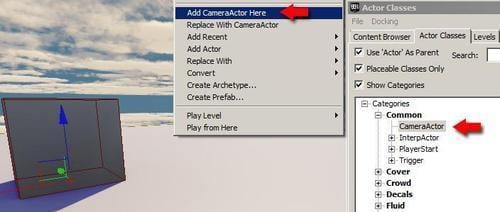
Over the last few topics, while learning about package handling and assets, we opened up several editors within UDK: the Properties Editor (F4), the Static Mesh editor, Cascade, and the Material Instance editor. Most actors have their own editor type. You can examine the types of assets that UDK provides by going to the Actor Classes list, which is in the tab alongside the Content Browser. Once you highlight any given actor type you can add it into the scene by right-clicking in the viewport and assign it from the context options.
Let's tie this in better with the copying and pasting topic.
Use the Actor Classes list to locate the CameraActor type, and add one to the scene from the right-click menu in the Perspective view, as seen in the previous screenshot.
To match this camera exactly into another scene so that its position and location are the same, go to the Edit menu and choose Copy. If you want, save the scene.
Open a new scene template and from the Edit menu, choose Paste. Another instance of the first camera will appear with exactly the same settings.
Tip
This works even when the camera is animated, but you'd also have to copy and paste the relevant Kismet. You can't copy both at once, unless the animated camera is converted to a Prefab. Prefabs are discussed under the first recipe in Chapter 5, It Is Your Destiny!