
Capsule light, as the name implies, is a light source shaped as a capsule. Unlike spot and point light sources that have a point origin, the capsule light source has a line at its origin and it is emitting light evenly in all directions. The following screenshot shows a red capsule light source:
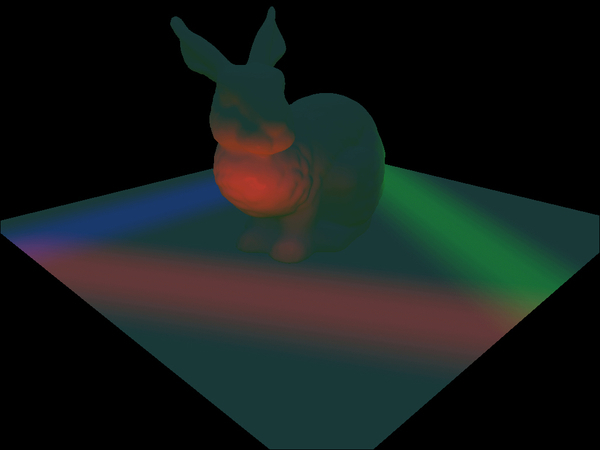
Capsule lights can be used to represent fluorescent tubes or a lightsaber.
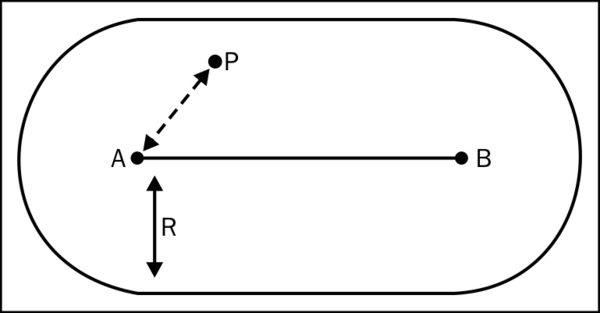
Capsules can be thought of as a sphere split into two halves, which are then extruded by the length of the capsule light's line length. The following figure shows the line start point A and end points B and R are the light's range:
Capsule lights use the following constant buffer in their pixel shader:
cbuffer CapsuleLightConstants : register( b0 )
{
  float3 CapsuleLightPos     : packoffset( c0 );
  float CapsuleLightRangeRcp : packoffset( c0.w );
  float3 CapsuleLightDir     : packoffset( c1 );
  float CapsuleLightLen      : packoffset( c1.w );
  float3 CapsuleLightColor   : packoffset( c2 );
}
Point A, referred to as the starting point is stored in the shader constant CapsuleLightPos.
In order to keep the math simple, instead of using the end point directly, we are going to use the normalized direction from A to B and the line's length (distance from point A to point B). We store the capsule's direction in the constant CapsuleLightDir and the length in CapsuleLightLen.
Similar to the point and spot lights, we store the range.
The code for calculating the capsule light looks like this:
float3 CalcCapsule(float3 position, Material material)
{
   float3 ToEye = EyePosition.xyz - position;

   // Find the shortest distance between the pixel and capsules segment
   float3 ToCapsuleStart = position - CapsuleLightPos;
   float DistOnLine = dot(ToCapsuleStart, CapsuleDirLen.xyz) / CapsuleLightRange;
   DistOnLine = saturate(DistOnLine) * CapsuleLightRange;
   float3 PointOnLine = CapsuleLightPos + CapsuleLightDir * DistOnLine;
   float3 ToLight = PointOnLine - position;
   float DistToLight = length(ToLight);

   // Phong diffuse
   ToLight /= DistToLight; // Normalize
   float NDotL = saturate(dot(ToLight, material.normal));
   float3 finalColor = material.diffuseColor * NDotL;

   // Blinn specular
   ToEye = normalize(ToEye);
   float3 HalfWay = normalize(ToEye + ToLight);
   float NDotH = saturate(dot(HalfWay, material.normal));
   finalColor += pow(NDotH, material.specExp) * material.specIntensity;

   // Attenuation
   float DistToLightNorm = 1.0 - saturate(DistToLight * CapsuleLightRangeRcp);
   float Attn = DistToLightNorm * DistToLightNorm;
   finalColor *= CapsuleLightColor.rgb * CapsuleIntensity * Attn;

   return finalColor;
}
This function takes the pixel's world position and material values, and it outputs the pixel's lit color value.
Look closely at the code and you will notice that it's basically the point light code except for the pixel to light position vector calculation. The idea is to find the closest point on the line to the pixel position. Once found, the vector to light is calculated by subtracting the closest position from the pixel position.
Finding the closest point on the line is done using the dot product. If you recall, the dot product result is the projected length of one vector over the other. By calculating the dot product of the vector AP with the capsule direction, we find the distance on the line from A to the closest point. We then have three possible results:
The value is negative (outside the line from A's side); in this case the closest point is A
The value is positive, but it's bigger than the line's length (outside the line from B's side); in this case the closest point is B
The value is within the line's length and it doesn't need any modifications
HLSL is not very good with code branches, so instead of using if statements, the value found is normalized by dividing with the line's length and using the saturate instruction (clamp the value to zero and one). This affectively takes care of situations one and two. By multiplying the normalized value with the line's length, we end up with the correct distance from A. Now we can find the closest point by adding A and the distance of the capsule direction.
From that point on, the calculations are exactly the same as the point lights.